ようへいの日々精進XP

よかろうもん

IAM Role を付与した EC2 インスタンスから Amazon ES にアクセスするメモ(Ruby 版)

tl;dr

Amazon ES のアクセス制御を IP だけでしかやったことなかったので、実運用を考慮すると IAM role で制御する場合の方法を模索してみましたの Ruby 版。

参考

ありがとうございます。

memo

構成

構成は前回と同様。

  • EC2 には AmazonESFullAccess ポリシーを付与した IAM role がアタッチされている
  • Amazon ES にはポリシー未適用

さんぷるスクリプト

ということで、参考として上げさせて頂いた記事を真似て以下のようなスクリプトをこさえてみました。

require 'elasticsearch'
require 'faraday'
require 'faraday_middleware/aws_signers_v4'
require 'json'

es_endpoint = 'https://your_domain-xxxxxxxxxxxxxxxxxxxx.ap-northeast-1.es.amazonaws.com'
role_name   = 'your_role_name'
region      = 'ap-northeast-1'

def get_credential
  metadata_url = 'http://169.254.169.254'
  conn = Faraday.new(:url => metadata_url) do |faraday|
    faraday.adapter  Faraday.default_adapter
  end
  response     = conn.get '/latest/meta-data/iam/security-credentials/dev'
  credential   = JSON.parse(response.body)

  return { 'access_key': credential['AccessKeyId'],
           'secret_key': credential['SecretAccessKey'],
           'token': credential['Token'] }

end

credentials  = get_credential()
es = Elasticsearch::Client.new(url: es_endpoint) do |faraday|
  faraday.request :aws_signers_v4,
                  credentials: Aws::Credentials.new(credentials[:access_key], credentials[:secret_key], credentials[:token]),
                  service_name: 'es',
                  region: region
end

puts JSON.dump(es.info)

github.com

この Gem が肝です。前回の Python と同様に署名付きリクエストという壁が立ちはだかりますが、この gem が AWS 署名バージョン 4 を良しなに扱ってくれます。ありがたや、ありがたや。

実行してみると...

#
# 環境の確認
#
$ cat /etc/redhat-release
CentOS Linux release 7.2.1511 (Core)
$ ruby -v
ruby 2.3.1p112 (2016-04-26 revision 54768) [x86_64-linux]

#
# 必要な gem をインストール
#
$ cat Gemfile
source "https://rubygems.org"

gem 'elasticsearch'
gem 'faraday_middleware-aws-signers-v4'
$ bundle install --path vendor/bundle

#
# スクリプトを実行
#
$ bundle exec ruby sample.rb  | jq .
{
  "name": "Space Turnip",
  "cluster_name": "1234567890123:your_domain",
  "version": {
    "number": "2.3.2",
    "build_hash": "0944b4bae2d0f7a126e92b6133caf1651ae316cc",
    "build_timestamp": "2016-05-20T07:46:04Z",
    "build_snapshot": false,
    "lucene_version": "5.5.0"
  },
  "tagline": "You Know, for Search"
}

おわり

先人の方々の努力のおかげでなんとかなりそうです。ありがとうございました。

おまけ : docker コンテナから Amazon ES にアクセスする場合

ファイル達

上記のサンプルを sample.py で保存。

$ tree .
.
├── Dockerfile
├── Gemfile
└── sample.rb

0 directories, 3 files

Dockerfile

FROM ruby:2.3.1-alpine
MAINTAINER inokappa

RUN apk --update add tzdata && \
    cp /usr/share/zoneinfo/Asia/Tokyo /etc/localtime && \
    apk del tzdata && \
    rm -rf /var/cache/apk/*

RUN  mkdir /app
COPY . /app
WORKDIR /app
RUN bundle install --path vendor/bundle && \
    bundle clean
ENTRYPOINT ["bundle", "exec", "ruby"]

build して run

$ docker build -t es-sample-ruby .
$ docker run --rm es-sample-ruby sample.rb | jq .
{
  "cluster_name": "1234567890123:your_domain",
  "tagline": "You Know, for Search",
  "version": {
    "lucene_version": "5.5.0",
    "build_hash": "0944b4bae2d0f7a126e92b6133caf1651ae316cc",
    "number": "2.3.2",
    "build_timestamp": "2016-05-20T07:46:04Z",
    "build_snapshot": false
  },
  "name": "Space Turnip"
}

IAM Role を付与した EC2 インスタンスから Amazon ES にアクセスするメモ(Python 版)

tl;dr

Amazon ES のアクセス制御を IP だけでしかやったことなかったので、実運用を考慮すると IAM role で制御する場合の方法を模索してみました。

参考

ありがとうございます。

memo

構成

  • EC2 には AmazonESFullAccess ポリシーを付与した IAM role がアタッチされている
  • Amazon ES にはポリシー未適用

この状態で Amazon ES にアクセスしてみると...

$ curl https://your_domain-xxxxxxxxxxxxxxxxxxxx.ap-northeast-1.es.amazonaws.com/
{"Message":"User: anonymous is not authorized to perform: es:ESHttpGet on resource: your_domain"}

リクエストに認証情報を埋め込んであげる必要があるようです。curl の場合にはどーやるのかな...と思ったら...

残念ながら curl で実現するのは難しいようです。

さんぷるスクリプト

ということで、参考として上げさせて頂いた記事を真似て以下のようなスクリプトをこさえてみました。

from elasticsearch import Elasticsearch, RequestsHttpConnection
from requests_aws4auth import AWS4Auth
import requests
import json, os

region      = 'ap-northeast-1'
es_endpoint = 'your_domain-xxxxxxxxxxxxxxxxxxxx.ap-northeast-1.es.amazonaws.com'
role_name   = 'your_role_name'

def get_credential():
    metadata_url = 'http://169.254.169.254/latest/meta-data/iam/security-credentials/' + role_name
    response     = requests.get(metadata_url)
    credential   = json.loads(response.text)

    return { 'access_key': credential['AccessKeyId'],
             'secret_key': credential['SecretAccessKey'],
             'token': credential['Token'] }

credentials = get_credential()

awsauth     = AWS4Auth(
    credentials['access_key'],
    credentials['secret_key'],
    region,
    'es',
    session_token=credentials['token']
)

es = Elasticsearch(
    hosts=[{'host': es_endpoint, 'port': 443}],
    http_auth=awsauth,
    use_ssl=True,
    verify_certs=True,
    connection_class=RequestsHttpConnection
)

print json.dumps(es.info())

pypi.python.org

requests-aws4auth という AWS リクエストに認証情報を追加する AWS 署名バージョン 4 を良しなに扱ってくれるモジュールを利用することでシンプルなコードになっていると思います。

実行してみると...

#
# 環境の確認
#
$ cat /etc/redhat-release
CentOS Linux release 7.2.1511 (Core)
$ python -V
Python 2.7.5

#
# 必要なモジュールを導入
#
$ cat requirements.txt
boto3
elasticsearch
requests
requests_aws4auth
$ sudo pip install -r requirements.txt

#
# スクリプトを実行
#
$ python test.py | jq .
{
  "cluster_name": "1234567890123:your_domain",
  "tagline": "You Know, for Search",
  "version": {
    "lucene_version": "5.5.0",
    "build_hash": "0944b4bae2d0f7a126e92b6133caf1651ae316cc",
    "number": "2.3.2",
    "build_timestamp": "2016-05-20T07:46:04Z",
    "build_snapshot": false
  },
  "name": "Rage"
}

おわり

先人の方々の努力のおかげでなんとかなりそうです。ありがとうございました。

おまけ : docker コンテナから Amazon ES にアクセスする場合

ファイル達

上記のサンプルを sample.py で保存。

$ tree .
.
├── Dockerfile
├── requirements.txt
└── sample.py

0 directories, 3 files

Dockerfile

FROM python:2.7.12-alpine
MAINTAINER inokappa

RUN apk --update add tzdata && \
    cp /usr/share/zoneinfo/Asia/Tokyo /etc/localtime && \
    apk del tzdata && \
    rm -rf /var/cache/apk/*

RUN  mkdir /app
COPY . /app
WORKDIR /app
RUN pip install -r requirements.txt
ENTRYPOINT ["python"]

build して run

$ docker build -t es-sample-python .
$ docker run --rm es-sample-python sample.py | jq .
{
  "cluster_name": "1234567890123:your_domain",
  "tagline": "You Know, for Search",
  "version": {
    "lucene_version": "5.5.0",
    "build_hash": "0944b4bae2d0f7a126e92b6133caf1651ae316cc",
    "number": "2.3.2",
    "build_timestamp": "2016-05-20T07:46:04Z",
    "build_snapshot": false
  },
  "name": "Space Turnip"
}

PowerShell で操作する Azure メモ(2)

ども、かっぱです。

tl;dr

引続き、PowerShell で Azure を操作するメモ。

操作する環境は以下の通り。

PS C:\Users\Administrator\Downloads> [System.Environment]::OSVersion

                          Platform ServicePack                        Version                            VersionString
                          -------- -----------                        -------                            -------------
                           Win32NT                                    6.3.9600.0                         Microsoft Windows NT 6.3.9600.0

PS C:\Users\Administrator\Downloads> $PSVersionTable

Name                           Value
----                           -----
PSVersion                      4.0
WSManStackVersion              3.0
SerializationVersion           1.1.0.1
CLRVersion                     4.0.30319.42000
BuildVersion                   6.3.9600.17400
PSCompatibleVersions           {1.0, 2.0, 3.0, 4.0}
PSRemotingProtocolVersion      2.2

参考

仮想ネットワークを作って、その中に仮想マシンを作る

要件

  • 仮想ネットワーク(クラシック)を作成(サブネットは 2 つ)
  • パラメータを指定して仮想マシンを作成する(OS は Windows Server 2012 R2)
  • 仮想マシン(クラシック)は New-AzureVM コマンドを利用して作成する
  • 作成した VM にアクセスしてみる

仮想ネットワークの作成

  • 既存の設定を書き出す(事前に仮想ネットワークを 1 つ作っておく)
Get-AzureVNetConfig -ExportToFile C:\Users\Administrator\Documents\NetworkConfig.xml
  • ouput
XMLConfiguration              OperationDescription          OperationId                   OperationStatus
----------------              --------------------          -----------                   ---------------
<?xml version="1.0" encodi... Get-AzureVNetConfig           xxxxxxxx-xxxx-xxxx-xxxx-a2... Succeeded
  • 確認
PS C:\Users\Administrator\Documents> cat NetworkConfig.xml
<?xml version="1.0" encoding="utf-8"?>
<NetworkConfiguration xmlns:xsd="http://www.w3.org/2001/XMLSchema" xmlns:xsi="http://www.w3.org/2001/XMLSchema-instance" xmlns="http://schemas.microsoft.com/ServiceHosting/2011/07/NetworkConfiguration">
  <VirtualNetworkConfiguration>
    <Dns />
    <VirtualNetworkSites>
      <VirtualNetworkSite name="Group your-service01 TestVNet01" Location="Japan West">
        <AddressSpace>
          <AddressPrefix>192.168.0.0/16</AddressPrefix>
        </AddressSpace>
        <Subnets>
          <Subnet name="FrontEnd">
            <AddressPrefix>192.168.1.0/24</AddressPrefix>
          </Subnet>
        </Subnets>
      </VirtualNetworkSite>
    </VirtualNetworkSites>
  </VirtualNetworkConfiguration>
</NetworkConfiguration>
  • 編集、確認(サブネット BackendEnd を一つ追加してみた)
PS C:\Users\Administrator\Documents> cat NetworkConfig.xml
<?xml version="1.0" encoding="utf-8"?>
<NetworkConfiguration xmlns:xsd="http://www.w3.org/2001/XMLSchema" xmlns:xsi="http://www.w3.org/2001/XMLSchema-instance" xmlns="http://schemas.microsoft.com/ServiceHosting/2011/07/NetworkConfiguration">
  <VirtualNetworkConfiguration>
    <Dns />
    <VirtualNetworkSites>
      <VirtualNetworkSite name="Group your-service01 TestVNet01" Location="Japan West">
        <AddressSpace>
          <AddressPrefix>192.168.0.0/16</AddressPrefix>
        </AddressSpace>
        <Subnets>
          <Subnet name="FrontEnd">
            <AddressPrefix>192.168.1.0/24</AddressPrefix>
          </Subnet>
          <Subnet name="BackendEnd">
            <AddressPrefix>192.168.2.0/24</AddressPrefix>
          </Subnet>
        </Subnets>
      </VirtualNetworkSite>
    </VirtualNetworkSites>
  </VirtualNetworkConfiguration>
</NetworkConfiguration>
  • 適用
Set-AzureVNetConfig -ConfigurationPath C:\Users\Administrator\Documents\NetworkConfig.xml
  • ouput
OperationDescription                    OperationId                             OperationStatus
--------------------                    -----------                             ---------------
Set-AzureVNetConfig                     xxxxxxxx-xxxx-xxxx-xxxx-xxxxxxxxxxxx    Succeeded
  • 確認
Get-AzureVNetSite -VNetName "Group your-service01 TestVNet01"
  • ouput
AddressSpacePrefixes : {192.168.0.0/16}
Location             : Japan West
AffinityGroup        :
DnsServers           : {}
GatewayProfile       :
GatewaySites         :
Id                   : 123456789-1234-5678-9000-12345678912
InUse                : False
Label                :
MigrationState       :
Name                 : Group your-service01 TestVNet01
State                : Created
Subnets              : {FrontEnd, BackendEnd}
OperationDescription : Get-AzureVNetSite
OperationId          : xxxxxxxxx-xxxx-xxxx-xxxx-xxxxxxxxxxx
OperationStatus      : Succeeded

VM 作成

  • New-AzureVMConfigVM の設定を定義して New-AzureVMVM を作成
$_locationName  = "Japan West"
$_vmName        = "vm01"
#
# Get-AzureVMImage を実行して Windows Server 2012 R2 datacenter の VM イメージの ImageName を取得
# 
$_imageName     = @(Get-AzureVMImage | ? {$_.OS -eq "Windows" -and $_.ImageFamily -eq "Windows Server 2012 R2 datacenter"} ` | Sort-Object PublishedDate –Descending | Select-Object -First 1 ).ImageName
$_adminUser     = "oreadmin"
$_adminPassword = "YourPassword!01"
$_cloudService  = "your-service01"
#
# Get-AzureVNetSite を実行して仮想ネットワーク名を取得
#
$_vnetName      = @(Get-AzureVNetSite -VNetName "Group your-service01 TestVNet01").Name
$_subNet        = "FrontEnd"

#
# New-AzureVMConfig ...インスタンスサイズ、イメージ名等を設定
# Add-AzureProvisioningConfig ... ログインユーザー名、パスワード等の OS より上のレイヤーを設定(-EnableWinRMHttp で HTTP 経由での WinRM の操作を有効にしている)
# Set-AzureVMBGInfoExtension ... VM エージェントをインストールする
# Set-AzureSubnet ... 仮想ネットワーク内に作成したサブネットを設定
#
$_vmConfig = `
New-AzureVMConfig -Name $_vmName -InstanceSize Small -ImageName $_imageName `
| Add-AzureProvisioningConfig -Windows -AdminUsername $_adminUser -Password $_adminPassword -EnableWinRMHttp `
| Set-AzureVMBGInfoExtension `
| Set-AzureSubnet -SubnetNames $_subNet `
| New-AzureVM -ServiceName "your-service01" -VNetName $_vnetName -Location "Japan West" -WaitForBoot

VM にアクセスする為に必要な情報を確認する

  • Get-AzureEndpoint を実行して Virtual IP とポート等を確認する
Get-AzureVM -ServiceName $_cloudService -Name $_vmName  | Get-AzureEndpoint | Select Name,Port,Vip
  • output
Name                                                                       Port Vip
----                                                                       ---- ---
PowerShell                                                                63829 xxx.xxx.xxx.xxx
RemoteDesktop                                                             50698 xxx.xxx.xxx.xxx

幾つかの方法で VM にアクセスする

$_username      = "oreadmin"
$_passwd        = "YourPassword!01"
$_secure_string = ConvertTo-SecureString $_passwd -AsPlainText -Force
$_pscredential  = New-Object System.Management.Automation.PsCredential($_username, $_secure_string)
$_cloudService  = "your-service01"
$_vmName        = "vm01"
$_uri = Get-AzureWinRMUri -ServiceName $_cloudService -Name $_vmName

#
# Enter-PSSession でインタラクティブに WinRM にアクセス
#
PS C:\Users\Administrator> Enter-PSSession -ConnectionUri $_uri -Credential $_pscredential -SessionOption (New-PSSessionOption -SkipCACheck)
[your-service01.cloudapp.net]: PS C:\Users\oreadmin\Documents> $PSVersionTable

Name                           Value
----                           -----
PSVersion                      4.0
WSManStackVersion              3.0
SerializationVersion           1.1.0.1
CLRVersion                     4.0.30319.42000
BuildVersion                   6.3.9600.17400
PSCompatibleVersions           {1.0, 2.0, 3.0, 4.0}
PSRemotingProtocolVersion      2.2


[your-service01.cloudapp.net]: PS C:\Users\oreadmin\Documents>

こちらの記事を参考にさせて頂いた。有難うございました。

#
# PowerShell を使って WinRM のエンドポイントを確認
# 
PS C:\Users\Administrator> Get-AzureWinRMUri -ServiceName $_cloudService -Name $_vmName  | select AbsoluteUri

AbsoluteUri
-----------
https://your-service01.cloudapp.net:63829/

AbsoluteUri を控えておいて...(事前に pip install pywinrm しておく必要がある)

$ python
Python 2.7.12 (default, Sep  3 2016, 08:17:12)
[GCC 4.2.1 Compatible Apple LLVM 7.3.0 (clang-703.0.31)] on darwin
Type "help", "copyright", "credits" or "license" for more information.
>>>
>>> import winrm
>>> s = winrm.Session('https://your-service01.cloudapp.net:63829/wsman', auth=('oreadmin', 'YourPassword!01'), server_cert_validation='ignore', transport='ntlm')
>>> r = s.run_cmd('ipconfig', ['/all'])
>>> r.status_code
0
>>> r = s.run_cmd('powershell -Command $PSVersionTable')
>>> r.status_code
0

WinRM 経由で ifconfig /allpowershell -Command $PSVersionTable を実行している。

後片付け

Remove-AzureVM -ServiceName your-service01 -Name vm01
  • output
OperationDescription                    OperationId                             OperationStatus
--------------------                    -----------                             ---------------
Remove-AzureVM                          xxxxxxxx-xxxx-xxxx-xxxx-xxxxxxxxxxxx    Succeeded
  • リソースグループの削除
#
# リソースグループ名を確認
#
Get-AzureRmResourceGroup | select ResourceGroupName
  • output
ResourceGroupName
-----------------
Default-Storage-JapanWest
your-service01
TestRG
  • your-service01 グループを削除
#
# your-service01 グループを削除
#
Remove-AzureRmResourceGroup -Name your-service01
  • output
確認
Are you sure you want to remove resource group 'your-service01'
[Y] はい(Y)  [N] いいえ(N)  [S] 中断(S)  [?] ヘルプ (既定値は "Y"): Y

(...暫く時間を置いて...)

True

リソースグループの削除に合わせて仮想ネットワークも削除される。

以上

メモでした。

Amazon ECR から docker pull する為に最低限必要な手順

tl;dr

整理した。

大前提

  • 最低でも IAM Policy の AmazonEC2ContainerRegistryReadOnly をつけた IAM Role 又は IAM User を使う

EC2 上での手順

前提

  • EC2 には 管理ポリシーの AmazonEC2ContainerRegistryReadOnly をつけた IAM Role が付いている

手順

  • docker login コマンドを取得する
aws --region ap-northeast-1 ecr get-login
  • docker login する
docker login -u AWS -p xxxxxxxxxxxxxxxx -e none https://0000000000000.dkr.ecr.ap-northeast-1.amazonaws.com
  • docker pull する
docker pull 0000000000000.dkr.ecr.ap-northeast-1.amazonaws.com/oreno-image

EC2 以外の環境での手順

前提

  • 管理ポリシーの AmazonEC2ContainerRegistryReadOnly をつけた IAM User を作成
  • IAM User の認証情報(アクセスキー、シークレットアクセスキー)を発行しておいて ~/.aws/credentials に登録しておく

手順

  • docker login コマンドを取得する
aws --profile oreno-profile --region ap-northeast-1 ecr get-login
  • docker login する
docker login -u AWS -p xxxxxxxxxxxxxxxx -e none https://0000000000000.dkr.ecr.ap-northeast-1.amazonaws.com
  • docker pull する
docker pull 0000000000000.dkr.ecr.ap-northeast-1.amazonaws.com/oreno-image

以上

メモでした。

Python boto3 で認証情報を指定するメモ

ども、かっぱです。ぼちぼちやってます。

tl;dr

適切な IAM Role が適用されていない環境で boto3 を使う際に避けては通れない(はず)の認証情報を指定する方法をメモっておく。

尚、ソースコード内に認証情報を書くのはよろしく無いので、あくまでも検証、動作確認用途に限定しましょう。

参考

有難うございましたmm

memo

~/.aws/credentials

$ cat ~/.aws/credentials

[oreno-profile]
aws_access_key_id = xxxxxxxxxxxxxxxxxxxx
aws_secret_access_key = yyyyyyyyyyyyyyyyyyyyyyyyyyyyyyyyyyyy

ACCESS_KEY と SECRET_ACCESS_KEY を使う場合

import boto3

s3 = boto3.client('s3',
                  aws_access_key_id='xxxxxxxxxxxxxxxxxxxx',
                  aws_secret_access_key='yyyyyyyyyyyyyyyyyyyyyyyyyyyyyyyyyyyy',
                  region_name='ap-northeast-1')
print s3.list_buckets().__class__.__name__

もしくは...

from boto3.session import Session

session = Session(aws_access_key_id='xxxxxxxxxxxxxxxxxxxx',
                  aws_secret_access_key='yyyyyyyyyyyyyyyyyyyyyyyyyyyyyyyyyyyy',
                  region_name='ap-northeast-1')

s3 = session.client('s3')
print s3.list_buckets().__class__.__name__

profile 名を指定する場合

from boto3.session import Session

session = Session(profile_name='oreno-profile')
s3 = session.client('s3')
print s3.list_buckets().__class__.__name__

実行例

#
# ACCESS_KEY と SECRET_ACCESS_KEY をベタ書き(出来るだけ避けたい例)
#
$ python
Python 2.7.12 (default, Sep  3 2016, 08:17:12)
[GCC 4.2.1 Compatible Apple LLVM 7.3.0 (clang-703.0.31)] on darwin
Type "help", "copyright", "credits" or "license" for more information.
>>> 
>>> import boto3
>>> s3 = boto3.client('s3',
...                   aws_access_key_id='xxxxxxxxxxxxxxxxxxxxx',
...                   aws_secret_access_key='yyyyyyyyyyyyyyyyyyyyyyyyyyyyyyyyyyy',
...                   region_name='ap-northeast-1')
>>> print s3.list_buckets().__class__.__name__
dict

#
# 環境変数を利用する(苦肉の策)
#
$ AWS_ACCESS_KEY_ID=xxxxxxxxxxxxxxxxxxxxx
$ AWS_SECRET_ACCESS_KEY=yyyyyyyyyyyyyyyyyyyyyyyyyyyyyyyyyyy
$ python
Python 2.7.12 (default, Sep  3 2016, 08:17:12)
[GCC 4.2.1 Compatible Apple LLVM 7.3.0 (clang-703.0.31)] on darwin
Type "help", "copyright", "credits" or "license" for more information.
>>>
>>> import boto3
>>> import os
>>> s3 = boto3.client('s3',
...                   aws_access_key_id=os.getenv('AWS_ACCESS_KEY_ID'),
...                   aws_secret_access_key=os.getenv('AWS_SECRET_ACCESS_KEY'),
...                   region_name='ap-northeast-1')
>>> print s3.list_buckets().__class__.__name__
dict

#
# session クラスを使って ACCESS_KEY と SECRET_ACCESS_KEY をベタ書き(出来るだけ避けたい例)
#
$ python
Python 2.7.12 (default, Sep  3 2016, 08:17:12)
[GCC 4.2.1 Compatible Apple LLVM 7.3.0 (clang-703.0.31)] on darwin
Type "help", "copyright", "credits" or "license" for more information.
>>> 
>>> from boto3.session import Session
>>>
>>> session = Session(aws_access_key_id='xxxxxxxxxxxxxxxxxxxxx',
...                   aws_secret_access_key='yyyyyyyyyyyyyyyyyyyyyyyyyyyyyyyyyyy',
...                   region_name='ap-northeast-1')
>>> s3 = session.client('s3')
>>> print s3.list_buckets().__class__.__name__
dict

#
# session クラスを使って ~/.aws/credentials の profile 名を指定する例
#
$ python
Python 2.7.12 (default, Sep  3 2016, 08:17:12)
[GCC 4.2.1 Compatible Apple LLVM 7.3.0 (clang-703.0.31)] on darwin
Type "help", "copyright", "credits" or "license" for more information.
>>> 
>>> from boto3.session import Session
>>> session = Session(profile_name='oreno-profile')
>>> s3 = session.client('s3')
>>> print s3.list_buckets().__class__.__name__
dict

以上

メモでした。

PowerShell で操作する Azure メモ(1)

ども、かっぱです。

tl;dr

mva.microsoft.com

上記の資料を参考に操作したメモ。

尚、操作する環境は以下の通り。

PS C:\Users\Administrator\Downloads> [System.Environment]::OSVersion

                          Platform ServicePack                        Version                            VersionString
                          -------- -----------                        -------                            -------------
                           Win32NT                                    6.3.9600.0                         Microsoft Windows NT 6.3.9600.0

PS C:\Users\Administrator\Downloads> $PSVersionTable

Name                           Value
----                           -----
PSVersion                      4.0
WSManStackVersion              3.0
SerializationVersion           1.1.0.1
CLRVersion                     4.0.30319.42000
BuildVersion                   6.3.9600.17400
PSCompatibleVersions           {1.0, 2.0, 3.0, 4.0}
PSRemotingProtocolVersion      2.2

仮想マシンを操作する

要件

クラウドサービスを作成する

run

New-AzureService -ServiceName "oreno-cloudservice" -Location "Japan West" -Label "oreno-cloudservice"

output

OperationDescription                    OperationId                             OperationStatus
--------------------                    -----------                             ---------------
New-AzureService                        xxxxxxxxx-xxxx-xxxx-xxxx-xxxxxxxxxxx    Succeeded

Ubuntu Server 16.04 の OS イメージを取得する

run

$ImageName = @(Get-AzureVMImage `
| ? {$_.OS -eq "Linux" -and $_.ImageFamily -eq "Ubuntu Server 16.04 LTS"} `
| Sort-Object PublishedDate –Descending `
| Select-Object -First 1).ImageName

confirm

PS C:\Users\Administrator> $ImageName
b39f27a8b8c64d52b05eac6a62ebad85__Ubuntu-16_04-LTS-amd64-server-20160815-en-us-30GB

以下のように実行すると OS イメージの各種情報が一覧で取得することが出来る。(参考:Windows Azure 仮想マシンの展開可能なイメージ一覧を取得する

run

Get-AzureVMImage | Sort-Object OS,Label,PublishedDate | Format-Table OS,Label,PublishedDate,ImageName -AutoSize

New-AzureQuickVM を利用して仮想マシンを起動する

run

New-AzureQuickVM `
  -Linux `
  -ImageName $ImageName `
  -LinuxUser "ubuntu" `
  -Password "xxxxxxxxxxxxxxxxxxx" `
  -ServiceName "oreno-cloudservice" `
  -Name "vm01" `
  -InstanceSize "ExtraSmall" `
  -Location "Japan West" `
  -Verbose

New-AzureQuickVM `
  -Linux `
  -ImageName $ImageName `
  -LinuxUser "ubuntu" `
  -Password "xxxxxxxxxxxxxxxxxxx" `
  -ServiceName "oreno-cloudservice" `
  -Name "vm02" `
  -InstanceSize "ExtraSmall" `
  -Location "Japan West" `
  -Verbose
#
# 気付いた点
# - ログインユーザー名に admin は利用出来ない
# - パスワードには、小文字 / 大文字 / 数字 / 記号のうち 3 種類の文字を含める必要がある
#

output

警告: No deployment found in service: 'oreno-cloudservice'.
詳細: 9:36:33 - Begin Operation: New-AzureQuickVM
詳細: 9:36:33 - Completed Operation: New-AzureQuickVM
詳細: 9:36:34 - Begin Operation: New-AzureQuickVM - Create Deployment with VM vm01

OperationDescription                    OperationId                             OperationStatus
--------------------                    -----------                             ---------------
New-AzureQuickVM                        xxxxxxxxx-xxxx-xxxx-xxxx-xxxxxxxxxxx    Succeeded
詳細: 9:37:39 - Completed Operation: New-AzureQuickVM - Create Deployment with VM vm01

インスタンスサイズの指定

インスタンスサイズは以下のような指定を行う。(参考:Azure の仮想マシンのサイズ

  • Basic_A0: Basic_A0
  • Basic_A1: Basic_A1...(A4 まで Basic_A4)
  • Standard_A0: ExtraSmall
  • Standard_A1: Small
  • Standard_A2: Medium
  • Standard_A3: Large
  • Standard_A4: ExtraLarge
  • Standard_A5: A5
  • Standard_A6: A6...(A11 まで A11)
  • D1: Standard_D1
  • D2: Standard_D2...(D14 まで Standard_D14)

仮想マシンを確認する

confirm

PS C:\Users\Administrator> Get-AzureVM

ServiceName                             Name                                    Status
-----------                             ----                                    ------
oreno-cloudservice                      vm01                                    RoleStateUnknown
oreno-cloudservice                      vm02                                    RoleStateUnknown

仮想マシンを停止する

confirm

PS C:\Users\Administrator\Downloads> Stop-AzureVM -ServiceName "oreno-cloudservice" -Name "vm03"

確認
The specified virtual machine is the last virtual machine in this deployment. Continuing will result in a new IP address for your
deployment. To shut down without losing the deployment IP use -StayProvisioned.
[Y] はい(Y)  [N] いいえ(N)  [S] 中断(S)  [?] ヘルプ (既定値は "Y"): Y

OperationDescription                           OperationId                                    OperationStatus
--------------------                           -----------                                    ---------------
Stop-AzureVM                                   xxxxxxxxx-xxxx-xxxx-xxxx-xxxxxxxxxxx           Succeeded


PS C:\Users\Administrator\Downloads> Stop-AzureVM -ServiceName "oreno-cloudservice" -Name "vm02" -Force

OperationDescription                           OperationId                                    OperationStatus
--------------------                           -----------                                    ---------------
Stop-AzureVM                                   xxxxxxxxx-xxxx-xxxx-xxxx-xxxxxxxxxxx           Succeeded

仮想マシンを削除する

confirm

PS C:\Users\Administrator\Downloads> Remove-AzureVM -ServiceName "oreno-cloudservice" -Name "vm01"

OperationDescription                           OperationId                                    OperationStatus
--------------------                           -----------                                    ---------------
Remove-AzureVM                                 xxxxxxxxx-xxxx-xxxx-xxxx-xxxxxxxxxxx           Succeeded


PS C:\Users\Administrator\Downloads> Remove-AzureVM -ServiceName "oreno-cloudservice" -Name "vm02"

OperationDescription                           OperationId                                    OperationStatus
--------------------                           -----------                                    ---------------
Remove-AzureVM                                 xxxxxxxxx-xxxx-xxxx-xxxx-xxxxxxxxxxx           Succeeded

memo

New-AzureQuickVM : CurrentStorageAccountName is not accessible. エラーの対処

エラー

New-AzureQuickVM 実行時に以下のようなエラーを確認。

  • output
警告: No deployment found in service: 'oreno-cloudservice'.
New-AzureQuickVM : CurrentStorageAccountName is not accessible. Ensure the current storage account is accessible and in the same location or affinity group as your cloud service.
発生場所 行:1 文字:1
+ New-AzureQuickVM `
+ ~~~~~~~~~~~~~~~~~~
    + CategoryInfo          : CloseError: (:) [New-AzureQuickVM]、ArgumentException
    + FullyQualifiedErrorId : Microsoft.WindowsAzure.Commands.ServiceManagement.IaaS.PersistentVMs.NewQuickVM

サブスクリプションCurrentStorageAccountName が以下のように未定義な為に発生する。ストレージアカウントを作成して CurrentStorageAccountNameStorageAccountName を定義する必要がある。

  • confirm
PS C:\Users\Administrator\Downloads> Get-AzureSubscription


SubscriptionId            : 123456789-1234-1234-1234-123456789012
SubscriptionName          : XXXXXXXXXXXX
Environment               : AzureCloud
DefaultAccount            : xxxxxxxxxxxxxxxxxxxxxxxxxxxxxxxxxxxxxxxxxxxxxxxxxx
IsDefault                 : True
IsCurrent                 : True
TenantId                  :
CurrentStorageAccountName :

サブスクリプションを Import した直後は上記のように CurrentStorageAccountName が空欄になっていた。

ストレージアカウントを作成

  • run
New-AzureStorageAccount `
  -StorageAccountName "xxxxxxxxxxxx" `
  -Label "xxxxxxxxxxxx" `
  -Location "Japan West" `
  -Type "Standard_LRS"

ストレージアカウントタイプ(-type)は以下の何れかを指定する。

-type で指定する値 ストレージタイプ
Standard_LRS 標準的なローカル冗長ストレージ
Standard_ZRS 標準ゾーン冗長ストレージ
Standard_GRS 標準的な地理冗長ストレージ
Standard_RAGRS 標準の読み取りアクセス地理冗長ストレージ
  • output
OperationDescription                    OperationId                             OperationStatus
--------------------                    -----------                             ---------------
New-AzureStorageAccount                 xxxxxxxxx-xxxx-xxxx-xxxx-xxxxxxxxxxx    Succeeded
  • confirm
PS C:\Users\Administrator\Downloads> Get-AzureStorageAccount


Context                   : Microsoft.WindowsAzure.Commands.Common.Storage.LazyAzureStorageContext
StorageAccountDescription :
AffinityGroup             :
Location                  : Japan West
GeoPrimaryLocation        : Japan West
GeoSecondaryLocation      :
Label                     : xxxxxxxxxxxx
StorageAccountStatus      : Created
StatusOfPrimary           : Available
StatusOfSecondary         :
Endpoints                 : {https://xxxxxxxxxxxx.blob.core.windows.net/, https://xxxxxxxxxxxx.queue.core.windows.net/,
                             https://xxxxxxxxxxxx.table.core.windows.net/, https://xxxxxxxxxxxx.file.core.windows.net/}
AccountType               : Standard_LRS
LastGeoFailoverTime       :
MigrationState            :
StorageAccountName        : xxxxxxxxxxxx
OperationDescription      : Get-AzureStorageAccount
OperationId               : xxxxxxxxx-xxxx-xxxx-xxxx-xxxxxxxxxxx
OperationStatus           : Succeeded

カレントサブスクリプションにストレージアカウントを設定

  • run
Set-AzureSubscription `
  -SubscriptionName "XXXXXXXXXXXX" `
  -CurrentStorageAccountName (Get-AzureStorageAccount).StorageAccountName `
  -PassThru
  • output
Id          : 123456789-1234-1234-1234-123456789012
Name        : XXXXXXXXXXXX
Environment : AzureCloud
Account     : xxxxxxxxxxxxxxxxxxxxxxxxxxxxxxxxxxxxxxxxxxxxxxxxxx
State       :
Properties  : {[Default, True], [StorageAccount, BlobEndpoint=https://xxxxxxxxxxxx.blob.core.windows.net/;QueueEndpoint
              =https://xxxxxxxxxxxx.queue.core.windows.net/;TableEndpoint=https://xxxxxxxxxxxx.table.core.windows.net/;
              FileEndpoint=https://xxxxxxxxxxxx.file.core.windows.net/;AccountName=xxxxxxxxxxxx;AccountKey=xxxxxxxxxxxx
              xxxxxxxxxxxxxxxxxxxxxxxxxxxxxxxxxxxxxxxxxxxxxxxxxxxxxxxxxxxxxxxxxxxxxxxxxxx]}
  • confirm
PS C:\Users\Administrator\Downloads> Get-AzureSubscription


SubscriptionId            : 123456789-1234-1234-1234-123456789012
SubscriptionName          : XXXXXXXXXXXX
Environment               : AzureCloud
DefaultAccount            : xxxxxxxxxxxxxxxxxxxxxxxxxxxxxxxxxxxxxxxxxxxxxxxxxx
IsDefault                 : True
IsCurrent                 : True
TenantId                  :
CurrentStorageAccountName : xxxxxxxxxxxx

仮想マシンの階層とサイズ

基本階層

- A シリーズ
 - 負荷分散機能と自動スケール機能が無い
 - ディスクの IOPS は 300

標準階層

- 負荷分散機能が利用可能
- 高可用セットを設定することで、自動スケールを構成が可能
- A / D / G シリーズ
- A シリーズ
 - IOPS は 500
- D シリーズ
 - A シリーズの 2 倍のメモリ構成
 - 一時ディスクに SSD を使用
- G シリーズ
 - Xeon プロセッサ E5 v3 と D シリーズの 2 倍のメモリ
 - データディスクにプレミアムストレージを使用出来る(最大で 6.59TB x 64 まで) 

Amazon ECR が東京リージョンで利用出来るようになったのでメモ

ども、かっぱです。

YOKOSO 東京へ

待ちにまった ECR が東京リージョンで利用出来るようになったのでメモ。

うんちくは割愛、CLI のチートみたいな感じで。

ちなみに、今までの ECR 遍歴については本ブログの ECR カテゴリをご覧くさい。

memo

試した環境

$ sw_vers
ProductName:    Mac OS X
ProductVersion: 10.11.6
BuildVersion:   15G31

$ aws --version
aws-cli/1.10.41 Python/2.7.10 Darwin/15.6.0 botocore/1.4.31

docker login する為のトークンを取得

  • run
$ aws --region ap-northeast-1 ecr get-login
  • output
docker login -u AWS -p xxx -e none https://xxxxxxxxxxxx.dkr.ecr.ap-northeast-1.amazonaws.com

ECR にログインする

  • run
$ docker login -u AWS -p xxx -e none https://xxxxxxxxxxxx.dkr.ecr.ap-northeast-1.amazonaws.com
  • output
WARNING: login credentials saved in /Users/xxxxx/.docker/config.json
Login Succeeded
  • run / output
$ cat ~/.docker/config.json
{
        "auths": {
                "https://xxxxxxxxxxxx.dkr.ecr.ap-northeast-1.amazonaws.com": {
                        "auth": "yyyy",
                        "email": "none"
                },
                "https://xxxxxxxxxxxx.dkr.ecr.us-east-1.amazonaws.com": {
                        "auth": "xxxx",
                        "email": "none"
                }
        }
}

ECR にリポジトリを作成

  • run
$ aws --region ap-northeast-1 ecr create-repository --repository-name oreno-image
  • output
{
    "repository": {
        "registryId": "xxxxxxxxxxxx",
        "repositoryName": "oreno-image",
        "repositoryArn": "arn:aws:ecr:ap-northeast-1:xxxxxxxxxxxx:repository/oreno-image",
        "repositoryUri": "xxxxxxxxxxxx.dkr.ecr.ap-northeast-1.amazonaws.com/oreno-image"
    }
}

タグ付けからの docker push

  • run
$ docker tag busybox xxxxxxxxxxxx.dkr.ecr.ap-northeast-1.amazonaws.com/oreno-image
$ docker push xxxxxxxxxxxx.dkr.ecr.ap-northeast-1.amazonaws.com/oreno-image
  • output
The push refers to a repository [xxxxxxxxxxxx.dkr.ecr.ap-northeast-1.amazonaws.com/oreno-image]
5f70bf18a086: Pushed
1834950e52ce: Pushed
latest: digest: sha256:xxx size: 1920

ECR 上のリポジトリを確認

  • run
$ aws --region ap-northeast-1 ecr describe-repositories
  • output
{
    "repositories": [
        {
            "registryId": "xxxxxxxxxxxx",
            "repositoryName": "oreno-image",
            "repositoryArn": "arn:aws:ecr:ap-northeast-1:xxxxxxxxxxxx:repository/oreno-image",
            "repositoryUri": "xxxxxxxxxxxx.dkr.ecr.ap-northeast-1.amazonaws.com/oreno-image"
        }
    ]
}

リポジトリ上のイメージを確認

  • run
$ aws --region ap-northeast-1 ecr list-images --repository-name oreno-image
  • output
{
    "imageIds": [
        {
            "imageTag": "latest",
            "imageDigest": "sha256:xxx"
        }
    ]
}

以上

メモでした。

Amazon ECS と AWS Application Load Balancer の組み合わせを試しているメモ(2)〜 AWS CLI で試す 〜

エブリデイ試した系ですいません。かっぱです。

tl;dr

inokara.hateblo.jp

の続き。

AWS CLI で ALB を作成して ECS の Service を作成して ALB と組み合わせてみる。尚、ALB を操作するには elbv2 というサブコマンドを利用する。

メモ

ちょっとウンチク

ここまで試してきて Amazon ECS と AWS Application Load Balancer は以下のような構成になっていると理解。

f:id:inokara:20160816092039p:plain

  • Listner で ALB がインターネットからの接続を何番ポートで Listen するか定義する
  • Path Pattern 毎に Target Group を定義する
  • Target Group には EC2 インスタンスやコンテナをぶら下げることが出来る(バックエンドへのルーティングやヘルスチェックについて定義する)

ALB の詳細については以下の Blog 記事はドキュメントと並んでとても参考になる。

dev.classmethod.jp

また、ALB についての制限事項については以下のドキュメントには目を通しておきたい。

docs.aws.amazon.com

試した環境

Amazon ECS や AWS Application Load Balancer を操作する環境としては...

% sw_vers
ProductName:    Mac OS X
ProductVersion: 10.11.6
BuildVersion:   15G24b

% aws --version
aws-cli/1.10.56 Python/2.7.6 Darwin/15.6.0 botocore/1.4.46

ECS については...

  • クラスタ作成済み(コンテナインスタンスは 2 台)
  • Task Definition は ecscompose-ecs-app:22 を利用
  • Container Name は app とする
  • コンテナアプリケーションはコンテナ内で Port 4567 で Listen する
  • Task は /hostname という URL にアクセスするとコンテナのホスト名を返す

ざっくり流れ

  1. ALB ロードバランサの作成
  2. ALB ターゲットグループの作成
  3. ALB リスナーの作成
  4. ALB ターゲットグループを指定して ECS Service を作成

ALB の作成

% cat alb.json
{
    "Name": "alb-demo", 
    "Subnets": [
        "subnet-12345678",
        "subnet-abcdefgh"
    ], 
    "SecurityGroups": [
        "sg-12345678"
    ] 
}
  • run
% ELB_ARN=$(aws --debug \
  elbv2 create-load-balancer \
    --cli-input-json file://alb.json | jq -r '.LoadBalancers[].LoadBalancerArn')
  • 確認
% aws \
  elbv2 describe-load-balancers
  • 念のため削除(消す必要が無ければ叩かない)
% aws \
  elbv2 delete-load-balancer \
    --load-balancer-arn ${ELB_ARN}

ターゲットグループ作成

% cat target-group.json
{
    "Name": "default", 
    "Protocol": "HTTP", 
    "Port": 80, 
    "VpcId": "vpc-xxxxxxxx",
    "HealthCheckPath": "/hostname", 
    "HealthCheckIntervalSeconds": 30, 
    "HealthCheckTimeoutSeconds": 15, 
    "HealthyThresholdCount": 3, 
    "UnhealthyThresholdCount": 3, 
    "Matcher": {
        "HttpCode": "200"
    }
}

以下のように HealthCheckPort を指定しない場合には traffic-port という値が入る。Amazon ECS のコンテナをぶら下げる場合には Docker から払いだされたポートに対するヘルスチェックとなるので HealthCheckPort は指定しない。

% aws elbv2 describe-target-groups
{
    "TargetGroups": [
        {
            "HealthCheckPath": "/hostname", 
            "HealthCheckIntervalSeconds": 30, 
            "VpcId": "vpc-xxxxxxxxx", 
            "Protocol": "HTTP", 
            "HealthCheckTimeoutSeconds": 15, 
            "HealthCheckProtocol": "HTTP", 
            "LoadBalancerArns": [
                "arn:aws:elasticloadbalancing:ap-northeast-1:1234567890123:loadbalancer/app/alb-demo/1234567890123456"
            ], 
            "UnhealthyThresholdCount": 3, 
            "HealthyThresholdCount": 3, 
            "TargetGroupArn": "arn:aws:elasticloadbalancing:ap-northeast-1:1234567890123:targetgroup/default/1234567890123456", 
            "Matcher": {
                "HttpCode": "200"
            }, 
            "HealthCheckPort": "traffic-port", 
            "Port": 80, 
            "TargetGroupName": "default"
        }
    ]
}
  • run
% TARGET_GROUP=$(aws --debug \
  elbv2 create-target-group \
    --cli-input-json file://target-group.json | jq -r '.TargetGroups[].TargetGroupArn')
  • 確認
% echo ${TARGET_GROUP}

リスナーの作成

  • run
% aws \
  elbv2 create-listener \
    --load-balancer-arn ${ELB_ARN} \
    --protocol HTTP \
    --port 80 \
    --default-actions Type=forward,TargetGroupArn=${TARGET_GROUP}

ECS Service の作成

  • ecs-simple-service-elb.json
% cat ecs-simple-service-elb.json
{
    "serviceName": "ecs-simple-service-elb",
    "taskDefinition": "ecscompose-ecs-app:22",
    "loadBalancers": [
        {
            "targetGroupArn": "arn:aws:elasticloadbalancing:ap-northeast-1:xxxxxxxxxxxx:targetgroup/default/zzzzzzzzzzzzzzzz",
            "containerName": "app",
            "containerPort": 4567
        }
    ],
    "desiredCount": 2,
    "role": "ecsServiceRole"
}
  • run
aws \
  ecs create-service \
    --cluster ecs-demo \
    --service-name ecs-simple-service-elb \
    --cli-input-json file://ecs-simple-service-elb.json

ここまでで...

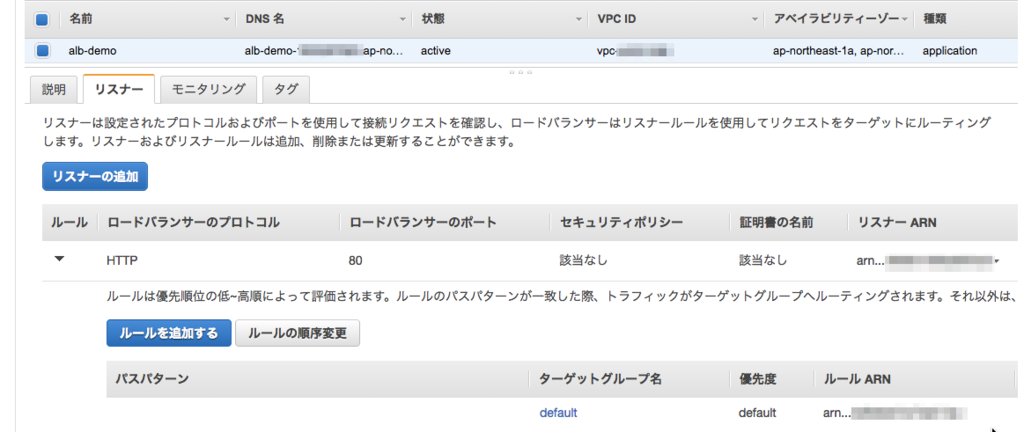
  • ALB とリスナー

f:id:inokara:20160813233133p:plain

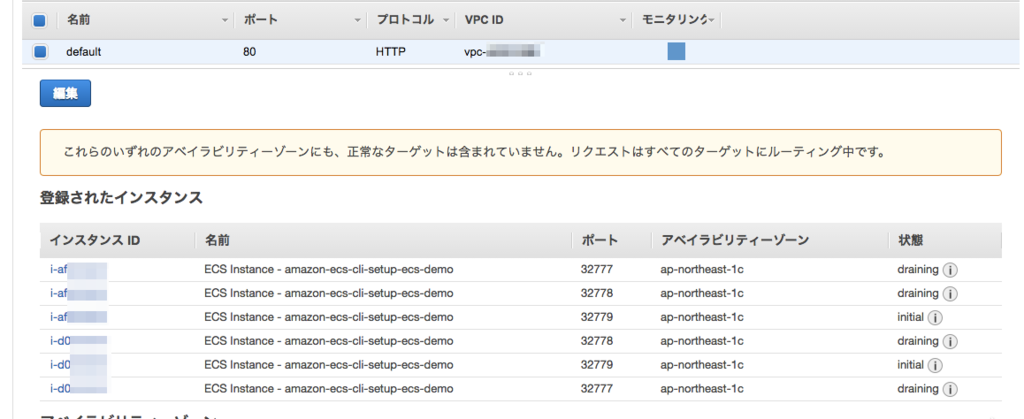
  • ターゲットグループ(ヘルスチェックが適切では無かったので unhealthydraining を繰り返している... )

f:id:inokara:20160813233346p:plain

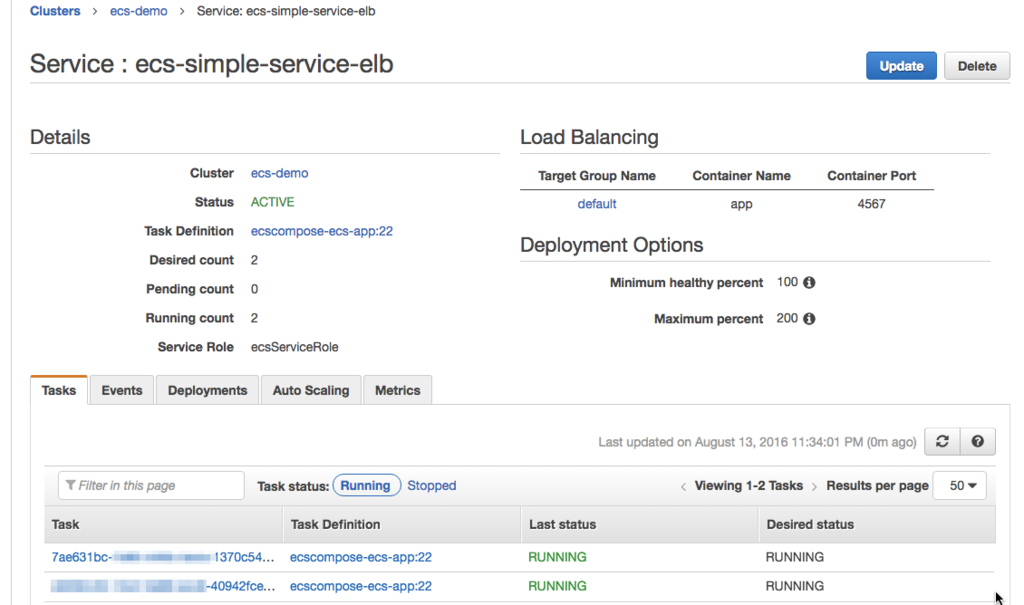
  • ECS Service

f:id:inokara:20160813233821p:plain

確認

  • run
% URL=$(aws \
  elbv2 describe-load-balancers \
    --query 'LoadBalancers[].DNSName' \
    --output text)

% echo ${URL}
% curl ${URL}
% curl ${URL}/hostname
  • output
% curl ${URL}/hostname
e80f74a9026f%
% curl ${URL}/hostname
af8647af702e%
% curl ${URL}/hostname
5963b959e447%

その他メモ

ecs-cli で ECS クラスタ作成

--subnets--azs 等の複数指定出来るパラメータの値はカンマで区切ること。スペースでは無いので注意。(aws cli はスペースで区切るという違いがある。)

% ecs-cli up \
  --keypair ${KEY_NAME} \
  --capability-iam \
  --size 1 \
  --vpc vpc-xxxxxxxx \ 
  --instance-type t2.micro \
  --subnets subnet-xxxxxxxx,subnet-zzzzzzzz \
  --azs ap-northeast-1a,ap-northeast-1c \
  --security-group sg-xxxxxxxx

ecs-agent が止まるとどうなるのか

ALB と ECS を連携させた状態で ecs-agent を止めてみると...

  • 起動している Task(コンテナ)は維持される
  • ALB にぶら下がっている Task(コンテナ)にも正常にアクセス出来る

更にこの状態で一つの Task を Stop Container してみると...

  • ALB のヘルスチェックが失敗して停止したコンテナは unhealthydraining に状態が変化する(ALB から切り離される)
  • draining に遷移したタイミングで Running tasks count が 1 つ減る

ここで疑問、ecs-agent が動いていない状態でもクラスタの状態は何らかの方法で管理されている?

Amazon ECS と AWS Application Load Balancer の組み合わせを試しているメモ

ども、ECS は最近全然触れていないかっぱです。

追記

AWS CLI のでも操作してみた。

inokara.hateblo.jp

tl;dr

先日、AWS Application Load Balancer がリリースされて、Amazon ECS の Dynamic Port Mapping にも対応されたとのことで、ECS と Application Load Balancer の組み合わせを試行錯誤している。内容な認識等に誤りがあるかもしれないのでご容赦下さい。

試した環境

手元の環境

% sw_vers
ProductName:    Mac OS X
ProductVersion: 10.11.6
BuildVersion:   15G24b

% ecs-cli --version
ecs-cli version 0.4.2 (9159726)

ECS

  • amzn-ami-2016.03.f-amazon-ecs-optimized (ami-ed26e78c)
  • ECS のクラスタは ecs-cli で作成済み
  • マネジメントコンソールより ECS の Service を作成していく
  • Service 内で起動する Task はコンテナ自身のホスト名を返す Sinatra アプリケーション(コンテナ内で 4567 ポートで Listen する)

memo

以下、殴り書き。(後で整理するかも)

  • 事前に Application Load Balancer を作っておく(以後、Application Load Balancer を ALB と記す)
  • ALB 作成の際にはターゲットグループを一つ作る必要がある(ターゲットにインスタンスを登録する必要は無い)
  • ターゲットグループを消す時にはALB を消してからターゲットグループを削除した方が良さそう(リスナーの定義を先に消せば良い)
  • 下図のように ECS の Service 作成時に ALB を指定することが出来る(ターゲットグループが生成される)

f:id:inokara:20160813103607p:plain

f:id:inokara:20160813103618p:plain

ecsServiceRole という IAM Role が付与される。この Role には AmazonEC2ContainerServiceRole というマネジメントポリシーが適用されている。

f:id:inokara:20160813103632p:plain

f:id:inokara:20160813103648p:plain

f:id:inokara:20160813103833p:plain

  • 既存の ECS Service には追加出来ない?(Service 作成時のみ ELB 定義が出来るようだ)
  • Container Instance に付ける Security Group は ALB に付与した Security Group から Container の Dynamic Port にアクセス出来るようなルールを定義しておく
source: public-access
protocol: TCP
port range: 0-65535

f:id:inokara:20160813101535p:plain

  • ルーティングのルールはロードバランサーの一覧にて該当の ALB を指定してリスナーで修正する

f:id:inokara:20160813102651p:plain

/* としておくとクライアントのリクエストをそのままバックエンドに流すような挙動になった。

  • ALB に登録されたコンテナにアクセスしてみる
% curl -v alb-ecs-demo-xxxxxxxxxxxxxx.ap-northeast-1.elb.amazonaws.com/hostname
*   Trying 54.xx.xxx.xxx...
* Connected to alb-ecs-demo-xxxxxxxxxxxxxx.ap-northeast-1.elb.amazonaws.com (54.xx.xxx.xxx) port 80 (#0)
> GET /hostname HTTP/1.1
> Host: alb-ecs-demo-xxxxxxxxxxxxxx.ap-northeast-1.elb.amazonaws.com
> User-Agent: curl/7.43.0
> Accept: */*
> 
< HTTP/1.1 200 OK
< Date: Sat, 13 Aug 2016 01:39:01 GMT
< Content-Type: text/html;charset=utf-8
< Content-Length: 12
< Connection: keep-alive
< X-XSS-Protection: 1; mode=block
< X-Content-Type-Options: nosniff
< X-Frame-Options: SAMEORIGIN
< * Connection #0 to host alb-ecs-demo-xxxxxxxxxxxxxx.ap-northeast-1.elb.amazonaws.com left intact
59294f32f412
  • 当たり前だのクラッカーだけど Task のスケールアウトにも追随してくれる
#
# Task を 3 つに増やした後にアクセス
#
% curl alb-ecs-demo-1930795025.ap-northeast-1.elb.amazonaws.com/hostname
79a796b62150%                                                                                                                                                                                    
% curl alb-ecs-demo-1930795025.ap-northeast-1.elb.amazonaws.com/hostname
68cb8177a441%
% curl alb-ecs-demo-1930795025.ap-northeast-1.elb.amazonaws.com/hostname                                                                               59294f32f412% 

まとまってないけどまとめ

  • まさに産業革命
  • Dynamic Port Mapping やりくりする為に HAProxy とか入れなくても良くなったのは嬉しい
  • 後で CLI でもやってみる

ラムダこりゃ(Amazon Lambda チュートリアル 6)〜 AWS Lambda で JRuby を 30 分位試したメモ 〜

まったく筆が乗らないかっぱです。

tl;dr

aws.typepad.com

8/9 の AWS上でのサーバーレスアーキテクチャ入門 を何気なく聞いていたら JRuby という単語が聞こえてきたので、「あー、確かに Lambda で Java は動くから JRuby を使えば内部処理は Ruby で書けるんぢゃないかな」と思ってググッてみたら...

github.com

qiita.com

株式会社ソラコムの片山さん が既に上記のようなプロジェクトを作られていたので、参考にさせて頂きつつ試してみることにした。

memo

git clone してくる

git clone https://github.com/c9katayama/aws-lambda-jruby.git 

Ruby で内部処理を書く

src/main/resources/main.rb に Ruby で以下のような内部処理を書く。Lambda が受け取った引数を使って足し算して結果を返すだけ。(せっかくなので定数で定義されている Ruby のバージョン等も出力するようにしてみた。)

require "yaml"
require "json"
require "java"

json = JSON.load $lambda_arg
# json = JSON.load '{"a": 1, "b": 2, "c": 3}'

hash = java.util.HashMap.new

result = json["a"] + json["b"] + json["c"]

hash.put("ruby_version", RUBY_VERSION)
hash.put("ruby_description", RUBY_DESCRIPTION)
hash.put("ruby_platform", RUBY_PLATFORM)
hash.put("result", result)

return hash
# return { ruby_version: RUBY_VERSION, result: result.to_s }

Java の HashMap クラスを呼べたりするのが新鮮。

ビルドする

cd aws-lambda-jruby
./gradlew build

Lambda Function を作ってアップロードする

f:id:inokara:20160811183334p:plain

メモリ容量は 512MB 以上を指定しておかないとメモリ不足のエラーとなるので注意。

動作確認

以下のようにテストデータを用意。

f:id:inokara:20160811183724p:plain

Test ボタンをポチッとな。

f:id:inokara:20160811185351p:plain

API Gateway を絡める

せっかくなので API Gateway と絡めてみる。

f:id:inokara:20160811184029p:plain

以下のように curl で呼んでみる。

% curl -s -d '{"a": 1000, "b": 2, "c": 4}' https://xxxxxxx.execute-api.ap-northeast-1.amazonaws.com/prod/jruby-test
"{result=1006, ruby_description=jruby 9.0.0.0 (2.2.2) 2015-07-21 e10ec96 OpenJDK 64-Bit Server VM 25.77-b03 on 1.8.0_77-b03 +jit [linux-amd64], ruby_platform=java, ruby_version=2.2.2}"

最後に

出来なかったこと

結局

Lambda Funciton を直接 Ruby で書けるというわけではないけど、内部処理を Java よりちょっと身近な Ruby で書けるのは色々と夢が広がりそうな気がした。


Lambda 関係無いけど

@yoshidashingo さんのツイートで確認。ELB にアプリケーションロードバランサの昨日が追加されてて驚いた。

f:id:inokara:20160812005102p:plain