はじめに
EC2インスタンス上にCassandraをインストールしてクラスタを構成する- 合わせて DataStax の OpsCenter をセットアップする
AWSの操作は基本的にawscliを利用する- とりあえず
Cassandraとは...については別途書くとして今回はクラスタを構成してみる
参考
- Cassandra Wiki
- Amazon EC2にapache-cassandra-1.2.5を入れてみた
- Cassandraクラスタと、DataStax OpsCenterの構築
- これがCassandra
- cassandra運用監視小ネタ集
- seedとは何ですか?
- DataStax OpsCenter
Cassandra サーバーの構築
インストールする環境は下記の通り。
- Amazon Linux AMI release 2013.09
- java version "1.6.0_24"(Open JDK)
VPC内のインスタンスにセットアップ- インスタンスは
t1.micro Cassandraは 1.1.12 を選択
構成図
ざっくりとした構成図は以下のとおり。

Cassandra のインストール
wget http://ftp.kddilabs.jp/infosystems/apache/cassandra/1.1.12/apache-cassandra-1.1.12-bin.tar.gz
tar zxvf apache-cassandra-1.1.12-bin.tar.gz
sudo cp -rf apache-cassandra-1.1.12 /usr/local/cassandra
sudo cp /usr/local/cassandra/conf/cassandra.yaml /usr/local/cassandra/conf/cassandra.yaml.original
cassandra.yaml の修正
/usr/local/cassandra/conf/cassandra.yaml を下記の通り修正する。
--- cassandra.yaml.original     2014-01-07 13:39:21.832561314 +0000
+++ cassandra.yaml      2014-01-07 15:17:28.474798126 +0000
@@ -7,7 +7,7 @@

 # The name of the cluster. This is mainly used to prevent machines in
 # one logical cluster from joining another.
-cluster_name: 'Test Cluster'
+cluster_name: 'Hoge Cluster'

 # You should always specify InitialToken when setting up a production
 # cluster for the first time, and often when adding capacity later.
@@ -178,7 +178,7 @@
       parameters:
           # seeds is actually a comma-delimited list of addresses.
           # Ex: "<ip1>,<ip2>,<ip3>"
-          - seeds: "127.0.0.1"
+          - seeds: "SEEDIP"

 # emergency pressure valve: each time heap usage after a full (CMS)
 # garbage collection is above this fraction of the max, Cassandra will
@@ -269,7 +269,7 @@
 # address associated with the hostname (it might not be).
 #
 # Setting this to 0.0.0.0 is always wrong.
-listen_address: localhost
+listen_address: IPADDRESS

 # Address to broadcast to other Cassandra nodes
 # Leaving this blank will set it to the same value as listen_address
@@ -285,7 +285,7 @@
 #
 # Leaving this blank has the same effect it does for ListenAddress,
 # (i.e. it will be based on the configured hostname of the node).
-rpc_address: localhost
+rpc_address: IPADDRESS
 # port for Thrift to listen for clients on
 rpc_port: 9160
修正して /usr/local/cassandra/conf/cassandra.yaml.template という名前で保存しておく。また、/usr/local/cassandra/conf/cassandra.yaml 自身は以下のように設定して保存しておく。
| パラメータ | 値 |
|---|---|
| cluster_name | Hoge Cluster |
| seeds | ホストのプライベート IP |
| listen_address | ホストのプライベート IP |
| rpc_address | ホストのプライベート IP |
/etc/init.d/cassandra の設定
以下のような起動スクリプトを作成する。
# chkconfig: 345 99 1
# description: cassandra
# processname: cassandra
#!/bin/sh

CASS_BIN=/usr/local/cassandra/bin/cassandra
CASS_PID=/var/run/cassandra.pid

case "$1" in
    start)
        $CASS_BIN -p $CASS_PID
        echo "Running Cassandra"
        ;;
    stop)
        kill `cat $CASS_PID`
        rm -f $CASS_PID
        echo "Stopped Cassandra"
        ;;
    *)
        echo "Usage: $0 {start|stop}"
        exit 1
esac
exit 0
起動の為の微調整
/usr/local/cassandra/conf/cassandra-env.sh を一部修正する。
--- cassandra-env.sh.bk   2014-01-07 23:54:06.220390893 +0000
+++ cassandra-env.sh    2014-01-07 23:58:16.679313668 +0000
@@ -190,7 +190,7 @@
     # be pooled anyway.) Only do so on Linux where it is known to be
     # supported.
     # u34 and greater need 180k
-    JVM_OPTS="$JVM_OPTS -Xss180k"
+    JVM_OPTS="$JVM_OPTS -Xss250k"
 fi
 echo "xss = $JVM_OPTS"
Cassandra の起動
sudo /etc/init.d/cassandra start
若干、長目の起動メッセージが表示される。
クラスタ構成管理ツール(OpsCenter)のインストール
シードとなるホストに OpsCenter をインストールする。OpsCenter は Cassandra クラスタの構成をブラウザで視覚的に管理出来るツール。また、datastax-agent というエージェントをインストールすることでクラスタ内のノードのデータを収集して OpsCenter にて確認することが出来る。
リポジトリを追加する
専用のリポジトリが用意されているようなので追加する。
/etc/yum.repos.d/datastax.repo
以下の内容で記載する。
[opscenter]
name= DataStax Repository
baseurl=http://rpm.datastax.com/community
enabled=1
gpgcheck=0
インストール
yum install opscenter-free
そのままでは動かないのでちょっと修正
/usr/share/opscenter/bin/opscenter を修正する。(Amazon Linux には非対応?)
--- opscenter.bk        2014-01-07 15:20:43.985726779 +0000
+++ opscenter   2014-01-07 15:23:49.841243046 +0000
@@ -60,7 +60,7 @@
 if [ $is_mac = 1 ]; then
     FALLBACK_PY_DISTRO="./lib-fallback/py-osx/${PY_VER}/amd64" # always use 64bit for OS X
     PY_DISTRO="./lib/py-osx/${PY_VER}/amd64" # always use 64bit for OS X
-elif [ -f "/etc/redhat-release" ]; then
+elif [ -f "/etc/redhat-release" -o -f "/etc/system-release" ]; then
     VER=`rpm -q centos-release --qf %{VERSION}`
     if [ 1 -eq $? ]; then
         VER=`rpm -q redhat-release --qf %{VERSION}` # RHEL 5
@@ -68,6 +68,9 @@
             VER=`rpm -q redhat-release-server --qf %{VERSION}` # RHEL 6
             if [ 1 -eq $? ]; then
                 VER=`rpm -q enterprise-release --qf %{VERSION}` # Oracle Linux
+              if [ 1 -eq $? ];then
+                  VER=`rpm -q system-release --qf %{VERSION}` # Amazon Linux
+              fi
             fi
         fi
     fi
起動する
/etc/init.d/opscenterd start
とりあえず起動することが解ったら stop しておく。
構築した seed サーバーを一旦 AMI 化
構築したサーバーは一旦、以下のようにして AMI 化しておく。
aws ec2 create-image --instance-id i-xxxxxxx --name cassandra-image
AMI を利用して追加ノードを構築、クラスタの構築
以下のようにして新しいノードサーバーを構築する。(下記の場合 2 台のノードを同じ VPC のサブネット内に構築する)
for i in `seq 1 2`
do
  id=`aws ec2 run-instances --image-id ami-xxxxxxx --count 1 --instance-type t1.micro --key-name test-key --security-group-ids sg-xxxxxxx --subnet-id subnet-xxxxxxx --associate-public-ip-address --user-data file://user_data/cassandra.sh | jq '.Instances[]|.InstanceId' | sed 's/"//g'`
  aws ec2 create-tags --resources $id --tags Key=Name,Value=cassandra-test-node0$i
done
ec2 run-instances コマンドにて ---user-data オプションをつけてシェルスクリプトをかませることで自動的にクラスタの構成まで設定する。以下はシェルスクリプト。
#!/bin/sh

SEEDIP='xxx.xxx.xxx.1'

yum install -y telnet curl vim-enhanced

# エージェントのインストールがブラウザから正常に終了しなかったので手動でインストール
yum install -y datastax-agent

IP=`ifconfig eth0 | grep 'inet addr:' | sed -e 's/^.*inet addr://' -e 's/ .*//'`
sed -i s/SEEDIP/${SEEDIP}/g \
/usr/local/cassandra/conf/cassandra.yaml.template

sed s/IPADDRESS/${IP}/g \
/usr/local/cassandra/conf/cassandra.yaml.template > /usr/local/cassandra/conf/cassandra.yaml

if [ ! -d /var/lib/cassandra ];then
  mkdir /var/lib/cassandra
else
  mv /var/lib/cassandra /var/lib/cassandra.bk
  mkdir /var/lib/cassandra
fi

/etc/init.d/cassandra start
sleep 5
/etc/init.d/datastax-agent start
インスタンスが起動するのをしばし待つ...
クラスタ構成の確認
以下のようにしてクラスタ構成を確認する。
/usr/local/cassandra/bin/nodetool ring
正常にインスタンスが起動して設定が正しく行われて Cassandra が起動すると以下のような出力となる。
Address         DC          Rack        Status State   Load            Effective-Ownership Token
                                                                                           123456789012345678901234567890123456789
xxx.xxx.xxx.2    datacenter1 rack1       Up     Normal  36.24 KB        88.48%             1234567890123456789012345678901234567
xxx.xxx.xxx.1    datacenter1 rack1       Up     Normal  45.05 KB        72.17%             1234567890123456789012345678901234565
xxx.xxx.xxx.3    datacenter1 rack1       Up     Normal  61.09 KB        39.34%             123456789012345678901234567890123456785
OpsCenter で確認する
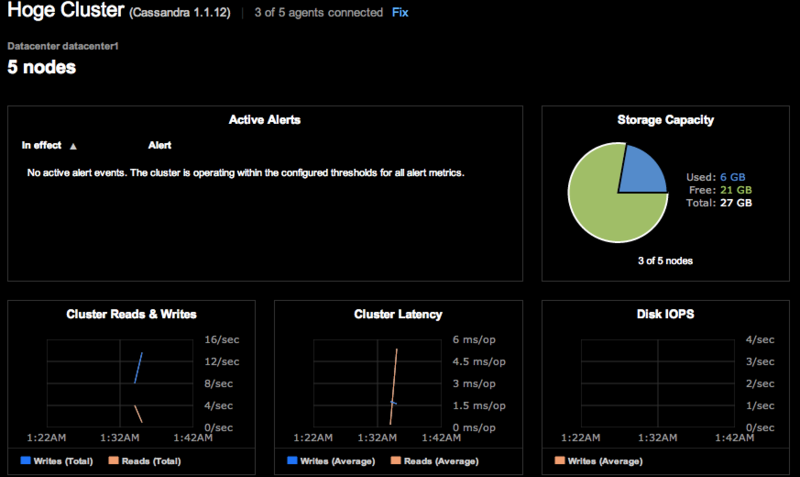
OpsCenter はデフォルトではシードとなるホストの 8888 番ポートで Listen している。ブラウザでアクセスすると以下のようなダッシュボードにクラスタ内のノードのリソース状態がサマリとして表示される。

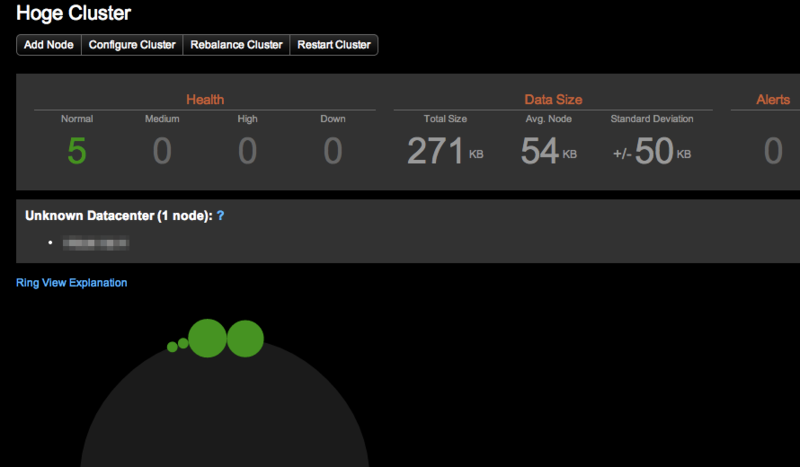
また、左のメニューから Ring View を選択すると以下のようにクラスタの状態が表示される。

とりあえず
- 今日はここまで
- 少しの設定で
Cassandraのクラスタ構成を構築することが出来た - また、
OpsCenterの設定についても特に難しい部分は無かったがブラウザからのノード追加(エージェントのインストールが正常に終了しなかった) - (追記)AMI を作成する際には datastax-agent はインストールしない状態で作成した方がいい