はじめに
- ELB で配下のインスタンスを
AutoScalingを使って立ち上げたり、落としたりする - とりあえず試した際のコマンドをメモ
- 詳細は適宜アップデートしていく
参考
- autoscaling
- AWSのVPCでAuto Scalingを試した記録
- ELB & CloudWatch & AutoScaling - AWSマイスターシリーズ
- Auto Scalingの薄い資料
- Aws st 20130617-auto_scaling
- Load Balancing with Auto Scaling
- Dynamic Scaling
構成図
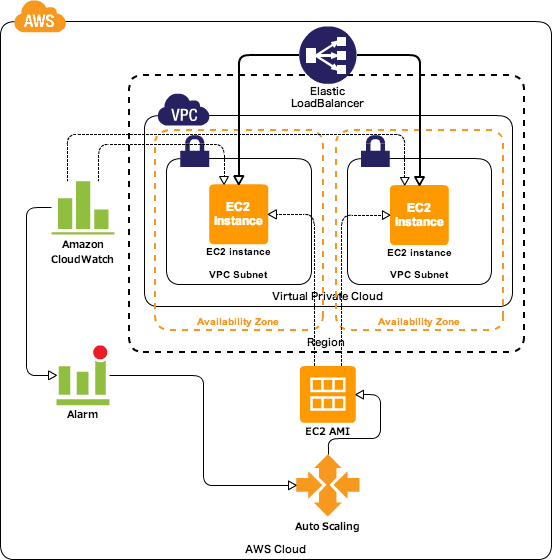
こちらを参考に以下のような構成で試してみた。

キーワード
こちらの資料の 47 ページ目が個人的には解りやすかった。
Launch Configuration
Auto Scaling Group
Auto Scalingさせるグループを指定する- どの
Launch Configurationを利用するか - グループ内でのインスタンスの最小、最大数
- ヘルスチェックのタイプ(
EC2orELB) AZやVPCのSubnet等
Scaling Policy
CloudWatchのアラームが発生した際のポリシーを指定- アラーム発生のトリガー(
CPU使用率、Auto Scalingグループ内のインスタンス数等) - いくつのインスタンスを増やすか?
- 個人的に理解が曖昧なので引き続き、調べる
設定
Launch Configuration
aws autoscaling create-launch-configuration \
--launch-configuration-name my-test-as \
--image-id ami-xxxxxxx \
--instance-type t1.micro \
--key-name ${your_key} \
--security-groups sg-xxxxxxx \
--associate-public-ip-address \
--user-data file://path/to/script
以下のように設定した内容を確認する。
aws autoscaling describe-launch-configurations --launch-configuration-name my-test-as
以下のように出力される。
{
    "LaunchConfigurations": [
        {
            "UserData": "IyEvYmluL2Jhc2gKCnNlcnZpY2Ugbmdpbnggc3RhcnQKaG9zdG5hbWUgPiAvdXNyL3NoYXJlL25naW54L2h0bWwvaW5kZXguaHRtbAo=",
            "EbsOptimized": false,
            "LaunchConfigurationARN": "arn:aws:autoscaling:ap-northeast-1:1234567890123:launchConfiguration:7f3dcc1b-caaa-4e46-83d6-ec8227a1337a:launchConfigurationName/my-test-as",
            "InstanceMonitoring": {
                "Enabled": true
            },
            "ImageId": "ami-xxxxxxx",
            "CreatedTime": "2014-01-05T01:15:37.866Z",
            "BlockDeviceMappings": [],
            "KeyName": "your_key",
            "SecurityGroups": [
                "sg-xxxxxxx"
            ],
            "LaunchConfigurationName": "my-test-as",
            "KernelId": null,
            "RamdiskId": null,
            "InstanceType": "t1.micro",
            "AssociatePublicIpAddress": true
        }
    ]
}
削除は以下のとおり。
aws autoscaling delete-launch-configuration --launch-configuration-name my-test-as
尚、Auto Scaling 自体の削除はコツが必要なので注意する(以下、Auto Scaling の削除について を参照)
Auto Scaling Group
aws autoscaling create-auto-scaling-group \
--auto-scaling-group-name my-test-asg \
--launch-configuration-name my-test-as \
--min-size 1 \
--max-size 2 \
--desired-capacity 2 \
--load-balancer-names hoge \
--health-check-type ELB \
--health-check-grace-period 180 \
--availability-zones ap-northeast-1a ap-northeast-1c \
--vpc-zone-identifier subnet-xxxxxxx,subnet-xxxxxxx
設定内容を動的に更新する場合には update-auto-scaling-group を利用する。
aws autoscaling update-auto-scaling-group --auto-scaling-group-name my-test-asg --min-size 2 --max-size 2 --desired-capacity 2
以下のように設定した内容を確認する。
aws autoscaling describe-auto-scaling-groups
以下のように出力される。
{
    "AutoScalingGroups": [
        {
            "AutoScalingGroupARN": "arn:aws:autoscaling:ap-northeast-1:1234567890123:autoScalingGroup:fc90ac04-81bc-4cf8-a291-4bebb8d1ce3d:autoScalingGroupName/my-test-asg",
            "HealthCheckGracePeriod": 180,
            "SuspendedProcesses": [],
            "DesiredCapacity": 2,
            "Tags": [],
            "EnabledMetrics": [],
            "LoadBalancerNames": [
                "hoge"
            ],
            "AutoScalingGroupName": "my-test-asg",
            "DefaultCooldown": 300,
            "MinSize": 2,
            "Instances": [
                {
                    "InstanceId": "i-xxxxxx1",
                    "AvailabilityZone": "ap-northeast-1c",
                    "HealthStatus": "Healthy",
                    "LifecycleState": "InService",
                    "LaunchConfigurationName": "my-test-as"
                },
                {
                    "InstanceId": "i-xxxxxx2",
                    "AvailabilityZone": "ap-northeast-1a",
                    "HealthStatus": "Healthy",
                    "LifecycleState": "InService",
                    "LaunchConfigurationName": "my-test-as"
                }
            ],
            "MaxSize": 2,
            "VPCZoneIdentifier": "subnet-xxxxxx1,subnet-xxxxxx2",
            "TerminationPolicies": [
                "Default"
            ],
            "LaunchConfigurationName": "my-test-as",
            "CreatedTime": "2014-01-05T01:15:55.839Z",
            "AvailabilityZones": [
                "ap-northeast-1c",
                "ap-northeast-1a"
            ],
            "HealthCheckType": "ELB"
        }
    ]
}
Scaling Policy
aws autoscaling put-scaling-policy \
--auto-scaling-group-name my-test-asg \
--policy-name my-test-poli \
--scaling-adjustment 2 \
--adjustment-type ExactCapacity
以下のように設定内容を確認する。
describe-policies
以下のように設定を削除する。
aws autoscaling delete-policy \
--auto-scaling-group-name my-test-asg \
--policy-name my-test-poli
Auto Scaling の削除について
Auto Scaling の構成を削除する場合にはそれぞれのコンポーネントの設定を削除するだけでは削除することは出来ない。
まずは Scaling Policy を削除する。
aws autoscaling delete-policy \
--auto-scaling-group-name my-test-asg \
--policy-name my-test-poli
次に、以下のように auto-scaling-group のパラメータをアップデートする。
aws autoscaling update-auto-scaling-group --auto-scaling-group-name my-test-asg --min-size 0 --desired-capacity 0
その後、暫く時間を置いて以下を実行して auto-scaling-group を削除する。
aws autoscaling delete-auto-scaling-group --auto-scaling-group-name my-test-asg
その後、Launch Configuration を削除する。
aws autoscaling delete-launch-configuration --launch-configuration-name my-test-as
動作確認
適当にアクセスしてみる
動作確認はコマンドラインから ELB の DNS Name に対して curl を使ってアクセスする。
% curl http://hoge-1234567890.ap-northeast-1.elb.amazonaws.com
ip-10-0-0-37
% curl http://hoge-1234567890.ap-northeast-1.elb.amazonaws.com
ip-10-0-1-51
ちょっと気になったのが、アクセスしていると一つのインスタンスにアクセスが偏ってしまう現象が見られた。これって 。(追記:軽く比較してみたところインスタンスが同一の ELB の設定に漏れがあったりするのかしら...AZ にいる場合にはランダムにアクセスされるっぽい。異なる AZ の場合にはアクセスに偏りがあるように見える...)
障害発生!
障害発生!というシチュエーションを意図的に作って Auto Scaling の醍醐味を試してみた。
障害発生!


おお。
CloudWatch のメトリクス
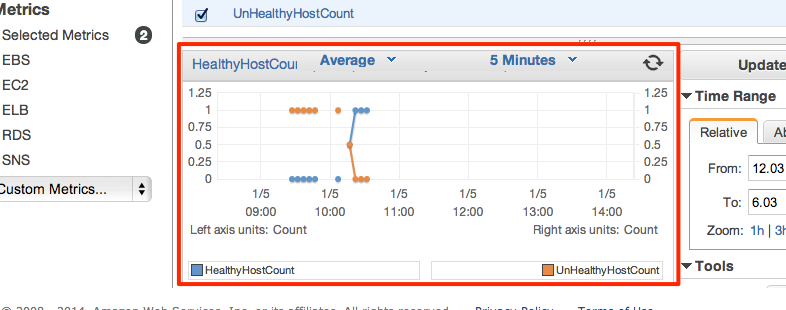
Auto Scaling は CloudWatch を利用してインスタンスの監視結果をトリガーにインスタンスの増減を行うので CloudWatch 側では以下のようにインスタンス数の増減がメトリクスとしてプロットされている。

最後に
- 思ったより簡単に
Auto Scalingを試すことが出来た - 但し、
Auto Scaling Groupの設定でパラメータの値を複数設定出来るがスペースで区切るのとカンマ区切りで区切るのがあって焦った ELBでAZをまたぐ場合には割り振りが偏ったように見える現象については引き続き調査