ようへいの日々精進XP

よかろうもん

小ネタ道場一本勝負 〜 Rake からタスクを呼び出す際に実行されるコマンドの出力を止めたい 〜

たのもう

Rake のタスク実行時に出力されるコマンド…

$ bundle exec rake spec
/path/to/.rbenv/versions/2.3.0/bin/ruby -I/path/to/vendor/bundle/ruby/2.3.0/gems/rspec-core-3.5.4/lib:/path/to2/vendor/bundle/ruby/2.3.0/gems/rspec-support-3.5.0/lib /path/to/vendor/bundle/ruby/2.3.0/gems/rspec-core-3.5.4/exe/rspec --pattern spec/\*\*\{,/\*/\*\*\}/\*_spec.rb
↑
↑ これの出力を止めたい!

ec2 'dev'
  should be stopped
  should have iam instance profile "xxxxxxxx"
  should have security group "xxxxxxxxx"

実行されるコマンド /path/to/.rbenv/versions/2.3.0/bin/ruby... の出力を止めたいのである。

技あり

以下のように書けば良かった。

require 'rspec/core/rake_task'

RSpec::Core::RakeTask.new do |t|
  t.verbose = false
end
task :default => :spec

肝は t.verbose = false ですな。

実際に実行すると以下のように出力される。

$ bundle exec rake spec

ec2 'dev'
  should be stopped
  should have iam instance profile "xxxxxxxx"
  should have security group "xxxxxxxxx"

有効

ちなみに、Rake タスク内でシェルを実行する場合には以下のように書く。

namespace :foo do
  desc 'demo'
  task :bar do
   sh "echo 'bar'", verbose: false
  end
end

肝は verbose: false ですな。

実際に実行すると以下のように出力される。

$ bundle exec rake foo:bar
bar

もしくは、コマンドラインオプションで以下のように実行することでも出力を抑制出来る。

$ bundle exec rake --quiet foo:bar
$ bundle exec rake --silent foo:bar

--quiet--silent の違いはなんですか。

$ bundle exec rake --help | egrep 'quiet|silent'
    -q, --quiet                      Do not log messages to standard output.
    -s, --silent                     Like --quiet, but also suppresses the 'in directory' announcement.

以下のように --silent は ‘in directory’ の出力も抑制するとのこと。

bash-3.2$ mkdir tmp && cd tmp
bash-3.2$ bundle exec rake --quiet -T
(in /path/to/sandbox/rake-demo)
rake foo:bar  # demo

bash-3.2$ bundle exec rake --silent -T
rake foo:bar  # demo

ありがとうございました!

Datadog の Monitors 定義を YAML で管理する Chihuahua を Gem でリリースした

f:id:inokara:20170311201901p:plain

なんで作ったのか

Datadog API Monitors の勉強と将来的には同様の機能を Barkdog に Merge してもらいたくて、自分でも実装を試してみたかった為。

Gem

詳細は

github.com

inokara.hateblo.jp

更新情報

概要

  • Monitors を Export する際の条件を再利用するようにした
  • 定義の更新、追加後に最新の定義を Export するようにした
  • バグの修正

Monitors を Export する際の条件を再利用するようにした

例えば、初回は以下のように Export したとする。

$ bundle exec chihuahua export --project demo --tags=host:vagrant-ubuntu-trusty-64
Export...
[{{#is_alert}}CRITICAL{{/is_alert}}{{#is_warning}}WARNING{{/is_warning}}] CPU load is very high on {{host.name}} を export しました.
Test4 [{{#is_alert}}CRITICAL{{/is_alert}}{{#is_warning}}WARNING{{/is_warning}}] CPU load is very high on {{host.name}} を export しました.
Test3 [{{#is_alert}}CRITICAL{{/is_alert}}{{#is_warning}}WARNING{{/is_warning}}] CPU load is very high on {{host.name}} を export しました.
Test 5 [{{#is_alert}}CRITICAL{{/is_alert}}{{#is_warning}}WARNING{{/is_warning}}] CPU load is very high on {{host.name}} を export しました.
Test 8 [{{#is_alert}}CRITICAL{{/is_alert}}{{#is_warning}}WARNING{{/is_warning}}] CPU load is very high on {{host.name}} を export しました.
Test 9 [{{#is_alert}}CRITICAL{{/is_alert}}{{#is_warning}}WARNING{{/is_warning}}] CPU load is very high on {{host.name}} を export しました.
Test 10 [{{#is_alert}}CRITICAL{{/is_alert}}{{#is_warning}}WARNING{{/is_warning}}] CPU load is very high on {{host.name}} を export しました.
7 件の Monitors 定義を出力しました.

二回目以降、同じ条件(--tags=host:vagrant-ubuntu-trusty-64)で Export したい場合には、以下のように実行出来る。

$ bundle exec chihuahua export --project demo

仕組みとしては、条件も Monitors 定義と同様に YAML ファイルに吐いているだけ。

$ tree -a monitors/demo/
monitors/demo/
├── .filter.yml
└── monitors.yml

0 directories, 2 files

定義の更新、追加後に最新の定義を Export するようにした

会社の Slack チャンネルで宣伝したら、S さんが早速使ってくれて、S さんより貰ったフィードバックを元に実装。

$ bundle exec chihuahua apply --project demo
Apply...
Update line.
Test 10 [{{#is_alert}}CRITICAL{{/is_alert}}{{#is_warning}}WARNING{{/is_warning}}] CPU load is very high on {{host.name}} を apply しました.
[{{#is_alert}}CRITICAL{{/is_alert}}{{#is_warning}}WARNING{{/is_warning}}] CPU load is very high on {{host.name}} を export しました.
Test4 [{{#is_alert}}CRITICAL{{/is_alert}}{{#is_warning}}WARNING{{/is_warning}}] CPU load is very high on {{host.name}} を export しました.
Test3 [{{#is_alert}}CRITICAL{{/is_alert}}{{#is_warning}}WARNING{{/is_warning}}] CPU load is very high on {{host.name}} を export しました.
Test 5 [{{#is_alert}}CRITICAL{{/is_alert}}{{#is_warning}}WARNING{{/is_warning}}] CPU load is very high on {{host.name}} を export しました.
Test 8 [{{#is_alert}}CRITICAL{{/is_alert}}{{#is_warning}}WARNING{{/is_warning}}] CPU load is very high on {{host.name}} を export しました.
Test 9 [{{#is_alert}}CRITICAL{{/is_alert}}{{#is_warning}}WARNING{{/is_warning}}] CPU load is very high on {{host.name}} を export しました.
Test 10 [{{#is_alert}}CRITICAL{{/is_alert}}{{#is_warning}}WARNING{{/is_warning}}] CPU load is very high on {{host.name}} を export しました.
7 件の Monitors 定義を出力しました.
done.

これで、更新した後、あらためて Export する手間が省けた。

バグの修正

こちらも社内からのフィードバック。

やっぱり、他の人に使って貰うというのはとても参考になるし、本当に有難かった。

今後の目標

  • テストを書く
  • コードを綺麗にする
  • Barkdog にマージして貰えるようにする

2017 年 03 月 15 日(水)

奥さんの誕生日

奥さんの 41 回目の誕生日。おめでとう。

お祝いに中洲川端のたつみ鮨でお鮨をつまんで、その後は玉置浩二のコンサート。

その地を揺るがすような歌声にプロのシンガーの実力を見せつけれて大きく心を揺さぶられた。そして、主人公の奥さんもとても喜んでくれたようで良かった。

奥さん江、この世に生まれてきてくれて、出会ってくれて有難う。

これからもよろしく。

2017 年 03 月 14 日(火)

朝から

  • 気合入れて掃除に洗濯の家事業

やりたいこと

仕事でもプライベートでもやりたいことというか、やらんきゃいかんざきな事がフッと思いたって、メモっておこうと思うと忘れる。いかんなあ。

奥さんが熊本に出張

  • 日帰りで
  • お土産はもちろん馬刺しと辛子レンコン
  • おいしゅうございました

2017 年 03 月 13 日(月)

中途半端な天気

雨なんだか、晴れなんだか。

風呂上がりに夜風にあたりたい季節になってきた。

春はそこまで来ているのかもしれない。

EC2 の一覧、ELB の一覧

仕事から EC2 の一覧とか ELB の一覧がすぐ欲しい時がある。

うっかりするとマネジメントコンソールのスクショを撮ろうとするが、ここは CLI でってことで。コマンド化してみた。

$ cat /usr/local/bin/list-ec2
#!/usr/bin/env bash

_PROFILE=${1}
_TAG_NAME_PREFIX="${2}"
_REGION=${3}

[ ! -n "${_REGION}" ] && _REGION="ap-northeast-1"

aws --profile ${1} --region ${_REGION} \
  ec2 describe-instances \
    --filter "Name=tag:Name,Values=${_TAG_NAME_PREFIX}" \
    --query 'Reservations[].Instances[].{InstanceId:InstanceId, Name:Tags[?Key==`Name`]| [0].Value, InstanceType:InstanceType, PrivateIpAddress:PrivateIpAddress, State:State.Name}' \
    --output table

EC2 の一覧を取得する。

以下のように使う。

list-ec2 oreno-profile oreno-ec2

ELB も同じように…

$ cat /usr/local/bin/list-elb-ec2
#!/usr/bin/env bash

_PROFILE=${1}
_ELB_NAME=${2}
_REGION=${3}

[ ! -n "${_REGION}" ] && _REGION="ap-northeast-1"

aws --profile ${1} --region ${_REGION} \
  elb describe-instance-health \
    --load-balancer-name ${_ELB_NAME} --query 'InstanceStates[].{InstanceId:InstanceId,State:State}' --output table

以下のように使う。

list-ec2 oreno-profile oreno-elb

list_instances というナゾのコマンド

上記のコマンドを仕込んでいる時に発見したんだけど、list_instances というコマンドがインストールされていた。

$ list_instances --help
Usage: list_instances [options]

Options:
  -h, --help            show this help message and exit
  -r REGION, --region=REGION
                        Region (default us-east-1)
  -H ID,Zone,Groups,Hostname,State,T:Name, --headers=ID,Zone,Groups,Hostname,State,T:Name
                        Set headers (use 'T:tagname' for including tags)
  -t, --tab             Tab delimited, skip header - useful in shell scripts
  -f FILTER, --filter=FILTER
                        Filter option sent to DescribeInstances API call,
                        format is key1=value1,key2=value2,...

どうやら、EC2 インスタンスの一覧を取得してくれるツールらしい。

awspec にプルリクエストした時のメモ

tl;dr

マージされるか解りませんが、awspec で CloudWatch Logs のテストをしたかったので、CloudWatch Logs リソースタイプの追加をプルリクエストした際の作業内容をメモっておきます。用語の使い方や認識に誤りがあり嘘を書いてしまっていることがあるかもしれませんがご容赦ください。また、ご指摘頂ければ幸いです。

awspec とは

awspec は福岡生まれ*1、福岡育ちの AWS 上で構築したリソースを RspecDSL でテストするツールです。

github.com

まさに地産地消(消費されているのは地元だけではなく世界ですが。)

Rspec 基礎知識

自分の Rspec の知識は以下の記事くらいです。

inokara.hateblo.jp

プルリクエストして学ぶ awspec

テストしたい AWS リソース

  • CloudWatch Logs

テスト

一応、以下のように書くことを想定しています。

require 'spec_helper'

describe cloudwatch_logs('my-cloudwatch-logs-group') do
  it { should exist }
  its(:retention_in_days) { should eq 365 }
  it { should have_log_stream('my-cloudwatch-logs-stream') }
  it { should have_metric_filter('my-cloudwatch-logs-metric-filter') }
  it do
    should have_subscription_filter('my-cloudwatch-logs-subscription-filter')\
      .filter_pattern('[host, ident, authuser, date, request, status, bytes]')
  end
end

toolbox

awspec では以下の資料のように、リソースタイプを追加しやすいツールが同梱されています。

speakerdeck.com

新しいリソースタイプを追加したい場合には、以下のように実行することで雛形が生成されるので、雛形を修正していくだけで新しいリソースタイプを追加することが出来ます。

bundle exec bin/toolbox template cloudwatch_logs

以下のように出力されます。

$ bundle exec bin/toolbox template cloudwatch_logs
 + lib/awspec/stub/cloudwatch_logs.rb
 + lib/awspec/type/cloudwatch_logs.rb
 + spec/type/cloudwatch_logs_spec.rb
 + lib/awspec/generator/doc/type/cloudwatch_logs.rb
 + doc/_resource_types/cloudwatch_logs.md

Generate CloudwatchLogs template files.

* !! AND add 'cloudwatch_logs' to Awspec::Helper::Type::TYPES in lib/awspec/helper/type.rb *
* !! AND add 'cloudwatch_logs' client to lib/awspec/helper/finder.rb *

Stub

Rspec での Stub とは「あるメソッドが呼ばれたら、任意の値を返す」為に利用されるものという理解。もっとシンプルに言うと、ダミーデータを返すものだと思っておけば良いと勝手に思っています。今回のプルリクエストでは以下のように書きました。

Aws.config[:cloudwatchlogs] = {
  stub_responses: {
    describe_log_groups: {
      log_groups: [
        {
          log_group_name: 'my-cloudwatch-logs-group',
          retention_in_days: 365
        }
      ]
    },
    describe_log_streams: {
      log_streams: [
        {
          log_stream_name: 'my-cloudwatch-logs-stream'
        }
      ]
    },
    describe_metric_filters: {
      metric_filters: [
        {
          filter_name: 'my-cloudwatch-logs-metric-filter'
        }
      ]
    },
    describe_subscription_filters: {
      subscription_filters: [
        {
          filter_name: 'my-cloudwatch-logs-subscription-filter',
          filter_pattern: '[host, ident, authuser, date, request, status, bytes]'
        }
      ]
    }
  }
}

ちなみに、AWS SDK for Ruby では以下の Blog 記事のように標準で Stub が呼べるようになっているとのことです。

ほえー。

Spec

ここでの Spec は awspec を利用する際に書くテストと同じ内容を記載する。

require 'spec_helper'
Awspec::Stub.load 'cloudwatch_logs'

describe cloudwatch_logs('my-cloudwatch-logs-group') do
  it { should exist }
  its(:retention_in_days) { should eq 365 }
  it { should have_log_stream('my-cloudwatch-logs-stream') }
  it { should have_metric_filter('my-cloudwatch-logs-metric-filter') }
  it do
    should have_subscription_filter('my-cloudwatch-logs-subscription-filter')\
      .filter_pattern('[host, ident, authuser, date, request, status, bytes]')
  end
end

但し、Awspec::Stub クラスの load メソッドで Stub を読み込んでいる点だと思います。

Type

Type では実装の Spec ファイルに記述された example の結果を返す処理を記述する部分です。

    def has_log_stream?(stream_name)
      ret = find_cloudwatch_logs_stream(@id).log_stream_name
      return true if ret == stream_name
    end

例えば、上記は example の以下の部分の呼び出しに対応します。

describe cloudwatch_logs('my-cloudwatch-logs-group') do
  it { should have_log_stream('my-cloudwatch-logs-stream') }
end

have_log_stream がマッチャとなり、呼び出されるメソッドは has_log_stream? となります。

Helper

Helper モジュールには AWS SDK クライアントの定義、各 AWS リソースを取得する為のメソッドを定義したりします。

/lib/awspec/helper/finder.rb

  • finder モジュールにて CloudWatch Logs 用のモジュールを include する
  • CloudWatch Logs Client を定義する

lib/awspec/helper/finder/cloudwatch_logs.rb

  • AWS SDK を利用して各種リソースを取得する為のコードを定義する
  • 例えば、以下のように CloudWatch Logs の Log group を取得するメソッドを書いたりする
      def find_cloudwatch_logs_group(id)
        cloudwatch_logs_client.describe_log_groups({ log_group_name_prefix: id }).log_groups.last
      end

ちょっとマッチャ

lib/awspec/matcher/have_subscription_filter.rb

今回、一番テストしたかったのが、CloudWatch Subscription filter のフィルタパターンだったんですが、フィルタパターンをテストするにはマッチャを独自に定義する必要たありました。独自のマッチャを定義するには、以下のように RSpec::Matchers.define を呼び出す必要がありました。

RSpec::Matchers.define :have_subscription_filter do |filter_name|
  match do |log_group_name|
    log_group_name.has_subscription_filter?(filter_name, @pattern)
  end

  chain :filter_pattern do |pattern|
    @pattern = pattern
  end
end

また、lib/awspec/matcher.rb で上記の have_subscription_filter.rb を include してあげる必要があります。

# CloudWatch Logs
require 'awspec/matcher/have_subscription_filter'

そして、以下のように example を記述してフィルタパターンをテストすることが出来ました。

describe cloudwatch_logs('my-cloudwatch-logs-group') do
  it do
    should have_subscription_filter('my-cloudwatch-logs-subscription-filter')\
      .filter_pattern('[host, ident, authuser, date, request, status, bytes]')
  end
end

Document

ちゃんとドキュメントも追加しましょう。

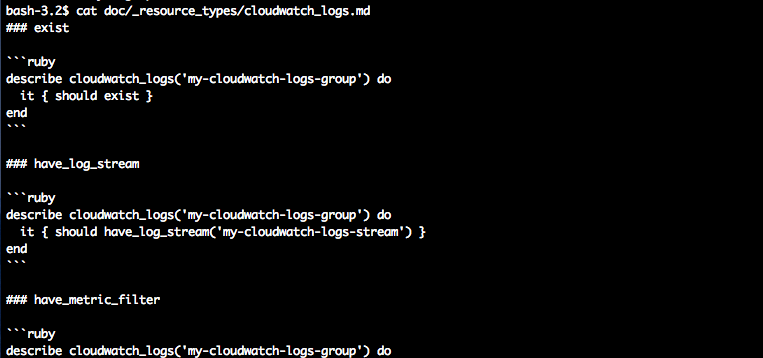
今回はリソースタイプの追加になりますので、doc/_resource_types/cloudwatch_logs.md を以下のように追加しました。
f:id:inokara:20170313095905p:plain

合わせて、自動生成されていた lib/awspec/generator/doc/type/cloudwatch_logs.rb もチェックします。

$ cat lib/awspec/generator/doc/type/cloudwatch_logs.rb
module Awspec::Generator
  module Doc
    module Type
      class CloudwatchLogs < Base
        def initialize
          super
          @type_name = 'CloudwatchLogs'
          @type = Awspec::Type::CloudwatchLogs.new('my-cloudwatch-logs-group')
          @ret = @type.resource_via_client
          @matchers = []
          @ignore_matchers = []
          @describes = []
        end
      end
    end
  end
end

尚、Awspec::Type::CloudwatchLogs.new('my-cloudwatch-logs-group') の引数 my-cloudwatch-logs-group はドキュメントの引数と合わせておく必要があります。

最後に以下のようにドキュメントを書き出します。

$ bundle exec bin/toolbox docgen > doc/resource_types.md

rubocop

ここまで来るとあとはプルリクエストを…と思った貴方、もうひと頑張りが必要です。rubocop という国家権力(国家は余計)と戦う必要があります。

rubocop とはコーディングルールに準拠しているかをチェックしてくれるツールで、この警察権力のチェックを事前に行っておくことで、プルリクエスト後の Travis CI でのテストも乗り切ることが出来るはずです。

bundle exec rake spec:rubocop

以下のように出力されれば無事に釈放です。

bash-3.2$ bundle exec rake spec:rubocop
Running RuboCop...
Inspecting 346 files
..........................................................................................................................................................................................................................................................................................................................................................

346 files inspected, no offenses detected

ということで

ひとまずテストを動かしてみると…

bash-3.2$ bundle exec rake spec:cloudwatch_logs
(略)

cloudwatch_logs 'my-cloudwatch-logs-group'
  should exist
  should have log stream "my-cloudwatch-logs-stream"
  should have metric filter "my-cloudwatch-logs-metric-filter"
  should have subscription filter "my-cloudwatch-logs-subscription-filter"
  retention_in_days
    should eq 365

Finished in 0.0841 seconds (files took 1.45 seconds to load)
5 examples, 0 failures

おお、Stub のレスポンスとなりますが、テストが通りました。

わーい。

拡張し易い awspec

これまで書いてきましたが、awspec は自分のような Ruby 初心者でも比較的簡単に拡張することが出来ました。これは awspec 実装の際に参考にされたとされる Serverspec でも同様のことが言えると思います。本当に作者の方には感謝の言葉しかありません。有難うございます!

ということで、福岡生まれ、世界育ちの awspec を頑張っていこうと思います。

*1:作者の @k1LoW さんが福岡の株式会社 Fusic にお務めです

2017 年 03 月 11 日(土)

3.11

東日本大震災から 6 年が経った。あの日、某データセンターで体験した生まれて初めての大きな揺れと死ぬかもしれないという恐怖。自宅に戻れず、ネットラジオで伝え聞く東北地方の惨状に震えたことをこの日が来る度に思い出す。

youtu.be

復興、復興と声高に叫ばれていたのは最初の三年位だったかな。毎年、メディアでの取り上げ方も小さくなってきている気がする。いや、小さくなってきているのは間違いない。復興の為に何にも出来ていない自分だけど、この体験を一生忘れず生きていくことが、せめてもの復興支援になれば幸い。

日課

  • (腕立て x 30 + 腹筋 x 30) x 3

Datadog の Monitors 定義をコード(YAML)で管理するツール chihuahua を再発明した

f:id:inokara:20170311201901p:plain

tl;dr

既に Datadog の Monitors を管理するコマンドラインツールとして codenize-tools の Barkdog が有名で、他の codenize-tools ツール達と同じインターフェースで備えていて、ちゃんと使うなら Barkdog だなーと思っている。

github.com

しかし、朝、目が覚めて、何かが降りてきたのか知らないけど、Monitors の API 周りの勉強を兼ねて、自分でもコマンドラインツールを作ってみることにした。

作ったもの

チワワ。

github.com

詳細は README を。

使い方

インストール

Gem では今のところ配布していない。

git clone https://github.com/inokappa/chihuahua.git
cd chihuahua
bundle install --path vendor/bundle

初期化

Monitors の定義を書き出すディレクトリを作成する。

bash-3.2$ bundle exec ./bin/chihuahua init
done.
bash-3.2$ tree monitors/
monitors/

0 directories, 0 files

上記のように monitors ディレクトリが作成されているはず。

既存設定の書き出し

チワワは既存設定の書き出しから始めることを想定している。また、必ず --project= オプションでプロジェクト名を指定する必要がある。これは、一つの Datadog アカウントに複数のプロジェクトの Monitors 設定が行われている場合、Monitors の Name キーや Tags キーによってプロジェクトを絞り込んで利用することを想定している。

export DATADOG_API_KEY=...
export DATADOG_APP_KEY=...

bundle exec ./bin/chihuahua export --project=your_project_name --tags=project:foo,stage:production

上記のように --tags= オプションでタグを指定することで、任意の Monitors 定義を取得することが出来る。

export オプションで書き出しを行うと以下のように monitors ディレクトリ以下にプロジェクト名のディレクトリが作成されて monitors.yml ファイルが作成されている。

$ bundle exec ./bin/chihuahua export --project=foo --tags=host:vagrant-ubuntu-trusty-64
Export...
6 monitors output done.

$ tree -a ./monitors/
./monitors/
└── foo
    ├── .filter.yml
    └── monitors.yml

1 directory, 2 files

新規登録

書き出された既存の Monitors 定義を利用して新しい Monitors 定義を登録してみる。

$ vim ./monitors/foo/monitors.yml
#
# 以下を追加
#
- query: avg(last_1m):avg:system.load.5{host:vagrant-ubuntu-trusty-64} > 1
  message: |-
    CPU load is very high on {{host.name}}
    @slack-datadog-notification
  name: Test 10 [{{#is_alert}}CRITICAL{{/is_alert}}{{#is_warning}}WARNING{{/is_warning}}]
    CPU load is very high on {{host.name}}
  type: metric alert
  options:
    thresholds:
      critical: 1.0
      warning: 0.8

上記のように monitors.yml に定義を追加する。ポイントは id キーを付与しないこと。

以下のように --dry-run オプションを付けて chihuahua export を実行すると、一応 登録する内容のチェックを行うことが出来る。

$ bundle exec ./bin/chihuahua apply --project=foo --dry-run
Apply...(dry-run)
Check add line.
---
query: avg(last_1m):avg:system.load.5{host:vagrant-ubuntu-trusty-64} > 1
message: |-
  CPU load is very high on {{host.name}}
  @slack-datadog-notification
name: Test 10 [{{#is_alert}}CRITICAL{{/is_alert}}{{#is_warning}}WARNING{{/is_warning}}]
  CPU load is very high on {{host.name}}
type: metric alert
options:
  thresholds:
    critical: 1.0
    warning: 0.8

定義する内容に問題なさ気であれば、--dry-run を外して登録する。

$ bundle exec ./bin/chihuahua apply --project=foo
Apply...
Add line.
{"tags"=>[], "deleted"=>nil, "query"=>"avg(last_1m):avg:system.load.5{host:vagrant-ubuntu-trusty-64} > 1", "message"=>"CPU load is very high on {{host.name}}\n@slack-datadog-notification", "id"=>1234567, "multi"=>false, "name"=>"Test 10 [{{#is_alert}}CRITICAL{{/is_alert}}{{#is_warning}}WARNING{{/is_warning}}] CPU load is very high on {{host.name}}", "created"=>"2017-03-11T13:01:57.454395+00:00", "created_at"=>1489237317000, "creator"=>{"id"=>22222, "handle"=>"inokara@gmail.com", "name"=>"ようへい かわはら", "email"=>"inokara@xxx.com"}, "org_id"=>11111, "modified"=>"2017-03-11T13:01:57.454395+00:00", "overall_state_modified"=>nil, "overall_state"=>"No Data", "type"=>"metric alert", "options"=>{"notify_audit"=>false, "locked"=>false, "silenced"=>{}, "thresholds"=>{"critical"=>1.0, "warning"=>0.8}, "new_host_delay"=>300, "require_full_window"=>true, "notify_no_data"=>false}}

更新

定義を少し更新してみる。

$ vim ./monitors/foo/monitors.yml
#
# query と thresholds を更新してみる
#
- query: avg(last_1m):avg:system.load.5{host:vagrant-ubuntu-trusty-64} > 2
  message: |-
    CPU load is very high on {{host.name}}
    @slack-datadog-notification
  id: 1234567
  name: Test 10 [{{#is_alert}}CRITICAL{{/is_alert}}{{#is_warning}}WARNING{{/is_warning}}]
    CPU load is very high on {{host.name}}
  type: metric alert
  options:
    thresholds:
      critical: 2.0
      warning: 0.8

以下のように --dry-run オプションを付けて chihuahua export を実行すると、一応 登録する内容のチェックを行うことが出来る。

$ bundle exec ./bin/chihuahua apply --project=foo --dry-run
Apply...(dry-run)
Check update line.
 ---
 tags: []
-query: avg(last_1m):avg:system.load.5{host:vagrant-ubuntu-trusty-64} > 1
+query: avg(last_1m):avg:system.load.5{host:vagrant-ubuntu-trusty-64} > 2
 message: |-
   CPU load is very high on {{host.name}}
   @slack-datadog-notification
 id: 1234567
 name: Test 10 [{{#is_alert}}CRITICAL{{/is_alert}}{{#is_warning}}WARNING{{/is_warning}}]
   CPU load is very high on {{host.name}}
 type: metric alert
 options:
   notify_audit: false
   locked: false
   silenced: {}
   thresholds:
-    critical: 1.0
+    critical: 2.0
     warning: 0.8
   new_host_delay: 300
   require_full_window: true
   notify_no_data: false

done.

定義する内容に問題なさ毛であれば、--dry-run を外して登録する。

$ bundle exec ./bin/chihuahua apply --project=foo
Apply...
Update line.
{"tags"=>[], "deleted"=>nil, "query"=>"avg(last_1m):avg:system.load.5{host:vagrant-ubuntu-trusty-64} > 2", "message"=>"CPU load is very high on {{host.name}}\n@slack-datadog-notification", "id"=>1234567, "multi"=>false, "name"=>"Test 10 [{{#is_alert}}CRITICAL{{/is_alert}}{{#is_warning}}WARNING{{/is_warning}}] CPU load is very high on {{host.name}}", "created"=>"2017-03-11T13:01:57.454395+00:00", "created_at"=>1489237317000, "org_id"=>11111, "modified"=>"2017-03-11T13:08:16.046036+00:00", "overall_state_modified"=>nil, "overall_state"=>"No Data", "type"=>"metric alert", "options"=>{"notify_audit"=>false, "locked"=>false, "silenced"=>{}, "thresholds"=>{"critical"=>2.0, "warning"=>0.8}, "require_full_window"=>true, "new_host_delay"=>300, "notify_no_data"=>false}}
done.

削除

って怖いのでダッシュボード上で指差し確認しながら削除する想定なので、削除は実装していない(というか出来ない。スキル的に)。ダッシュボードで削除した上で書き出しを行えば、一応、定義をコードで管理することが出来ると思う。

ということで

Datadog API の Monitors Tips

  • 新規登録は id キー不要
  • id がユニークキーとなる
  • id キーを指定することで任意の Monitors 定義を取得することが出来る
  • 新規登録時の必須オプションは type キーと query キー

想定する使い方

  • 1 つの Datadog アカウントで複数のプロジェクトの Monitors を管理していて、プロジェクト毎に Monitors の管理を分けたいというニーズがある場合
  • 但し、上記のような使い方をする場合には Tags キーや Name キーを厳密に設定しておく必要があると思う

ちなみに、現時点(version 1.25.0)で Datadog APIRuby Client では Monitors の定義を取得する get_all_monitors メソッドは :name オプションをサポートしていないので注意が必要(version 1.26.0 でサポート予定)。

以上。

codenize-tools

chihuahua を作るにあたり、Barkdog のオプション指定方法等を参考にさせて頂いた。codenize-tools ファミリーのツールって洗練されているなあと思った。