はじめに
Mackerel を触ってみました。
やったこと
Docker コンテナの監視
参考
上記のスライドとリポジトリを参考に...
モニタリング用コンテナを利用する。
docker run \
  -h `hostname` \
  --name=mackerel-agent \
  -v /var/run/docker.sock:/var/run/docker.sock \
  -v /var/lib/mackerel-agent/:/var/lib/mackerel-agent/ \
  -v /proc/mounts:/host/proc/mounts:ro \
  -v /sys/fs/cgroup/:/host/sys/fs/cgroup:ro \
  -e 'apikey=${mackerel-API-key}' \
mackerel/mackerel-agent
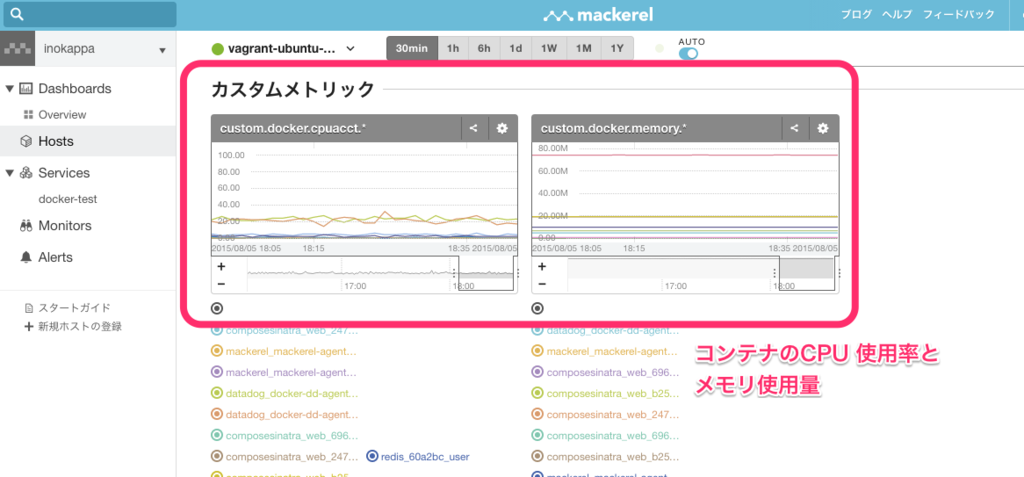
コンテナを実行後、暫くするとシステムメトリクスと共に以下の通りカスタムメトリクスとして Docker コンテナの CPU 使用率、メモリ使用量についてグラフが作成される。

メトリクスの収集については以下の記事に少しメモっている。
コマンドラインツール mkr の利用
Mackerel の CLI ツール
CLI ツールが用意されているとのことなので簡単に試してみた。全部のコマンドオプションは試せてないのであくまでも参考程度に。
参考
詳細については上記のヘルプや README を。
インストール
Mac OS X Yosemite 10.10.4
インストールは README に従って...
sudo wget -O /usr/local/bin/mkr "https://github.com/mackerelio/mkr/releases/download/$(curl -sI https://github.com/mackerelio/mkr/releases/latest | awk -F'/' '/^Location:/{print $NF}' | tr -d '\r')/mkr_darwin_amd64" && sudo chmod +x /usr/local/bin/mkr
インストール完了。
% mkr
NAME:
   mkr - A CLI tool for mackerel.io

USAGE:
   mkr [global options] command [command options] [arguments...]

VERSION:
   v0.3.1

AUTHOR(S):
   Hatena Co., Ltd.

COMMANDS:
   status       Show the host
   hosts        List hosts
   create       Create a new host
   update       Update the host
   throw        Post metric values
   fetch        Fetch latest metric values
   retire       Retire hosts
   help, h      Shows a list of commands or help for one command

GLOBAL OPTIONS:
   --conf "/Users/xxxxxxxxx/Library/mackerel-agent/mackerel-agent.conf"     Config file path
   --help, -h                                                           show help
   --version, -v                                                        print the version
export MACKEREL_APIKEY='<your_api_key>'
mkr hosts
% mkr hosts --help
NAME:
    hosts - List hosts

USAGE:
    mkr hosts [--verbose | -v] [--name | -n <name>] [--service | -s <service>] [[--role | -r <role>]...] [[--status | --st <status>]...]

DESCRIPTION:
    List the information of the hosts refined by host name, service name, role name and/or status.
    Request "GET /api/v0/hosts.json". See http://help-ja.mackerel.io/entry/spec/api/v0#hosts-list.


OPTIONS:
    --name, -n                                          List hosts only matched with <name>
    --service, -s                                       List hosts only belongs to <service>
    --role, -r [--role option --role option]            List hosts only belongs to <role>. Multiple choice allow. Required --service
    --status, --st [--status option --status option]    List hosts only matched <status>. Multiple choice allow.
    --format, -f                                        Output format template
    --verbose, -v                                       Verbose output mode
Mackerel でモニタリングしているホストの一覧を取得するコマンド。
% mkr hosts
以下のようにデフォルトは JSON で出力される。
[
    {
        "id": "xxxxxxxxxxx",
        "name": "tpX1-Carbon",
        "status": "standby",
        "roleFullnames": [
            "docker-test:foo"
        ],
        "isRetired": false,
        "createdAt": "Aug 3, 2015 at 11:30pm (JST)",
        "ipAddresses": {
            "eth0": "172.17.0.1"
        }
    },
    {
        "id": "zzzzzzzzzzzz",
        "name": "vagrant-ubuntu-trusty-64",
        "status": "standby",
        "roleFullnames": [
            "docker-test:bar"
        ],
        "isRetired": false,
        "createdAt": "Aug 3, 2015 at 4:42pm (JST)",
        "ipAddresses": {
            "eth0": "172.17.0.173"
        }
    }
]
--format オプションに続けて Go Template の書式(だと思う)のフォーマットを渡して上げると任意のフォーマットで出力することも出来るが、テンプレートに書けるフィールドってどこで確認出来るのかなって思っている。(こちらを見て幾つか試してみたけど...)
%  mkr hosts --format '{{range .}}{{.ID}}{{"\t"}}{{.Name}}{{"\t"}}{{(index .Interfaces 0).IPAddress}}{{"\t"}}{{.Status}}{{"\n"}}{{end}}'
xxxxxxxxxxx     tpX1-Carbon     172.17.0.1      standby
2syFuyMBFTN     vagrant-ubuntu-trusty-64        172.17.0.173    standby
もちろん Service や Role で絞り込むことも出来るし、--name オプションでホスト名を指定することも出来る。
% mkr hosts --service docker-test -role foo
[
    {
        "id": "xxxxxxxxxxx",
        "name": "tpX1-Carbon",
        "status": "standby",
        "roleFullnames": [
            "docker-test:foo"
        ],
        "isRetired": false,
        "createdAt": "Aug 3, 2015 at 11:30pm (JST)",
        "ipAddresses": {
            "eth0": "172.17.0.1"
        }
    }
]

% mkr hosts --name tpX1-Carbon
[
    {
        "id": "xxxxxxxxxxx",
        "name": "tpX1-Carbon",
        "status": "standby",
        "roleFullnames": [
            "docker-test:foo"
        ],
        "isRetired": false,
        "createdAt": "Aug 3, 2015 at 11:30pm (JST)",
        "ipAddresses": {
            "eth0": "172.17.0.1"
        }
    }
]
--status オプションでホストの状態でも絞り込むことが出来る。
% mkr hosts --status poweroff --format '{{range .}}{{.ID}}{{"\t"}}{{.Name}}{{"\t"}}{{(index .Interfaces 0).IPAddress}}{{"\t"}}{{.Status}}{{"\n"}}{{end}}'
xxxxxxxxxxx     389d8cc2acd1    172.17.0.16     poweroff
2spRRFnSGoC     640b4256a520    172.17.0.20     poweroff
25xawMjZDJy     05c704e0667c    172.17.0.2      poweroff
25BTbk2NM3q     ip-192-168-0-176        192.168.0.176   poweroff
25ERcwvkCGq     ip-192-168-0-110        192.168.0.110   poweroff
25Wc3QcAUTA     ip-192-168-0-162        192.168.0.162   poweroff
25woPLygHXN     f7854e60a2bd    172.17.0.3      poweroff
ステータスは...
- working
- standby
- maintenance
- poweroff
から選んで指定する。
mkr status
% mkr status --help
NAME:
    status - Show the host

USAGE:
    mkr status [-v|verbose] <hostId>

DESCRIPTION:
    Show the information of the host identified with <hostId>.
    Request "GET /api/v0/hosts/<hostId>". See http://help-ja.mackerel.io/entry/spec/api/v0#host-get.


OPTIONS:
    --verbose, -v       Verbose output mode
ホスト毎のステータスを確認するコマンドでホスト ID を指定して実行する。
% mkr status xxxxxxxxxxx
{
    "id": "xxxxxxxxxxx",
    "name": "389d8cc2acd1",
    "status": "poweroff",
    "isRetired": false,
    "createdAt": "Jul 31, 2015 at 12:58pm (JST)",
    "ipAddresses": {
        "eth0": "172.17.0.16"
    }
}
mkr throw と mkr fetch
% mkr throw --help
NAME:
    throw - Post metric values

USAGE:
    mkr throw [--host | -h <hostId>] [--service | -s <service>] stdin

DESCRIPTION:
    Post metric values to 'host metric' or 'service metric'.
    Output format of metric value is compatible with that of Sensu plugin.
    Request "POST /api/v0/tsdb". See http://help-ja.mackerel.io/entry/spec/api/v0#metric-value-post.


OPTIONS:
    --host, -H          Post host metric values to <hostID>.
    --service, -s       Post service metric values to <service>.

% mkr fetch --help
NAME:
    fetch - Fetch latest metric values

USAGE:
    mkr fetch [--name | -n <metricName>] hostIds...

DESCRIPTION:
    Fetch latest metric values about the hosts.
    Request "GET /api/v0/tsdb/latest". See http://help-ja.mackerel.io/entry/spec/api/v0#tsdb-latest.


OPTIONS:
    --name, -n [--name option --name option]    Fetch metric values identified with <name>. Required. Multiple choice allow.
メトリクスをポストしたり取得したりするコマンドでメトリクスをポストする際には以下のようなフォーマットとなる。
{metric name}\t{metric value}\t{epoch seconds}
詳細についてはこちらを。(※Graphite のメトリクスと同じフォーマットだと思う)
ということで、以下の通り throw と fetch を試してみる。
# throw
% echo "foo.bar $RANDOM `date +%s`" | mkr throw --host xxxxxxxxxxx
    thrown xxxxxxxxxxx 'foo.bar 24626.000000    1438764497'
% echo "foo.bar $RANDOM `date +%s`" | mkr throw --host xxxxxxxxxxx
    thrown xxxxxxxxxxx 'foo.bar 1890.000000     1438764501'
% echo "foo.bar $RANDOM `date +%s`" | mkr throw --host xxxxxxxxxxx
    thrown xxxxxxxxxxx 'foo.bar 21338.000000    1438764503'
% echo "foo.bar $RANDOM `date +%s`" | mkr throw --host xxxxxxxxxxx
    thrown xxxxxxxxxxx 'foo.bar 17524.000000    1438764504'
% echo "foo.bar $RANDOM `date +%s`" | mkr throw --host xxxxxxxxxxx
    thrown xxxxxxxxxxx 'foo.bar 13549.000000    1438764506'

# fetch
% mkr fetch --name foo.bar xxxxxxxxxxx
{
    "xxxxxxxxxxx": {
        "foo.bar": {
            "time": 1438764300,
            "value": 7391.5
        }
    }
}
更に以下のように二つのメトリクスを送ってみる。
% while
while> true
while> do
while> echo "foo.bar $RANDOM `date +%s`" | mkr throw --host xxxxxxxxxxx
while> echo "foo.baz $RANDOM `date +%s`" | mkr throw --host xxxxxxxxxxx
while> sleep 30
while> done
    thrown xxxxxxxxxxx 'foo.bar 1012.000000     1438765363'
    thrown xxxxxxxxxxx 'foo.baz 6810.000000     1438765364'
    thrown xxxxxxxxxxx 'foo.bar 5679.000000     1438765394'
    thrown xxxxxxxxxxx 'foo.baz 32192.000000    1438765394'
    thrown xxxxxxxxxxx 'foo.bar 29165.000000    1438765425'
    thrown xxxxxxxxxxx 'foo.baz 8503.000000     1438765425'
    thrown xxxxxxxxxxx 'foo.bar 12323.000000    1438765456'
    thrown xxxxxxxxxxx 'foo.baz 30596.000000    1438765456'
    thrown xxxxxxxxxxx 'foo.bar 14864.000000    1438765486'
    thrown xxxxxxxxxxx 'foo.baz 1917.000000     1438765487'
    thrown xxxxxxxxxxx 'foo.bar 14631.000000    1438765517'
    thrown xxxxxxxxxxx 'foo.baz 16741.000000    1438765518'
    thrown xxxxxxxxxxx 'foo.bar 24837.000000    1438765548'
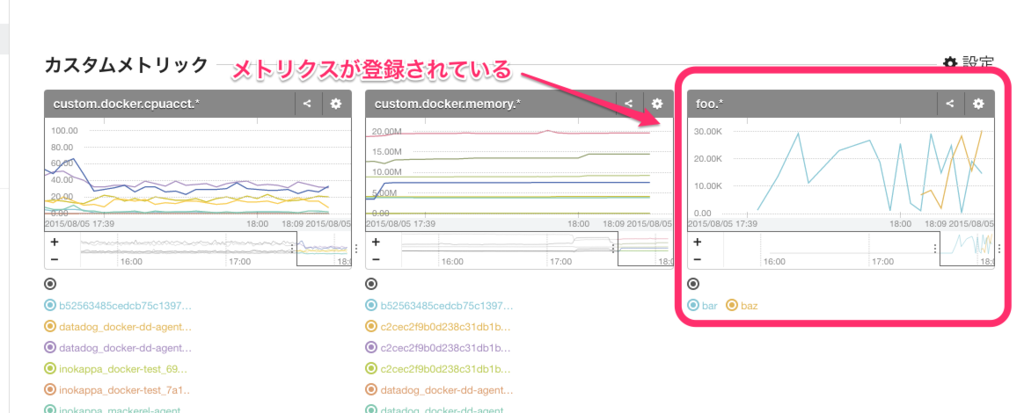
ブラウザでダッシュボードを見ると以下のようにカスタムメトリックにグラフが追加されている。

fetch でメトリクスを取得してみる。
% mkr fetch --name foo.bar xxxxxxxxxxx
{
    "xxxxxxxxxxx": {
        "foo.bar": {
            "time": 1438766100,
            "value": 8289
        }
    }
}
% mkr fetch --name foo.baz xxxxxxxxxxx
{
    "xxxxxxxxxxx": {
        "foo.baz": {
            "time": 1438766100,
            "value": 22315
        }
    }
}
その他
mkr create や mkr update 等についてはドキュメントや README を参照。
最後に
mkr シンプルだなあ
上記の blog 記事を読ませて頂き納得。
今回は特に jq と絡めて使うことは無かったけど出力は JSON に絞ったり、標準出力をパイプで渡すだけでメトリクスを投稿出来たりと他のツールとの連携がしやすくなっているなあと感じた。ヘルプも充実していて、API ドキュメントの URL も一緒に出力されるのは嬉しい配慮だと思う。