いきなり番外編。
tl;dr
そらまめ君のデータを定期的に集めて DynamoDB に投入する流れを作るにあたってどこかのサーバーを常時起動しておくのもなあということで Datapipeline の ShellCommandActivity を cron として利用してみた。 尚、Datapipeline の ShellCommandActivity を cron のように利用されている方が既に以下のように記事にされており大変参考になった。有難うございました。
ShellCommandActivity は必ず EC2 が起動してしまうが、そらまめ君のデータを収集する間だけ(厳密には起動時点で一時間分が課金される)起動すれば良いということで起動しっぱなしのサーバーよりはコスト削減につながるのでは考えている。
尚、Datapipeline の詳細について以下の資料、ドキュメントを参考にする。
www.slideshare.net
ドキュメントが読みやすいのが嬉しい。
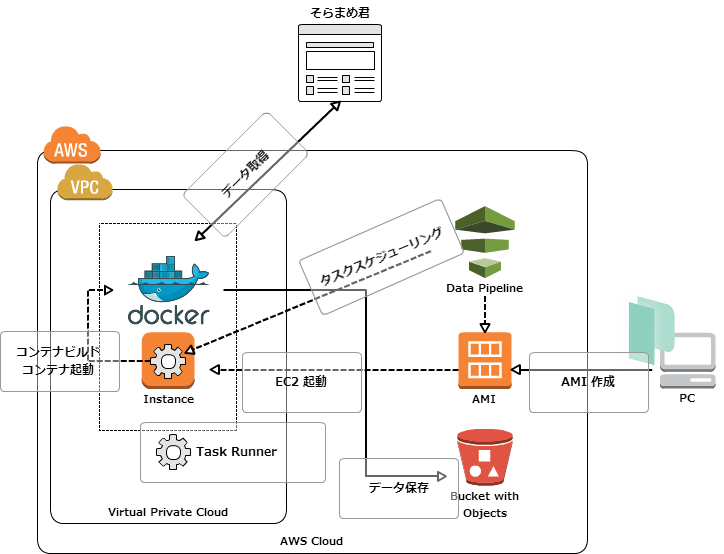
動作のイメージ
図で

処理の流れ
以下、処理の流れ。
- パイプライン開始
- EC2 起動
- EC2 の起動が完了したら Dockerfile を Github から取得
- docker build
- docker build したコンテナを起動してそらまめ君からデータを取得
- 取得したデータはそのまま S3 バケットに
- S3 バケットに保存されたデータから DynamoDB に Import(未実装)
処理を担うメンツ。
- 1 と 2 と 6 が Datapipeline での動作(多分、7. もいけそう)
- 3 〜 5 までが ShellCommandActivity に定義した動作(Task Runner がシェルを実行している)
準備
今回の教材
(後ほど整理してアップする)
AMI の用意
久し振りの Packer で。
{
  "variables": {
    "aws_access_key": "AKxxxxxxxxxxxxxxxxxxxxx",
    "aws_secret_key": "xxxxxxxxxxxxxxxxxxxxxxxxxxxxxxxxxxxxxxxxxxxxxx"
  },
  "builders": [{
    "type": "amazon-ebs",
    "access_key": "{{user `aws_access_key`}}",
    "secret_key": "{{user `aws_secret_key`}}",
    "region": "ap-northeast-1",
    "source_ami": "ami-1a1b9f1a",
    "instance_type": "t1.micro",
    "ssh_username": "ec2-user",
    "ami_name": "pipeline_ami-{{timestamp}}",
    "ssh_pty": true
  }],
  "provisioners": [{
    "type": "shell",
    "inline": [
      "sleep 30",
      "sudo yum -y update",
      "sudo yum -y install docker git",
      "sudo usermod -a -G docker ec2-user",
      "sudo chkconfig docker on",
      "sudo service docker start",
      "sudo docker pull ruby"
    ]
  }]
}
provisioners で sudo 使うのに "ssh_pty": true が必要だったりちょっとハマったけど、以下のようにビルドして鈴木 AMI を用意。
% ~/bin/packer validate pipeline-ami.json
Template validated successfully.
% ~/bin/packer build pipeline-ami.json

(snip)

==> amazon-ebs: Creating the AMI: pipeline_ami-1442131584
    amazon-ebs: AMI: ami-xxxxxxx
==> amazon-ebs: Waiting for AMI to become ready...
==> amazon-ebs: Terminating the source AWS instance...
==> amazon-ebs: Cleaning up any extra volumes...
==> amazon-ebs: No volumes to clean up, skipping
==> amazon-ebs: Deleting temporary security group...
==> amazon-ebs: Deleting temporary keypair...
Build 'amazon-ebs' finished.
AMI 作成完了。
そらまめ君からデータを拝借するスクリプトの準備
#!/usr/bin/env ruby

require 'open-uri'
require 'nokogiri'
require 'date'
require 'json'
require 'nkf'

d = Time.now.strftime("%Y%m%d")
h = (Time.now - 2 * 60 * 60).strftime("%H")
check_time = (Time.now - 2 * 60 * 60).strftime("%Y-%m-%d %H:00:00")
url = 'http://soramame.taiki.go.jp/Gazou/Hyou/AllMst/' + d + '/hb' + d + h + '08.html'

html = NKF.nkf("--utf8", open(url).read)

header = ['CHECK_TIME','mon_st_code','town_name', 'mon_st_name', 'SO2','NO','NO2','NOX','CO','OX','NMHC','CH4','THC','SPM','PM2.5','SP','WD','WS','TEMP','HUM','mon_st_kind']
doc = Nokogiri::HTML.parse(html, nil, 'UTF-8')
doc.xpath('//tr[td]').each do |tr|
  row = tr.xpath('td').map { |td| td.content.gsub(/[\u00A0\n]|\-\-\-/,'NA') }
  row.unshift(check_time)
  ary = [header,row].transpose
  puts Hash[*ary.flatten].to_json
end
各レコードを JSON フォーマットで出力するようにした。尚、一日に一回実行して 24 時間分のデータを一気に取得するという案もあるが、上記の例は一時間に一回実行して最新のデータを取得する。
そらまめ君データを取得するスクリプトを実行するコンテナの用意
以下のような Dockerfile を用意。
FROM ruby
MAINTAINER inokappa
RUN gem install aws-sdk nokogiri --no-ri --no-rdoc
RUN git clone https://github.com/inokappa/oreno-pipeline.git /app
RUN chmod 755 /app/put-to-s3.rb
CMD /app/put-to-s3.rb
Datapipeline で Docker を扱えば ECS では定義出来ない docker build を定義することが出来るのが地味に嬉しい。
Datapipeline の設定
雑だが以下のような設定を作ってみた。(マネジメントコンソール(architect)にて作成したパイプラインを Export したもの)
{
  "objects": [
    {
      "directoryPath": "#{myS3OutputLoc}/#{format(@scheduledStartTime, 'YYYY-MM-dd-HH-mm-ss')}",
      "name": "S3OutputLocation",
      "id": "S3OutputLocation",
      "type": "S3DataNode"
    },
    {
      "output": {
        "ref": "S3OutputLocation"
      },
      "stage": "true",
      "name": "ShellCommandActivityObj",
      "id": "ShellCommandActivityObj",
      "runsOn": {
        "ref": "EC2ResourceObj"
      },
      "type": "ShellCommandActivity",
      "command": "#{myShellCmd}"
    },
    {
      "period": "15 Minutes",
      "name": "Run_per_15 min",
      "id": "DefaultSchedule",
      "type": "Schedule",
      "startAt": "FIRST_ACTIVATION_DATE_TIME"
    },
    {
      "failureAndRerunMode": "CASCADE",
      "schedule": {
        "ref": "DefaultSchedule"
      },
      "resourceRole": "DataPipelineDefaultResourceRole",
      "role": "DataPipelineDefaultRole",
      "scheduleType": "cron",
      "name": "Default",
      "id": "Default"
    },
    {
      "subnetId": "subnet-xxxxxxxx",
      "imageId": "ami-xxxxxxxx",
      "securityGroupIds": "sg-xxxxxxxx",
      "instanceType": "t1.micro",
      "name": "EC2ResourceObj",
      "keyPair": "xxxxxxxxxxxxxxxxxxx",
      "id": "EC2ResourceObj",
      "type": "Ec2Resource",
      "terminateAfter": "10 Minutes"
    }
  ],
  "parameters": [
    {
      "description": "S3 output folder",
      "id": "myS3OutputLoc",
      "type": "AWS::S3::ObjectKey"
    },
    {
      "default": "s3://us-east-1.elasticmapreduce.samples/pig-apache-logs/data",
      "description": "S3 input folder",
      "id": "myS3InputLoc",
      "type": "AWS::S3::ObjectKey"
    },
    {
      "default": "grep -rc \"GET\" ${INPUT1_STAGING_DIR}/* > ${OUTPUT1_STAGING_DIR}/output.txt",
      "description": "Shell command to run",
      "id": "myShellCmd",
      "type": "String"
    }
  ],
  "values": {
    "myShellCmd": "mkdir /tmp/build\ncd /tmp/build\nwget https://raw.githubusercontent.com/inokappa/oreno-pipeline/master/Dockerfile\ndocker build --no-cache=true -t soramame-runner .\ndocker run soramame-runner | tee ${OUTPUT1_STAGING_DIR}/output.txt",
    "myS3InputLoc": "s3://xxxxxxxxxxxx-pipeline-input/",
    "myS3OutputLoc": "s3://xxxxxxxxxxxx-pipeline-output/"
  }
}
myShellCmd に Task Runner に叩いてもらうシェルスクリプトが記述されている。
mkdir /tmp/build
cd /tmp/build
wget https://raw.githubusercontent.com/inokappa/oreno-pipeline/master/Dockerfile
docker build --no-cache=true -t soramame-runner .
docker run soramame-runner | tee ${OUTPUT1_STAGING_DIR}/output.txt
とりあえず標準出力に出力される内容を tee コマンドで S3 に保存する(だけ)
あんまり面白く無いかもしれないスクショで振り返るデモ
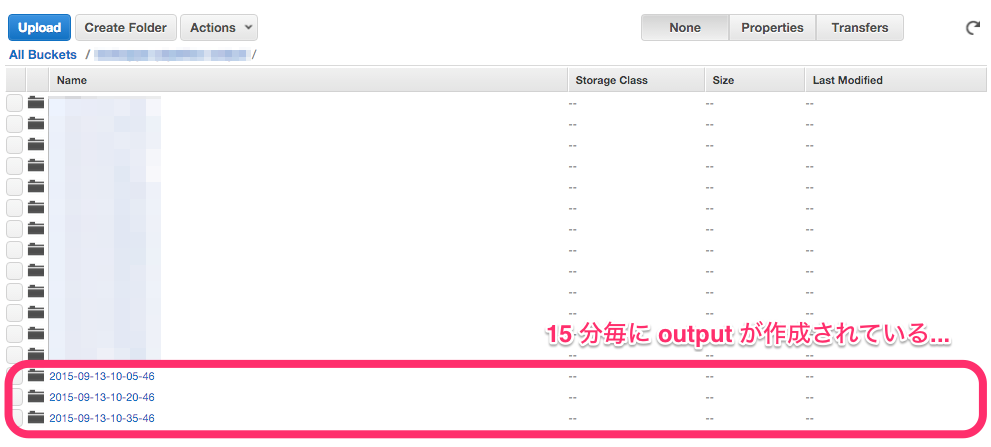
15 分毎に処理を行うように
デモなので若干、頻度が高め。

実行結果
Datapipeline のダッシュボード上にて確認。

S3 バケットを確認。

データを確認。

若干、ゴミが...。
最後に
Datapipeline を使えば
- cron っぽいことが出来る(但し、EC2 は利用する必要がある、最短 15 分毎という制限あり)
- Dockerbuild 出来るので ECS よりもコンテナの中身の自由度が高い気がする
Datapipeline については
- 改めてドキュメントを読んで理解を深めたい
- CLI からの操作を試してみる
改善案
- 一日に一回タスクを実行するようにそらまめ君のデータを取得するスクリプトを修正
- S3 のバケット名、ディレクトリ名の修正
- DynamoDB にデータをインポートする処理を追加する
- DynamoDB JSON サポートの動作確認をしておく
以上。