ようへいの日々精進XP

よかろうもん

もう 2018 年だけど, Jenkins + Docker + itamae + Serverspec でインフラ CI っぽいことをやってるのでメモ

やってること

今更かもしれないけど, ギョームで以下のようなことをやって, ここ数日で運用も回ってきた気がするのでメモしておく.

  1. itamae のレシピを amazonlinux コンテナに適用
  2. 適用したコンテナに対して Serverspec でテスト
  3. 1 と 2 を Jenkins のビルドパイプラインで流す
  4. 3 が正常に終了したら, pull request を作成, 又はマージ
  5. master ブランチのレシピをサーバーに手動で適用

Jenkins のポテンシャルと itamae と Serverspec の使いやすさに改めて感動した次第.

メモ

Jenkins を動かす環境

  • Amazon Linux AMI release 2017.09
  • Docker Server / Client 17.12.0-ce
  • OpenJDK 1.8.0_161

Docker イメージ

  • amazonlinux
  • 素の amazonlinux イメージだと色々と辛かったので, 以下のような Dockerfile を用意してイメージを作成

以下, Dockerfile.

FROM amazonlinux
RUN yum install -y sudo util-linux which diffutils
RUN useradd ec2-user
RUN echo 'ec2-user ALL = NOPASSWD: ALL' > /etc/sudoers.d/ec2-user
RUN yum reinstall -y glibc-common
ADD clock /etc/sysconfig/clock
ADD cloud.cfg /etc/cloud/cloud.cfg
ENV LANG ja_JP.UTF-8

以下, clock と cloud.cfg の中身.

# clock
ZONE="UTC"
UTC=true

cloud.cfg を直接編集するのは良くないらしい.

# cloud.cfg
# WARNING: Modifications to this file may be overridden by files in
# /etc/cloud/cloud.cfg.d

# If this is set, 'root' will not be able to ssh in and they
# will get a message to login instead as the default user (ec2-user)
disable_root: true

# This will cause the set+update hostname module to not operate (if true)
preserve_hostname: true

datasource_list: [ Ec2, None ]

repo_upgrade: security
repo_upgrade_exclude:
 - kernel
 - nvidia*
 - cudatoolkit

mounts:
 - [ ephemeral0, /media/ephemeral0 ]
 - [ swap, none, swap, sw, "0", "0" ]
# vim:syntax=yaml

clock と cloud.cfg は, itamae の中でこれらを書き換える為のレシピを用意する為, 事前に書き換えられる前のファイルを用意した.

itamae レシピ

以下のようなレシピを用意した.

# cookbooks/common/default.rb

# Package install
%w(wget
   git).each do |pkg|
  package pkg
end

# Edit /etc/sysconfig/clock
file '/etc/sysconfig/clock' do
  action :edit
  block do |content|
    content.gsub!('ZONE="UTC"', 'ZONE="Asia/Tokyo"')
    content.gsub!('UTC=true', 'UTC=false"')
  end
end

# Set LocalTime
local_file_exists = 'ls /usr/share/zoneinfo/Japan'
execute 'Set LocalTime' do
  command 'ln -nfs /usr/share/zoneinfo/Japan /etc/localtime'
  only_if local_file_exists
end

# Disable Package Update and Set Locale Language
remote_file '/etc/cloud/cloud.cfg.d/99_customize.cfg' do
  action :create
  mode '0644'
  owner 'root'
  group 'root'
  source 'files/etc/cloud/cloud.cfg.d/99_customize.cfg'
end

itamae のディレクトリ構造は以下の通り.

$ tree . -L 2
.
├── Gemfile
├── Gemfile.lock
├── Rakefile
├── cookbooks
│   └── common
├── docker
│   ├── Dockerfile
│   ├── clock
│   └── cloud.cfg
├── node.json
├── roles
│   └── docker-test.rb
└── vendor
    └── bundle

6 directories, 8 files

Serverspec テスト

以下のようなテストを用意.

require "spec_helper"

%w(wget
   git).each do |pkg|
  describe package(pkg) do
    it { should be_installed }
  end
end

describe file('/etc/sysconfig/clock') do
  it { should exist }
  its(:content) { should match /ZONE="Asia\/Tokyo"/ }
  its(:content) { should match /UTC=false/ }
end

describe file('/etc/localtime') do
  it { should be_symlink }
end

describe file('/etc/cloud/cloud.cfg.d/99_customize.cfg') do
  it { should exist }
  it { should be_mode 644 }
  it { should be_owned_by 'root' }
  it { should be_grouped_into 'root' }
end

describe command('date') do
  its(:stdout) { should contain('JST') }
end

describe command('locale') do
  its(:stdout) { should contain('ja_JP.UTF-8') }
end

spec_helper.rb にちょっとひと手間加えて, 環境変数に Docker イメージを指定して rspec が走るようにしておく.

require 'serverspec'
require 'net/ssh'
require 'json'

properties = YAML.load_file('properties.yml')

if ENV['DOCKER_IMAGE']
  begin
    require 'docker'
  rescue LoadError
    fail "docker-api is not available. Try installing it."
  end
  set :backend, :docker
  set :docker_image, ENV['DOCKER_IMAGE']
else
... 省略 ...

end

ディレクトリ構造は以下の通り.

$ tree . -L 2
.
├── Gemfile
├── Gemfile.lock
├── Rakefile
├── properties.yml
├── spec
│   ├── common
│   └── spec_helper.rb
└── vendor
    └── bundle

4 directories, 5 files

Jenkins の準備

プラグイン

以下のプラグインを利用した.

  • rbenv plugin
  • Parameterized Trigger plugin
  • Build Pipeline Plugin

Build Pipeline Plugin は必須では無い.

Docker 周り

jenkins ユーザーで docker コマンド叩けるようにしておく.

sudo gpasswd -a jenkins docker

こんな感じ.

$ sudo -u jenkins docker version
Client:
 Version:       17.12.0-ce
 API version:   1.35
 Go version:    go1.9.2
 Git commit:    3dfb8343b139d6342acfd9975d7f1068b5b1c3d3
 Built: Mon Mar  5 20:42:27 2018
 OS/Arch:       linux/amd64

Server:
 Engine:
  Version:      17.12.0-ce
  API version:  1.35 (minimum version 1.12)
  Go version:   go1.9.2
  Git commit:   402dd4a/17.12.0-ce
  Built:        Mon Mar  5 20:43:34 2018
  OS/Arch:      linux/amd64
  Experimental: false

ジョブ

以下のようにジョブを 2 つ用意した. (ジョブ名はなんでもいい)

  • infra-itamae
  • infra-serverspec

個々のジョブで共通して以下の内容を設定した.

  • ソースコード管理 (今回も Backlog Git を利用)
  • rbenv build wrapper で Ruby 2.5.0 を利用するようにした

以下のように infra-itamae が成功したら, infra-serverspec が実行されるように設定した.

infra-itamae の設定

[ビルド] の [シェル実行] に以下のようにシェルスクリプトを書いた.

cd itamae.sandbox
bundle install --path vendor/bundle
cd docker
docker build -t itamae-test .
cd ../
bundle exec itamae docker --image=itamae-test roles/docker-test.rb --log-level=info --no-color 2>&1 | tee test.log
if [ "$(cat test.log | tail -1 | awk -F":" '{print $4}')" != "" ];then
  echo -n "DOCKER_IMAGE=$(cat test.log | tail -1 | awk -F":" '{print $4}')" > ${WORKSPACE}/docker_image.txt
else
  exit 1
fi

itamae は Docker コンテナに対してプロビジョニングして, コンテナイメージを作成することが出来る.

$ bundle exec itamae --help docker
Usage:
  itamae docker RECIPE [RECIPE...]

Options:
      [--recipe-graph=PATH]                            # [EXPERIMENTAL] Write recipe dependency graph in DOT
  -j, [--node-json=NODE_JSON]
  -y, [--node-yaml=NODE_YAML]
  -n, [--dry-run], [--no-dry-run]
      [--shell=SHELL]
                                                       # Default: /bin/sh
      [--login-shell], [--no-login-shell]
      [--ohai], [--no-ohai]                            # This option is DEPRECATED and will be unavailable.
      [--profile=PATH]                                 # [EXPERIMENTAL] Save profiling data
      [--detailed-exitcode], [--no-detailed-exitcode]  # exit code 0 - The run succeeded with no changes or failures, exit code 1 - The run failed, exit code 2 - The run succeeded, and some resources were changed
  -l, [--log-level=LOG_LEVEL]
                                                       # Default: info
      [--color], [--no-color]
                                                       # Default: true
  -c, [--config=CONFIG]
      [--image=IMAGE]                                  # This option or 'container' option is required.
      [--container=CONTAINER]                          # This option or 'image' option is required.
      [--tls-verify-peer], [--no-tls-verify-peer]
                                                       # Default: true
      [--tag=TAG]

Create Docker image

[ビルド後の処理] で [Trigger parameterize build on other projects] を指定し, 以下のパラメータを設定した.

パラメータ名 概要
Projects to build infra-serverspec 下流プロジェクトを指定
Trigger when build is Stable 下流プロジェクトがビルドされる基準
Perameters from properties file 選択 ファイルからパラメータを指定する
Use properties from file docker_image.txt ${WORKSPACE} 以下に生成されるファイル名を指定

Use properties from file で指定するファイルは以下のようなフォーマットである必要がある.

KEY=value

今回だと, 下流プロジェクトである infra-serverspec で利用する Docker イメージ名を環境変数に指定しておきたいので, 以下のような内容になる.

DOCKER_IMAGE=xxxxxxxxxxxxxxxxxxxxxxxxxxxxxxxxxxxxxxxxxxxxxxxxxxxxxxx

尚, itamae 実行時に --no-color オプションを付与しておかないと, ログ出力にカラーコードが含まれてしまい, 意図しない環境変数が定義されるので注意する.

infra-serverspec の設定

[General] の [ビルドのパラメータ化] にチェックを入れて, 以下のように設定した.

  • テキストの [名前] には DOCKER_IMAGE を指定

[ビルド]の [シェル実行] に以下のようにシェルスクリプトを書いた.

cd serverspec.sandbox
bundle install --path vendor/bundle
bundle exec rake serverspec:docker-test && docker rmi -f ${DOCKER_IMAGE}

動いてる図

Build Pipeline
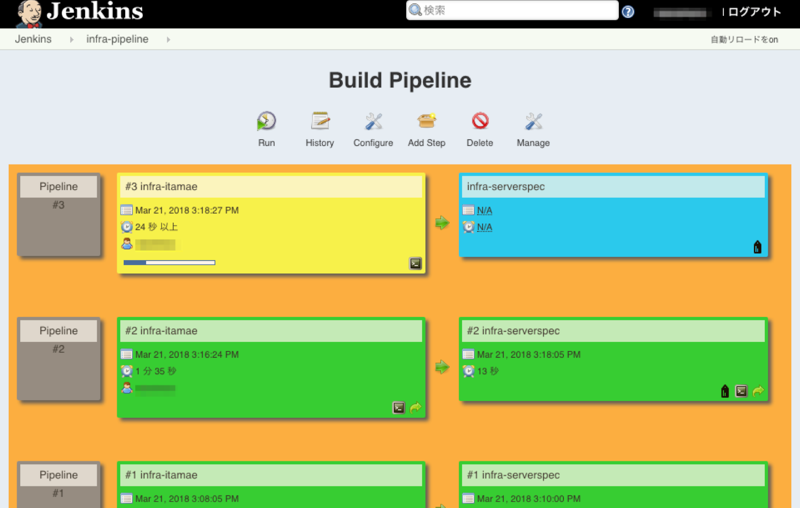
f:id:inokara:20180321153022p:plain

ログ

以下, infra-itamae の実行ログ (コンソール出力).

Started by user xxxxxxx
Building in workspace /var/lib/jenkins/workspace/infra-itamae
 > git rev-parse --is-inside-work-tree # timeout=10
Fetching changes from the remote Git repository

...

 INFO : Image created: sha256:fc7d8989c992a4035da943f19ff13758d659dc2c66e85b354a81ed35eac092a9
++ cat test.log
++ tail -1
++ awk -F: '{print $4}'
+ '[' fc7d8989c992a4035da943f19ff13758d659dc2c66e85b354a81ed35eac092a9 '!=' '' ']'
++ cat test.log
++ tail -1
++ awk -F: '{print $4}'
+ echo -n DOCKER_IMAGE=fc7d8989c992a4035da943f19ff13758d659dc2c66e85b354a81ed35eac092a9
Triggering a new build of infra-serverspec
Finished: SUCCESS

以下, infra-serverspec の実行ログ (コンソール出力).

Started by upstream project "infra-itamae" build number 3
originally caused by:
 Started by user xxxxxxxx
Building in workspace /var/lib/jenkins/workspace/infra-serverspec
 > git rev-parse --is-inside-work-tree # timeout=10
Fetching changes from the remote Git repository

...

Command "date"
  stdout
    should contain "JST"

Command "locale"
  stdout
    should contain "ja_JP.UTF-8"

Finished in 1.39 seconds (files took 0.36337 seconds to load)
12 examples, 0 failures

+ docker rmi -f 21f1cc87aee8a670710128fc65699f8554de4b38027c355dc39048a026850819
Deleted: sha256:21f1cc87aee8a670710128fc65699f8554de4b38027c355dc39048a026850819
Deleted: sha256:6605e21eb4b68cca7fa9c95da3f4f927f40988798c038ed7f42fc68caabb5f84
Deleted: sha256:1e12645118a9dbb47e9963ee37669022e91bb0a07c2a5757f30aaf88e83fde46
Deleted: sha256:2e643788655c8c760d1e980eca0b46251b7301af1b759b5df5ab7bbe642b0c9d
Deleted: sha256:00f5d50a957784ab20fd7b550fdfeca505dc4e550959ba7f73f2def824041d44
Deleted: sha256:e0f2d8168d9eaa1ed9592791b8a4e436b5476db41b99fa12bf32076891b9fd22
Deleted: sha256:b7937fd11c3afb70b655e281ef6acdc4d3afc3cd912a19fe14cfb3b93c0e7688
Deleted: sha256:9989831a58db4d3c31f5f18d590c5ffc08ad41ac4f424b3ea870fded4440e591
Deleted: sha256:4ac2d011c778bf4d55459f2549bb80bc89b3327e747384446c1f08652997bbfb
Deleted: sha256:7522d03ea4bb3188185376f4aa675724bc8c46e961fa0625dc73b164408b5736
Deleted: sha256:f0a3ff27c8c1d0e4242beb150786fae71a8b52a328b3810581c0a50d9101c89d
Deleted: sha256:95f9b360e9435265a8e1888110af30e93a90e563fe969c8249f14d446791c996
Deleted: sha256:be94791a1fc4eb636d443b0fb18b56eed7c32b0cd3a2b3912b10b7945d840179
Deleted: sha256:fff1c0462adfdaa1e8c815e4fc17c228b205479a23161cd717342dad5d9345b2
Finished: SUCCESS

テストが通った時だけ, コンテナイメージを削除しちゃう.

以上

ざっくりとしたメモでした.
awspec にプルリクエストした時のメモ

tl;dr

マージされるか解りませんが、awspec で CloudWatch Logs のテストをしたかったので、CloudWatch Logs リソースタイプの追加をプルリクエストした際の作業内容をメモっておきます。用語の使い方や認識に誤りがあり嘘を書いてしまっていることがあるかもしれませんがご容赦ください。また、ご指摘頂ければ幸いです。

awspec とは

awspec は福岡生まれ*1、福岡育ちの AWS 上で構築したリソースを RspecDSL でテストするツールです。

github.com

まさに地産地消(消費されているのは地元だけではなく世界ですが。)

Rspec 基礎知識

自分の Rspec の知識は以下の記事くらいです。

inokara.hateblo.jp

プルリクエストして学ぶ awspec

テストしたい AWS リソース

  • CloudWatch Logs

テスト

一応、以下のように書くことを想定しています。

require 'spec_helper'

describe cloudwatch_logs('my-cloudwatch-logs-group') do
  it { should exist }
  its(:retention_in_days) { should eq 365 }
  it { should have_log_stream('my-cloudwatch-logs-stream') }
  it { should have_metric_filter('my-cloudwatch-logs-metric-filter') }
  it do
    should have_subscription_filter('my-cloudwatch-logs-subscription-filter')\
      .filter_pattern('[host, ident, authuser, date, request, status, bytes]')
  end
end

toolbox

awspec では以下の資料のように、リソースタイプを追加しやすいツールが同梱されています。

speakerdeck.com

新しいリソースタイプを追加したい場合には、以下のように実行することで雛形が生成されるので、雛形を修正していくだけで新しいリソースタイプを追加することが出来ます。

bundle exec bin/toolbox template cloudwatch_logs

以下のように出力されます。

$ bundle exec bin/toolbox template cloudwatch_logs
 + lib/awspec/stub/cloudwatch_logs.rb
 + lib/awspec/type/cloudwatch_logs.rb
 + spec/type/cloudwatch_logs_spec.rb
 + lib/awspec/generator/doc/type/cloudwatch_logs.rb
 + doc/_resource_types/cloudwatch_logs.md

Generate CloudwatchLogs template files.

* !! AND add 'cloudwatch_logs' to Awspec::Helper::Type::TYPES in lib/awspec/helper/type.rb *
* !! AND add 'cloudwatch_logs' client to lib/awspec/helper/finder.rb *

Stub

Rspec での Stub とは「あるメソッドが呼ばれたら、任意の値を返す」為に利用されるものという理解。もっとシンプルに言うと、ダミーデータを返すものだと思っておけば良いと勝手に思っています。今回のプルリクエストでは以下のように書きました。

Aws.config[:cloudwatchlogs] = {
  stub_responses: {
    describe_log_groups: {
      log_groups: [
        {
          log_group_name: 'my-cloudwatch-logs-group',
          retention_in_days: 365
        }
      ]
    },
    describe_log_streams: {
      log_streams: [
        {
          log_stream_name: 'my-cloudwatch-logs-stream'
        }
      ]
    },
    describe_metric_filters: {
      metric_filters: [
        {
          filter_name: 'my-cloudwatch-logs-metric-filter'
        }
      ]
    },
    describe_subscription_filters: {
      subscription_filters: [
        {
          filter_name: 'my-cloudwatch-logs-subscription-filter',
          filter_pattern: '[host, ident, authuser, date, request, status, bytes]'
        }
      ]
    }
  }
}

ちなみに、AWS SDK for Ruby では以下の Blog 記事のように標準で Stub が呼べるようになっているとのことです。

ほえー。

Spec

ここでの Spec は awspec を利用する際に書くテストと同じ内容を記載する。

require 'spec_helper'
Awspec::Stub.load 'cloudwatch_logs'

describe cloudwatch_logs('my-cloudwatch-logs-group') do
  it { should exist }
  its(:retention_in_days) { should eq 365 }
  it { should have_log_stream('my-cloudwatch-logs-stream') }
  it { should have_metric_filter('my-cloudwatch-logs-metric-filter') }
  it do
    should have_subscription_filter('my-cloudwatch-logs-subscription-filter')\
      .filter_pattern('[host, ident, authuser, date, request, status, bytes]')
  end
end

但し、Awspec::Stub クラスの load メソッドで Stub を読み込んでいる点だと思います。

Type

Type では実装の Spec ファイルに記述された example の結果を返す処理を記述する部分です。

    def has_log_stream?(stream_name)
      ret = find_cloudwatch_logs_stream(@id).log_stream_name
      return true if ret == stream_name
    end

例えば、上記は example の以下の部分の呼び出しに対応します。

describe cloudwatch_logs('my-cloudwatch-logs-group') do
  it { should have_log_stream('my-cloudwatch-logs-stream') }
end

have_log_stream がマッチャとなり、呼び出されるメソッドは has_log_stream? となります。

Helper

Helper モジュールには AWS SDK クライアントの定義、各 AWS リソースを取得する為のメソッドを定義したりします。

/lib/awspec/helper/finder.rb

  • finder モジュールにて CloudWatch Logs 用のモジュールを include する
  • CloudWatch Logs Client を定義する

lib/awspec/helper/finder/cloudwatch_logs.rb

  • AWS SDK を利用して各種リソースを取得する為のコードを定義する
  • 例えば、以下のように CloudWatch Logs の Log group を取得するメソッドを書いたりする
      def find_cloudwatch_logs_group(id)
        cloudwatch_logs_client.describe_log_groups({ log_group_name_prefix: id }).log_groups.last
      end

ちょっとマッチャ

lib/awspec/matcher/have_subscription_filter.rb

今回、一番テストしたかったのが、CloudWatch Subscription filter のフィルタパターンだったんですが、フィルタパターンをテストするにはマッチャを独自に定義する必要たありました。独自のマッチャを定義するには、以下のように RSpec::Matchers.define を呼び出す必要がありました。

RSpec::Matchers.define :have_subscription_filter do |filter_name|
  match do |log_group_name|
    log_group_name.has_subscription_filter?(filter_name, @pattern)
  end

  chain :filter_pattern do |pattern|
    @pattern = pattern
  end
end

また、lib/awspec/matcher.rb で上記の have_subscription_filter.rb を include してあげる必要があります。

# CloudWatch Logs
require 'awspec/matcher/have_subscription_filter'

そして、以下のように example を記述してフィルタパターンをテストすることが出来ました。

describe cloudwatch_logs('my-cloudwatch-logs-group') do
  it do
    should have_subscription_filter('my-cloudwatch-logs-subscription-filter')\
      .filter_pattern('[host, ident, authuser, date, request, status, bytes]')
  end
end

Document

ちゃんとドキュメントも追加しましょう。

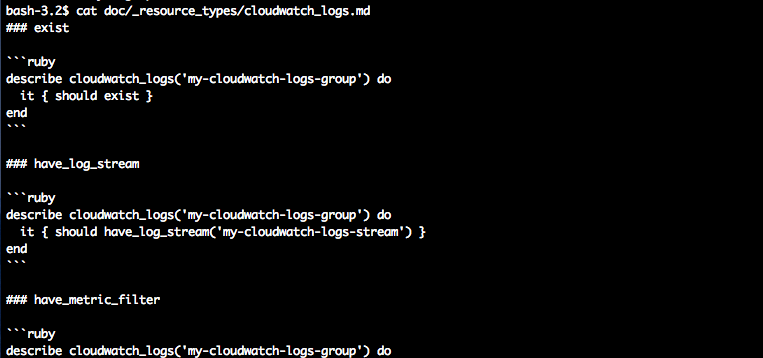
今回はリソースタイプの追加になりますので、doc/_resource_types/cloudwatch_logs.md を以下のように追加しました。

f:id:inokara:20170313095905p:plain

合わせて、自動生成されていた lib/awspec/generator/doc/type/cloudwatch_logs.rb もチェックします。

$ cat lib/awspec/generator/doc/type/cloudwatch_logs.rb
module Awspec::Generator
  module Doc
    module Type
      class CloudwatchLogs < Base
        def initialize
          super
          @type_name = 'CloudwatchLogs'
          @type = Awspec::Type::CloudwatchLogs.new('my-cloudwatch-logs-group')
          @ret = @type.resource_via_client
          @matchers = []
          @ignore_matchers = []
          @describes = []
        end
      end
    end
  end
end

尚、Awspec::Type::CloudwatchLogs.new('my-cloudwatch-logs-group') の引数 my-cloudwatch-logs-group はドキュメントの引数と合わせておく必要があります。

最後に以下のようにドキュメントを書き出します。

$ bundle exec bin/toolbox docgen > doc/resource_types.md

rubocop

ここまで来るとあとはプルリクエストを…と思った貴方、もうひと頑張りが必要です。rubocop という国家権力(国家は余計)と戦う必要があります。

rubocop とはコーディングルールに準拠しているかをチェックしてくれるツールで、この警察権力のチェックを事前に行っておくことで、プルリクエスト後の Travis CI でのテストも乗り切ることが出来るはずです。

bundle exec rake spec:rubocop

以下のように出力されれば無事に釈放です。

bash-3.2$ bundle exec rake spec:rubocop
Running RuboCop...
Inspecting 346 files
..........................................................................................................................................................................................................................................................................................................................................................

346 files inspected, no offenses detected

ということで

ひとまずテストを動かしてみると…

bash-3.2$ bundle exec rake spec:cloudwatch_logs
(略)

cloudwatch_logs 'my-cloudwatch-logs-group'
  should exist
  should have log stream "my-cloudwatch-logs-stream"
  should have metric filter "my-cloudwatch-logs-metric-filter"
  should have subscription filter "my-cloudwatch-logs-subscription-filter"
  retention_in_days
    should eq 365

Finished in 0.0841 seconds (files took 1.45 seconds to load)
5 examples, 0 failures

おお、Stub のレスポンスとなりますが、テストが通りました。

わーい。

拡張し易い awspec

これまで書いてきましたが、awspec は自分のような Ruby 初心者でも比較的簡単に拡張することが出来ました。これは awspec 実装の際に参考にされたとされる Serverspec でも同様のことが言えると思います。本当に作者の方には感謝の言葉しかありません。有難うございます!

ということで、福岡生まれ、世界育ちの awspec を頑張っていこうと思います。

*1:作者の @k1LoW さんが福岡の株式会社 Fusic にお務めです

ショロカレ 1 日目 | 俺の板前修業日記 〜 itamae でユーザーを複数のグループに所属させるメモ 〜

今年も

やって参りました、初老丸アドベントカレンダー。今年は独りぢゃないのが嬉しい。

qiita.com

ということで、小ネタ大ネタを交えて 12/25 まで張り切っていきましょう。

itamae でユーザーを複数のグループに所属させるメモ

親方と見習い

親方:おい、見習い、なんしよーとや

親方:あー、あれだ、そのサーバーにユーザーを作る必要があるくさ、ユーザーは複数のグループに所属する必要があるったい、きーつけろや

見習い:はい、やってみますたい

包丁の準備

itamae の準備

$ mkdir itamae
$ cd itamae
$ cat Gemfile
source "https://rubygems.org"

gem "itamae"
gem "rake"
gem "aws-sdk"
gem "unix-crypt"

後は bundle install するだけったい。

$ bundle install --path vendor/bundle

尚、今回試す itamae のバージョンは以下の通り。最新のバージョンでは未確認ったい。

$ bundle exec itamae version
Itamae v1.9.9

Serverspec の準備

後で Serverspec もするので準備するったい。

$ mkdir serverspec
$ cd serverspec
$ cat Gemfile
# A sample Gemfile
source "https://rubygems.org"

gem "serverspec"
gem "rake"

後は bundle install するだけったい。

$ bundle install --path vendor/bundle

ということで、以下のようなディレクトリ構成にしておく

$ tree . -L 2
.
├── itamae
│   ├── Gemfile
│   ├── Gemfile.lock
│   ├── Rakefile
│   ├── cookbooks
│   ├── roles
│   ├── sandbox.json
│   ├── ssh_config
│   └── vendor
└── serverspec
    ├── Gemfile
    ├── Gemfile.lock
    ├── Rakefile
    ├── properties.yml
    ├── spec
    ├── ssh_config
    └── vendor

ということで、パスワードは SHA512 でハッシュ

SHA512 でハッシュするには mkunixcrypt という Gem があるので、それを利用すれば良かと。

$ cd itamae
$ bundle exec mkunixcrypt -s "sandbox"

実行すると以下のように出力されると。

Enter password:
Verify password:
xxxxxxxxxxxxxxxxxxxxxxxxxxxxxxxxxxxxxxxxxxxxxxxxxxxxxxxxxxxxxxxxxxxxxxxxxxxxxxxxxxxxxxxxxxxxxxxxxxxxxxxxxxxxx #=> SHA512 でハッシュされたパスワード

上記で出力されたハッシュされたパスワード文字列を貼り付けると。

sandbox.json にユーザーを定義

sanbbox.json に作成したいユーザーやユーザー ID 等を以下のように記載したったい。

$ cd itamae
$ cat sandbox.json
{
  "groups": [
    {
      "groupname": "pika",
      "gid": 30000
    },
    {
      "groupname": "hage",
      "gid": 30100
    }
  ],
  "users": [
    {
      "username": "pika",
      "groupname": ["pika", "hage"],
      "uid": 30000,
      "gid": 30000,
      "password": "xxxxxxxxxxxxxxxxxxxxxxxxxxxxxxxxxxxxxxxxxxxxxxxxxxxxxxxxxxxxxxxxxxxxxxxxxxxxxxxxxxxxxxxxxxxxxxxxxxxxxxxx",
      "shell": "/bin/bash"
    },
    {
      "username": "hage",
      "groupname": ["pika"],
      "uid": 30001,
      "gid": 30100,
      "password": "xxxxxxxxxxxxxxxxxxxxxxxxxxxxxxxxxxxxxxxxxxxxxxxxxxxxxxxxxxxxxxxxxxxxxxxxxxxxxxxxxxxxxxxxxxxxxxxxxxxxxxxx",
      "shell": "/bin/bash"
    }
  ]
}

ユーザー作成

以下のようにレシピを書いたったい。

$ cd itamae
$ cat cookbooks/sandbox/default.rb
#
# まずはグループ作成
#
node[:groups].each do |group|
  group "creatae group #{group}" do
    groupname group[:groupname]
    gid group[:gid]
  end
end
#
# 次にユーザー作成
#
node[:users].each do |user|
  user "create user #{user[:username]}" do
    uid user[:uid]
    gid user[:gid]
    username user[:username]
    password user[:password]
    shell user[:shell]
  end

  if user[:groupname].length > 1 then
    user[:groupname].each do |group|
      execute "add #{group}" do
        only_if "id #{user[:username]}"
        not_if "getent group #{group} | grep #{user[:username]}"
        command "usermod #{user[:username]} -aG #{group}"
      end
    end
  end
end

他にも書き方があると思うので、教えてほしかー。

適用

itamae ssh で適用するったい。

まずは --dry-run をするくさ。

$ cd itamae
$ itamae ssh -h sandbox --ssh-config=ssh_config roles/sandbox.rb --node-json sandbox.json --log-level=info --dry-run

以下のように出力されるくさ。

 INFO : Starting Itamae...
 INFO : Loading node data from /path/to/itamae/sandbox.json...
 INFO : Recipe: /path/to/itamae/roles/sandbox.rb
 INFO :   Recipe: /path/to/itamae/cookbooks/sandbox/default.rb
 INFO :     user[create user pika] exist will change from 'false' to 'true'
 INFO :     user[create user hage] exist will change from 'false' to 'true'

そして、本当に適用するくさ。

$ cd itamae
$ itamae ssh -h sandbox --ssh-config=ssh_config roles/sandbox.rb --node-json sandbox.json --log-level=info

以下のように出力されるくさ。

 INFO : Starting Itamae...
 INFO : Loading node data from /path/to/itamae/sandbox.json...
 INFO : Recipe: /path/to/itamae/roles/sandbox.rb
 INFO :   Recipe: /path/to/itamae/cookbooks/sandbox/default.rb
 INFO :     user[create user pika] exist will change from 'false' to 'true'
 INFO :     execute[add hage] executed will change from 'false' to 'true'
 INFO :     user[create user hage] exist will change from 'false' to 'true'

Serverspec

sandbox/default_spec.rb

ユーザーがちゃんと作られているかチェックったい。

$ cd serverspec
$ cat spec/sandbox/default_spec.rb
require "spec_helper"

node_properties = open('../itamae/sandbox.json') do |io|
  JSON.load(io)
end
set_property node_properties

property["groups"].each do |group|
  describe group(group["groupname"]) do
    it { should exist }
    it { should have_gid group["gid"] }
  end
end

property["users"].each do |user|
  describe user(user["username"]) do
    it { should exist }
    it { should have_uid user["uid"].to_i }
    it { should belong_to_group user["groupname"] }
    it { should have_login_shell user["shell"] }
  end

end

itamae で使っている sandbox.json の情報を利用するったい。

チェック

$ cd serverspec
$ SSH_CONFIG_FILE=ssh_config bundle exec rake serverspec:sandbox
(省略)

Group "pika"
  should exist
  should have gid 30000

Group "hage"
  should exist
  should have gid 30100

User "pika"
  should exist
  should have uid 30000
  should belong to group "pika" and "hage"
  should have login shell "/bin/bash"

User "hage"
  should exist
  should have uid 30001
  should belong to group "pika"
  should have login shell "/bin/bash"

Finished in 7.44 seconds (files took 0.97224 seconds to load)
12 examples, 0 failures

いい感じったい。

再び、親方と見習い

見習い:おやかた〜

親方:なんや?

見習い:出来ましたー、hage ユーザーと pika ユーザー、ちゃんと hage ユーザーは hage グループと pika グループに所属させてます

親方:そげん、ハゲ、ピカ言わんと。

以上

メモでした。

Serverspec と Infrataster でテストした Docker コンテナイメージを Jenkins を介して Amazon ECR に push する考察

tl;dr

ニーズがあるかどうか解らないけど...Jenkins を触ってみたくて試してみた。Jenkins の Amazon ECR プラグインとの出会いに身震いした。

参考

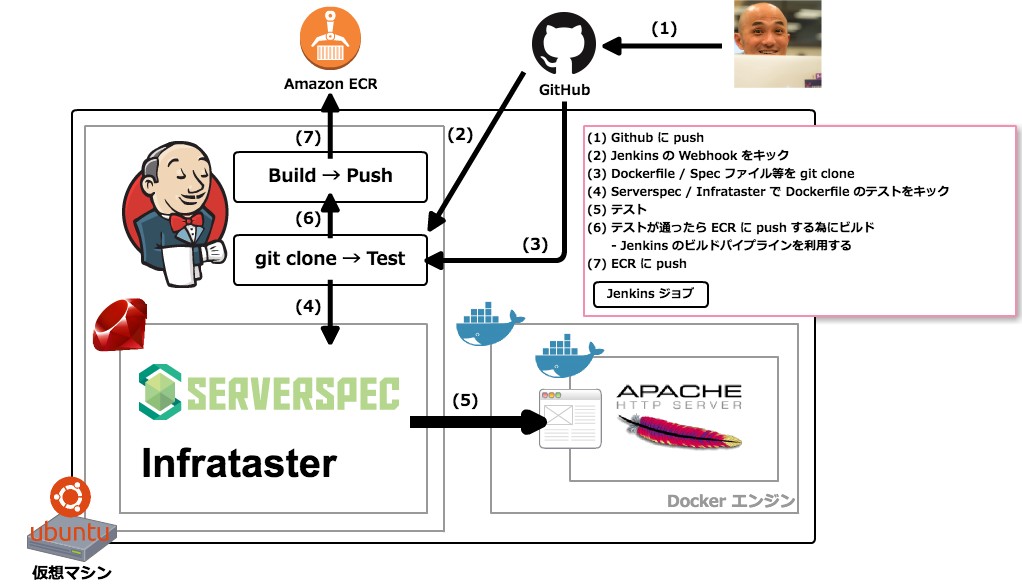
やったことを一枚の絵にすると...

こんな感じ。

f:id:inokara:20160625193046p:plain

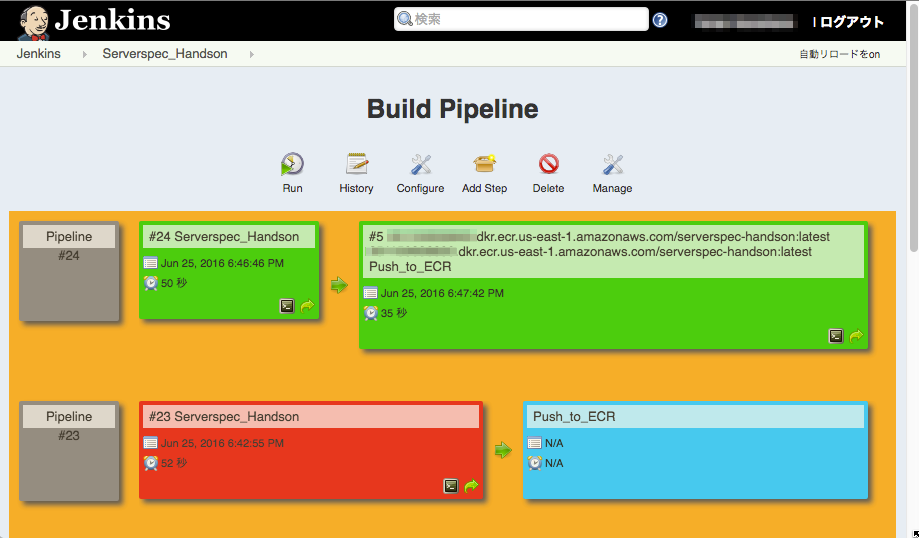
実際に動いている画面

f:id:inokara:20160625193614p:plain

サンプル

github.com

このサンプルでは以下のようなテストを行う。

  • Serverspec の Docker バックエンド(厳密に言えば Specinfra の Docker バックエンド)を利用してコンテナに対して Docker API を介してテスト
  • 合わせて Infrataster と Docker API を利用してコンテナ内に立ち上げた Apache に対して振る舞いのテスト

事前にやったこと

サマリ

  1. Jenkins の導入
  2. Jenkins ユーザーで Docker API を叩けるようにする
  3. 各種 Jenkins プラグインの導入(後述)
  4. GitHub に Jenkins の Jenkins (GitHub plugin) にて URL を設定する(後述)
  5. IAM ユーザーの払い出して Amazon ECR にリポジトリを作成
  6. IAM ユーザーのクレデンシャル情報を Jenkins の「認証情報」に設定
  7. ECR に push するジョブ(ジョブ (2))を作成
  8. ジョブ (2) にリポジトリ作成時に払いだされたレジストリ URL を Jenkins の Amazon ECR 用プラグインに設定する(後述)
  9. Serverspec と Infrataster でコンテナをテストするジョブ(ジョブ (1))を作成(後述)
  10. ジョブ (2)のビルドトリガにジョブ (1) を指定する(後述)
  11. ジョブ (2)の Amazon ECR 用プラグインに Build Context と Dockerfile Path を指定する(後述)
  12. Build Pipeline の View を作成する(後述)

各種 Jenkins プラグインの導入

以下のプラグインを順不同でインストール。(※ 以下のプラグイン以外でも依存関係で関連するプラグインがインストールされる)

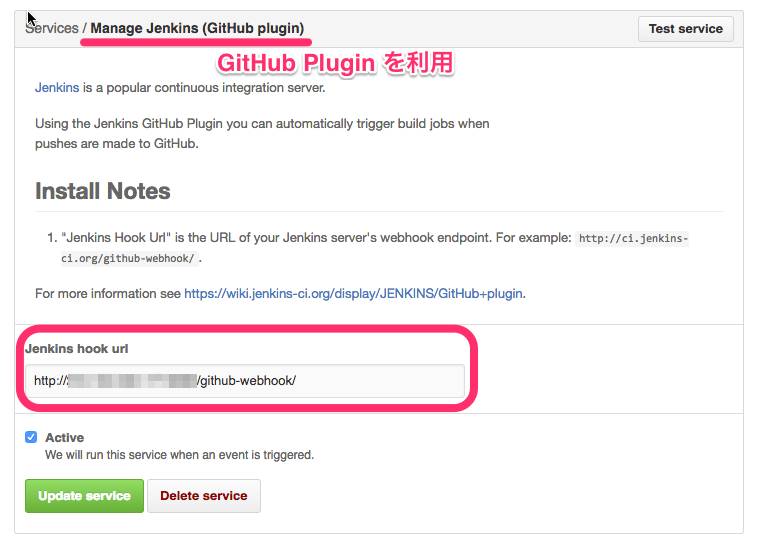
GitHub に Jenkins の Jenkins (GitHub plugin) にて URL を設定する

対象となる GitHub リポジトリの設定で Jenkins (GitHub plugin) を追加して Jenkins の Webhook URL を設定する。

f:id:inokara:20160625195221p:plain

尚、Jenkins の Webhook を設定する際に GitHub 側の IP アドレスを制限したい場合には以下のように API を実行して GitHub 側の IP アドレスを確認することが出来る。(Webhook の接続元は hooks キーの値を利用した)

curl -s https://api.github.com/meta

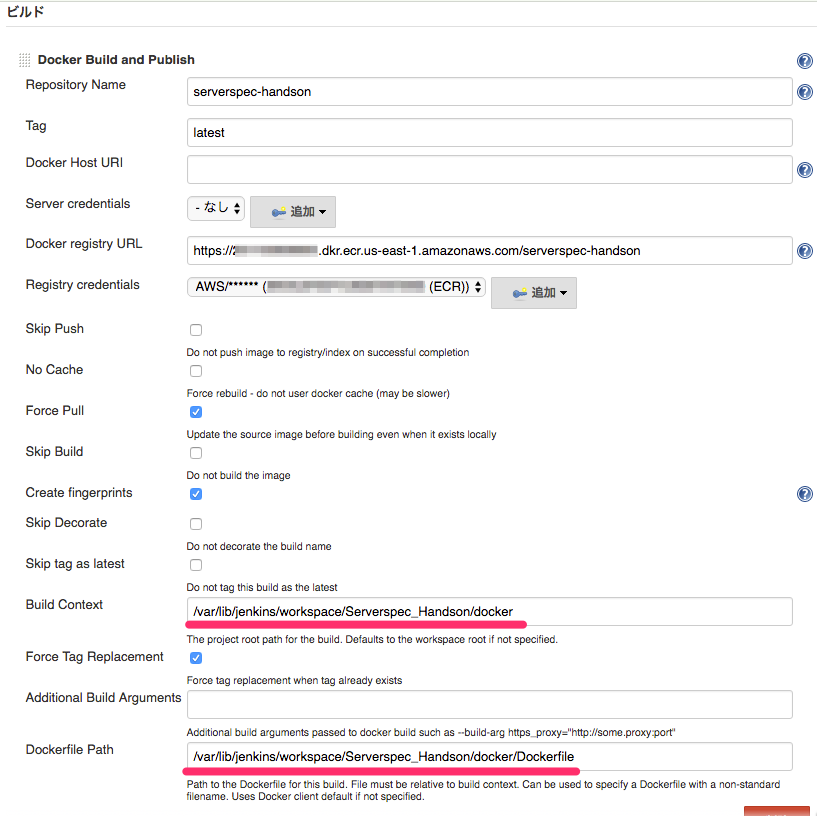
リポジトリ作成時に払いだされたレジストリ URL を Jenkins の Amazon ECR 用プラグインに設定する

ビルドにて Docker Build and Publish を選択すると以下のようにレジストリの情報等を入力出来るようになる。

f:id:inokara:20160625195911p:plain

Registry credentials では 事前に Jenkins の「認証情報」に登録しておいた IAM ユーザーの設定を利用する。

Serverspec と Infrataster でコンテナをテストするジョブ(ジョブ (1))を作成

PATH="/var/lib/jenkins/.rbenv/bin:$PATH"
eval "$(rbenv init -)"
cd /var/lib/jenkins/workspace/$JOB_NAME
bundle install
bundle exec rspec spec/docker_*_spec.rb

ジョブ (2)のビルドトリガにジョブ (1) を指定する

ビルドトリガにて「他のプロジェクトの後にビルド」を選択して、対象プロジェクトからジョブ (1) を選択する。

f:id:inokara:20160625200913p:plain

ジョブ(2)の Amazon ECR 用プラグインに Build Context と Dockerfile Path を指定する

ジョブ (1) の workspace に展開されている Dockerfile を利用してコンテナをビルドしたいので Build Context と Dockerfile Path を下図のように指定する。

f:id:inokara:20160625200925p:plain

Build Pipeline の View を作成する

特に難しいことは無く、Build Pipeline Plugin 導入後に Jenkins のダッシュボードの Job 一覧にある をクリックして作成する。

f:id:inokara:20160625193614p:plain

後は...

手元で Dockerfile を修正、spec ファイルを修正して push すれば Jenkins 先生がテストを走らせて、テストが合格であれば Dockerfile からコンテナイメージをビルドして Amazon ECR に push するという継続的デリバリー的な何かが動き始める。(これを継続的デリバリーと言うのかは解らないけど...)

そして、以下のように Amazon ECR のリポジトリにコンテナイメージが push されている。

f:id:inokara:20160625210720p:plain

また、Slack なんか絡めるとビルドの成功、失敗も以下のように通知してくれてナウい感じなるんぢゃないかと思ったり。

f:id:inokara:20160625203311p:plain

Packer をパカパカしたくて Rakefile を作って Windows Server の AMI を作成して Serverspec でテストするメモ

tl;dr

Windows Server の EC2 AMI を作りたくて Packer を久し振りに触っていたら、テンプレートを修正してビルドして成果物(AMI)を起動して確認するという繰り返しを出来るだけ簡素化したくて Rakefile に落とし込んでみた。(以前に作っていたものを更新した)


作ったもの

github.com

以前に作ったものを AWS SDK v2 で利用出来るようにしたり、Windows Server 対応にしてみた。


memo / demo

簡素化したかったこと

  • packer build を叩く(テンプレートファイルを指定して)
  • 作成されたイメージを利用してインスタンスを起動する
  • 起動したインスタンスの Administrator パスワードを取得する(Windows Server のみ)
  • インスタンスを起動したら、事前に作成しておいた Serverspec の spec ファイルを使ってテスト

使い方は...

  • README を...

Windows Server で AMI 作成、インスタンス起動、Serverspec でテストする demo

  • イメージのビルド
PACKER_TEMPLATE_PATH=~/git/myrepo/packer-windows/template.json rake build

以下のように出力される。

2016/04/03 19:20:24 ui: --> amazon-ebs: AMIs were created:

ap-northeast-1: ami-xxxxxxxx
2016/04/03 19:20:24 waiting for all plugin processes to complete...
--> amazon-ebs: AMIs were created:

ap-northeast-1: ami-xxxxxxxx
2016/04/03 19:20:24 /path/to/bin/packer: plugin process exited

ビルドが終わったらイメージ名 を確認しておく。(イメージ名を固定しておけば確認は不要)

  • config.yml を作成する

以下のように config.yml に作成したイメージ ID を指定する。また、秘密鍵やセキュリティブループ、サブネット等を指定する。

access_key_id: 'AKxxxxxxxxxxxxxxxxxxxxxxxxxx'
secret_access_key: 'xxxxxxxxxxxxxxxxxxxxxxxxxxxxxxxx'
region: 'ap-northeast-1'
user: "username"
key_path: "/path/to/key.pem"
instance_type: "t2.micro"
vpc_subnet: "subnet-xxxxxxxx"
security_group: "sg-xxxxxxxxx"
key_name: "keyname"
tag_name: "tagname"
image_tag_name: "imagename"
user_data_path: "/path/to/userdata.txt"

今のところ userdata は固定。今回のデモでは以下のような userdata を利用する。

<powershell>
tzutil.exe /s "Tokyo Standard Time"
Set-NetConnectionProfile -NetworkCategory Private
</powershell>

以下のようにインスタンスを起動。

rake ec2:launch

#wait_until メソッドインスタンスステータスが Running になるまで待つ。そして、Windows の場合には Administrator パスワードが取得可能な状態になるまで待つ。その場合には以下のように実行することでパスワードが取得可能であるかを確認することが出来る。

rake ec2:getpw

パスワードが取得出来ない場合には以下のように出力される。

password_data empty

体感で 10 分位待てばパスワードが取得可能な状態になる。

尚、インスタンスの情報は確認する必要がない。SSH や RDP でアクセスする必要があれば、マネジメントコンソールや API で確認する。(これも rake コマンドで叩けるようにしておこう)

  • Serverspec を実行する準備

今回は Windows Server が対象になるので、以下のように実行する。

rake genspec:win

実行すると、以下のようにカレントディレクトリの spec/ 以下に spec_helper.rb と対象となるインスタンスのディレクトリが作成され、spec ファイルが作成(コピー)される。

got password
rm -rf ./spec/ec*
Created ./spec//spec_helper.rb
Created ./spec/ec2-xx-xxx-xx-xxx.ap-northeast-1.compute.amazonaws.com/common_spec.rb

ファイル構成は以下の通り。

% tree spec
spec
├── ec2-xx-xxx-xx-xxx.ap-northeast-1.compute.amazonaws.com
│   └── common_spec.rb
└── spec_helper.rb
  • Serverspec 実行
rake spec:ec2-xx-xxx-xx-xxx.ap-northeast-1.compute.amazonaws.com

以下のように出力される。

ExecutionPolicy が RemoteSigned になっている場合...
  Command "powershell -Command "Get-ExecutionPolicy""
    stdout
      should match /RemoteSigned/

NetConnectionProfile が Private になっている場合...
  Command "powershell -Command "Get-NetConnectionProfile | select -First 1 NetworkCategory -ExpandProperty NetworkCategory""
    stdout
      should match /Private/

(略)

Time Zone が Tokyo Standard Time に設定されている場合...
  Command "powershell -Command "tzutil.exe /g""
    stdout
      should match /Tokyo Standard Time/

Finished in 7.4 seconds (files took 2.14 seconds to load)
6 examples, 0 failures

テストが通ったところでメデタシメデタシ。インスタンスを破棄しましょう。

rake ec2:terminate

インスタンス起動時と同様に #wait_until メソッドでターミネートされる状態を待つ。


おわり

  • CI ツールで利用出来ないか妄想中
  • Rakefile は汚いし、Ruby を理解していないので更に汚い
  • AWS SDK v2 は直感的で使い易いと思った

これで Packer を使ってパカパカ出来る!(かも)

Ansible や Serverspec で管理することを前提にした Windows Server 2012 で OS 起動時にスクリプトを実行する方法の考察

tl;dr

Windows Server で OS 起動時にとあるスクリプトを起動させたいと思って、調べたり、教えて頂いたりしたことをメモ。そして、それらを Ansible や Serverspec で管理することを前提として最適な方法を検討してみたい。(試した環境は Windows Server 2012 だけど Windows Server 2012 R2 でもイケるはず)


勘違い

当初は...

f:id:inokara:20160401074547p:plain

上記のように

  • C:\Users\Administrator\AppData\Roaming\Microsoft\Windows\Start Menu\Programs\Startup

に起動したいスクリプトを放り込んでいた。

上記の状態だと、リモートデスクトップでログオンした際にスクリプトが起動した。

f:id:inokara:20160401074608p:plain

OS が起動した際にはスクリプトは起動してくれないという事実に気付いたのはだいぶん後だった。


いや、違う

俺がやりたいのは

OS が起動した時には既に起動していて欲しい。


ということで

ローカルグループポリシーを使う場合

起動したいスクリプトを以下のようにバッチスクリプトにしておく。

python.exe C:\Users\Administrator\Documents\python\o-re-no-service03.py
  • ローカルグループポリシーエディタを起動する

以下のように gpedit.msc と入力してローカルグループポリシーエディタを起動する。

f:id:inokara:20160401075919p:plain

以下のように Computer Configuration をクリックして Scripts(Startup/Shutdown) をクリック、そして Startup をダブルクリックする。

f:id:inokara:20160401080119p:plain

以下のように Startup Properties が開くので Add... をクリックして起動したいバッチスクリプトを選択する。

f:id:inokara:20160401080310p:plain

スクリプトの引数まで指定することが出来るが、今回は特に引数無し。

以下のようにスクリプトが登録されたことを確認する。

f:id:inokara:20160401080438p:plain

スクリプトが登録されると以下のように C:\Windows\System32\GroupPolicy\Machine\Scripts に保存されている隠しファイル(script.ini)に設定が書き込まれる。

f:id:inokara:20160401080811p:plain

中身は以下のような内容となっている。

[Startup]
0CmdLine=C:\Users\Administrator\Documents\python\start.bat
0Parameters=

再起動後、スクリプトを確認する場合には以下のように PowerShell スクリプトで確認するか、タスクマネージャで確認することになる。

PS C:\Users\Administrator> Get-WmiObject Win32_Process -Filter "name = 'python.exe'" | select -First 1 CommandLine -Expa
ndProperty CommandLine
python.exe  C:\Users\Administrator\Documents\python\o-re-no-service03.py

以下のようにタスクマネージャで確認することが出来る。

f:id:inokara:20160401082450p:plain

  • ちょっとした罠

以下のように C:\Windows\System32\GroupPolicy\Machine\Scripts\Startupスクリプトを放り込めば...と思ったけど、このフォルダにスクリプトを放り込んでも OS 起動時ではなく、ログオン時にスクリプトが起動されるので期待した動作にはならない。

f:id:inokara:20160401080738p:plain

タスクスケジューラを利用する場合

  • 同僚 O 氏有難うございますmm

同僚の O 氏の教えて頂いたタスクスケジューラを利用する方法。

  • 構成管理ツールで管理する場合には....

個人的にこちらの方法が Ansible 等で管理する場合には良さそうという結論になった。理由については以下の通り。

- 登録したスタートアップタスクを XML で書き出すことが出来る
- 書きだした XML を PowerShell を使ってインポートすることが出来る
- パラメータは XML を修正することで、ある程度は修正可能
- ローカルグループポリシーエディタで書き出される script.ini を弄るのは怖い、敷居が高い

細かいタスク登録手順については以下の記事が詳しい、美しい。

www.atmarkit.co.jp

ウィザードに従って、タスクトリガーにてコンピュータの起動時を選択する。


Ansible + PowerShell を使って OS 起動時にスクリプトを実行させる例

必ず手動で一度は登録しなければいけない...

以下の通り、登録済みのタスクを Export するところから始める。

f:id:inokara:20160401085053p:plain

Export したタスクは以下のような XML フォーマットになっている。

<?xml version="1.0" encoding="UTF-16"?>
<Task version="1.2" xmlns="http://schemas.microsoft.com/windows/2004/02/mit/task">
  <RegistrationInfo>
    <Date>2016-03-31T23:40:31.1912347</Date>
    <Author>WIN-XXXXXXXXXXX\Administrator</Author>
  </RegistrationInfo>
  <Triggers>
    <BootTrigger>
      <Enabled>true</Enabled>
    </BootTrigger>
  </Triggers>
  <Principals>
    <Principal id="Author">
      <UserId>S-1-5-18</UserId>
      <RunLevel>LeastPrivilege</RunLevel>
    </Principal>
  </Principals>
  <Settings>
    <MultipleInstancesPolicy>IgnoreNew</MultipleInstancesPolicy>
    <DisallowStartIfOnBatteries>true</DisallowStartIfOnBatteries>
    <StopIfGoingOnBatteries>true</StopIfGoingOnBatteries>
    <AllowHardTerminate>true</AllowHardTerminate>
    <StartWhenAvailable>false</StartWhenAvailable>
    <RunOnlyIfNetworkAvailable>false</RunOnlyIfNetworkAvailable>
    <IdleSettings>
      <StopOnIdleEnd>true</StopOnIdleEnd>
      <RestartOnIdle>false</RestartOnIdle>
    </IdleSettings>
    <AllowStartOnDemand>true</AllowStartOnDemand>
    <Enabled>true</Enabled>
    <Hidden>false</Hidden>
    <RunOnlyIfIdle>false</RunOnlyIfIdle>
    <WakeToRun>false</WakeToRun>
    <ExecutionTimeLimit>P3D</ExecutionTimeLimit>
    <Priority>7</Priority>
  </Settings>
  <Actions Context="Author">
    <Exec>
      <Command>C:\Users\Administrator\Documents\python\start.bat</Command>
    </Exec>
  </Actions>
</Task>

PowerShell を利用して XML ファイルをインポートしてタスクを登録する

以下のような PowerShell スクリプトを作成して Export した XML ファイルをインポートしてタスクを登録する。

#
# Import Task
#
$XmlFile = "C:\path\to\" +  $args[0] + ".xml"
$Xml = (get-content $XmlFile | out-string)
Register-ScheduledTask `
  -Xml "$Xml" `
  -TaskName $args[0]

Export した XML ファイルを C:\path\to\ 以下に保存してスクリプトを実行するとタスクが登録される。

PS C:\oreno> .\import-task.ps1 Oreno-Script

TaskPath                                       TaskName                          State
--------                                       --------                          -----
\                                              Oreno-Script                      Ready

念のために確認。

PS C:\oreno> Get-ScheduledTask -TaskName Oreno-Script

TaskPath                                       TaskName                          State
--------                                       --------                          -----
\                                              Oreno-Script                      Ready

Ansible の Script モジュールを利用してタスクを登録する

前のステップで利用したタスクをインポートする PowerShell スクリプトを利用して、以下のような Playbook を作成して Ansible 経由でタスクを登録してみる。

#
# - files/scripts/ 以下のファイルをリモートホストの c:/path/to 以下にコピーする
#
- name: スクリプトファイルをアップロードする
  win_copy: src=scripts/ dest=c:/path/to

#
# - check-task.ps1 で登録済みのタスクをチェック
# - import-task.ps1 で XML ファイルをインポートしてタスクを登録
#
- name: 登録済みタスクが無いかをチェックする
  script: files/check-task.ps1 Oreno-Script
  always_run: yes
  failed_when: no
  changed_when: no
  register: task_info

- name: デバッグ出力
  debug: var=task_info.stdout

- name: PowerShell スクリプトと XML を利用してイベントベースのタスクを登録する
  script: files/import-task.ps1 Oreno-Script
  when: task_info.stdout != "Oreno-Script\r\n"
  register: result_info

- name: デバッグ出力
  debug: var=result_info.stdout

冪等性を出来るだけ担保する為に登録済みタスクをチェックするスクリプトも以下のように用意しておく。

#
# 登録済みのタスクをチェックする
#
Get-ScheduledTask -TaskName $args[0] | select -First 1 TaskName -ExpandProperty TaskName

最終的には以下のようなファイル構成となる。

$ tree roles/oreno-script/
roles/oreno-script/
├── files
│   ├── check-task.ps1
│   ├── import-task.ps1
│   └── xml
│       └── Oreno-Script.xml
└── tasks
    └── main.yml

3 directories, 4 files

Playbook を流してみる

早速、Playbook を流してみる。

$ ansible-playbook -i hosts default.yml

PLAY ***************************************************************************

TASK [oreno-script : スクリプトファイルをアップロードする] ***************************************
ok: [ec2-xx-xxx-xx-xx.ap-northeast-1.compute.amazonaws.com]

TASK [oreno-script : デバッグ出力] ***************************************************
ok: [ec2-xx-xxx-xx-xx.ap-northeast-1.compute.amazonaws.com] => {
    "task_info.stdout": "VARIABLE IS NOT DEFINED!"
}

TASK [oreno-script : 登録済みタスクが無いかをチェックする] ***************************************
ok: [ec2-xx-xxx-xx-xx.ap-northeast-1.compute.amazonaws.com]

TASK [oreno-script : デバッグ出力] ***************************************************
ok: [ec2-xx-xxx-xx-xx.ap-northeast-1.compute.amazonaws.com] => {    "task_info.stdout": ""
}

TASK [oreno-script : PowerShell スクリプトと XML を利用してイベントベースのタスクを登録する] **************
changed: [ec2-xx-xxx-xx-xx.ap-northeast-1.compute.amazonaws.com]

TASK [oreno-script : デバッグ出力] ***************************************************
ok: [ec2-xx-xxx-xx-xx.ap-northeast-1.compute.amazonaws.com] => {
    "result_info.stdout": "\r\nTaskPath                                       TaskName                        \r\n--------                                       --------                        \r\n\\                                              Oreno-Script                    \r\n\r\n\r\n"
}

PLAY RECAP *********************************************************************
ec2-xx-xxx-xx-xx.ap-northeast-1.compute.amazonaws.com : ok=6    changed=1    unreachable=0    failed=0   

流し終わったら、OS を再起動する。

登録されたことを確認する...Serverspec で

以下のようにテストを書く。

require 'spec_helper'

context "自動起動スクリプトがタスクスケジューラに登録、有効になっている場合..." do
  describe command("powershell -Command \"Get-ScheduledTask -TaskName 'Oreno-Script' | select -First 1 TaskName -ExpandProperty TaskName\"") do
    its(:stdout) { should match /Oreno-Script/ }
  end

  describe command("powershell -Command \"Get-ScheduledTask -TaskName 'Oreno-Script' | select -First 1 State -ExpandProperty State\"") do
    its(:stdout) { should match /Running/ }
  end
end

context "スクリプトが正常に起動している場合..." do
  describe process("python.exe") do
    it { should be_running }
    its(:CommandLine) { should match /o-re-no-service03.py/ }
  end
end

テストを走らすと以下のように。

$ bundle exec rake serverspec:ec2-xx-xxx-xx-xx
/home/vagrant/.rbenv/versions/2.2.3/bin/ruby -I/home/vagrant/git/sample-ansible-win/vendor/bundle/ruby/2.2.0/gems/rspec-core-3.4.1/lib:/home/vagrant/git/sample-ansible-win/vendor/bundle/ruby/2.2.0/gems/rspec-support-3.4.1/lib /home/vagrant/git/sample-ansible-win/vendor/bundle/ruby/2.2.0/gems/rspec-core-3.4.1/exe/rspec --pattern spec/\{oreno-script\}/\*_spec.rb

自動起動スクリプトがタスクスケジューラに登録、有効になっている場合...
  Command "powershell -Command "Get-ScheduledTask -TaskName 'Oreno-Script' | select -First 1 TaskName -ExpandProperty TaskName""
    stdout
      should match /Oreno-Script/
  Command "powershell -Command "Get-ScheduledTask -TaskName 'Oreno-Script' | select -First 1 State -ExpandProperty State""
    stdout
      should match /Running/

スクリプトが正常に起動している場合...
  Process "python.exe"
    should be running
    CommandLine
      should match /o-re-no-service03.py/

Finished in 7.77 seconds (files took 0.67635 seconds to load)
4 examples, 0 failures

おけけ。


考察

OS 起動時にスクリプトを実行する方法

  • ローカルグループポリシーを使う(実行したいスクリプトを登録する)
  • タスクマネージャを使う(XML をインポートする)

構成管理ツールで手軽に管理出来そうなのは

タスクマネージャを使うパターンが良さそう。理由としては、繰り返しになるけど以下の通り。

  • 登録したスタートアップタスクを XML で書き出すことが出来る
  • 書きだした XMLPowerShell を使ってインポートすることが出来る
  • パラメータは XML を修正することで、ある程度は修正可能
  • タスクスケジューラのコンソールから Status が確認出来る(実行している場合には Running となる)
  • ローカルグループポリシーエディタで書き出される script.ini を弄るのは怖い、敷居が高い

以上。

Serverspec on Windows の process リソースの使い方メモ

tl;dr

Windows 上で起動しているプロセスを Serverspec でテストする際に調べたので自分メモ。


参考

github.com

serverspec.org

github.com


メモ

やりたかったこと

  • 対象の Windows ホスト上で自分で作った Python スクリプトが引数も含めて正常に動いているかについてチェックしたかった

オレオレスクリプト

以下のようにオレオレスクリプトを起動する。

PS C:\path\to\scripts> start python.exe .\o-re-no-service02.py

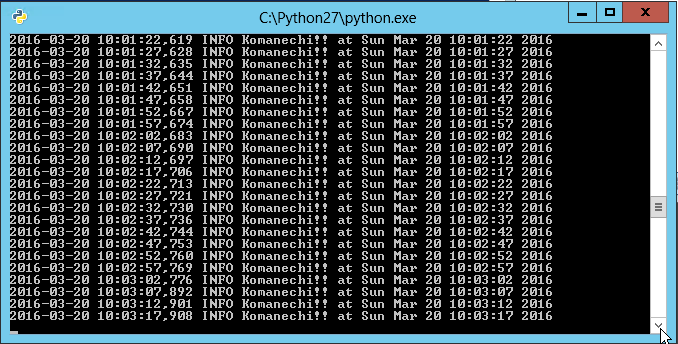
実行すると以下のようにコマンドプロンプトが立ち上がって、その中でスクリプトが起動する。

f:id:inokara:20160320190357p:plain

Serverspec on Windows ではどんな風にプロセスの情報を取得しているのか(超ザックリと)

こちらのドキュメントに書かれているように、Serverspec の command については全て PowerShell スクリプトを実行するようになっているので、プロセスの情報を取得する場合には以下のようなスクリプトが実行される(Cmdlet が実行される)。

例えば...

describe process("python.exe") do
  it { should be_running }
end

というテストがある場合には、Serverspec の process.rb から以下のメソッドが呼ばれる。

    def running?
      pid = @runner.get_process(@name, :format => "pid=").stdout
      not pid.empty?
    end

次に Specinfra の process.rb 内の以下のメソッドが呼ばる。

    def get(process, opts)
      column = opts[:format].chomp '='

      case column
      when 'pid'
        # map 'pid' to its windows equivalent
        get_process_property(process, 'processid')
      when 'user'
        %Q!gwmi win32_process -filter "name = '#{process}'" | select -first 1 | %{$_.getowner().user}!
      when 'group'
        # no concept of process group on Windows
        raise NotImplementedError.new('Unable to get process group on Windows')
      else
        get_process_property(process, column)
      end
    end

そして、マッチャが should be_running の場合には、opts[:format] には pid が指定されているので、同じ process.rb 内の以下の private メソッドget_process_property(process, processid) で呼び出す。

    def get_process_property(process, property)
      %Q!Get-WmiObject Win32_Process -Filter "name = '#{process}'" | select -First 1 #{property} -ExpandProperty #{property}!
    end

試しに上記のメソッド内で実行される PowerShell スクリプトを実行してみる。

PS C:\path\to\scripts> Get-WmiObject Win32_Process -Filter "name = 'python.exe'" | select -First 1 processid -ExpandProperty processid

以下のようにプロセス ID が返ってくる。

PS C:\path\to\scripts> Get-WmiObject Win32_Process -Filter "name = 'python.exe'" | select -First 1 processid -ExpandProperty processid
764

ということで...

引数も含めてプロセスが起動していることを確認したい場合にどうするか。

先ほどの PowerShell スクリプトをもう一度実行してみる。但し、以下のように絞込は行わず、全てのプロパティを出力してみる。

PS C:\path\to\scripts> Get-WmiObject Win32_Process -Filter "name = 'python.exe'" | select -First 1

以下のように出力される。

__GENUS                    : 2
__CLASS                    : Win32_Process
__SUPERCLASS               : CIM_Process
__DYNASTY                  : CIM_ManagedSystemElement
__RELPATH                  : Win32_Process.Handle="764"
__PROPERTY_COUNT           : 45
__DERIVATION               : {CIM_Process, CIM_LogicalElement, CIM_ManagedSystemElement}
__SERVER                   : WIN-LLA3FAS3UBE
__NAMESPACE                : root\cimv2
__PATH                     : \\WIN-LLA3FAS3UBE\root\cimv2:Win32_Process.Handle="764"
Caption                    : python.exe
CommandLine                : "C:\Python27\python.exe" .\o-re-no-service02.py
CreationClassName          : Win32_Process
CreationDate               : 20160320094741.949928+000
CSCreationClassName        : Win32_ComputerSystem
CSName                     : WIN-LLA3FAS3UBE
Description                : python.exe
ExecutablePath             : C:\Python27\python.exe
ExecutionState             :
Handle                     : 764
HandleCount                : 68
InstallDate                :
KernelModeTime             : 156001
MaximumWorkingSetSize      : 1380
MinimumWorkingSetSize      : 200
Name                       : python.exe
OSCreationClassName        : Win32_OperatingSystem
OSName                     : Microsoft Windows Server 2012 Standard|C:\Windows|\Device\Harddisk0\Partition2
OtherOperationCount        : 2233
OtherTransferCount         : 36862
PageFaults                 : 1731
PageFileUsage              : 3292
ParentProcessId            : 1032
PeakPageFileUsage          : 3292
PeakVirtualSize            : 68542464
PeakWorkingSetSize         : 6712
Priority                   : 8
PrivatePageCount           : 3371008
ProcessId                  : 764
QuotaNonPagedPoolUsage     : 7
QuotaPagedPoolUsage        : 124
QuotaPeakNonPagedPoolUsage : 7
QuotaPeakPagedPoolUsage    : 124
ReadOperationCount         : 118
ReadTransferCount          : 493182
SessionId                  : 2
Status                     :
TerminationDate            :
ThreadCount                : 1
UserModeTime               : 624004
VirtualSize                : 68542464
WindowsVersion             : 6.2.9200
WorkingSetSize             : 6873088
WriteOperationCount        : 1797
WriteTransferCount         : 83834
PSComputerName             : WIN-LLA3FAS3UBE
ProcessName                : python.exe
Handles                    : 68
VM                         : 68542464
WS                         : 6873088
Path                       : C:\Python27\python.exe

上記を見ると、CommandLine というプロパティにスクリプトを実行した際の引数も出力されているので、この CommandLine を利用すれば良さそうということで、以下のようにテストを書いた。

describe process("python.exe") do
  it { should be_running }
  its(:CommandLine) { should match /o-re-no-service02.py/ }
end

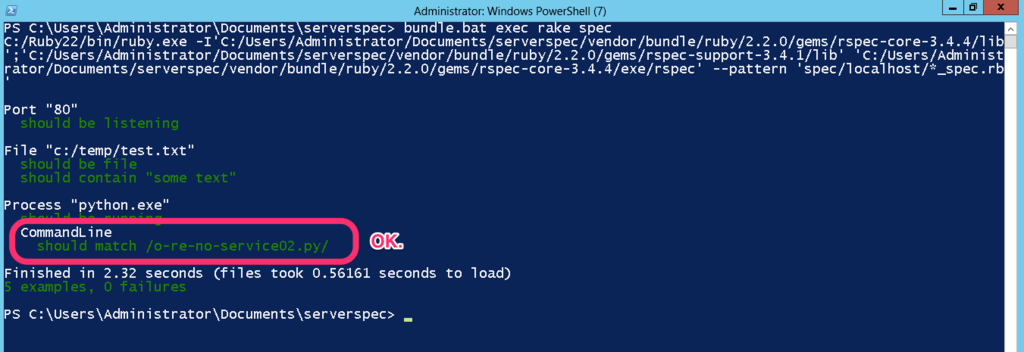
そして、テスト

以下のようにテストは無事に通った。

f:id:inokara:20160320194736p:plain

良かった。


ということで

process リソースについては

Cmdlet の Get-WmiObject Win32_Process を利用していることが解ったので、必要に応じて Get-WmiObject Win32_Process の出力結果からチェックしたいプロパティをピックアップしてテストを書けば良いと思う。

以上

メモでした! 間違ってたらごめんなさい!

Ansible で Windows Server の構成管理(2)~ IIS を Ansible でセットアップしてから Serverspec と Infrataster で一通りテストしてみる~

tl;dr

当然、前回の続きということでシリーズ化。

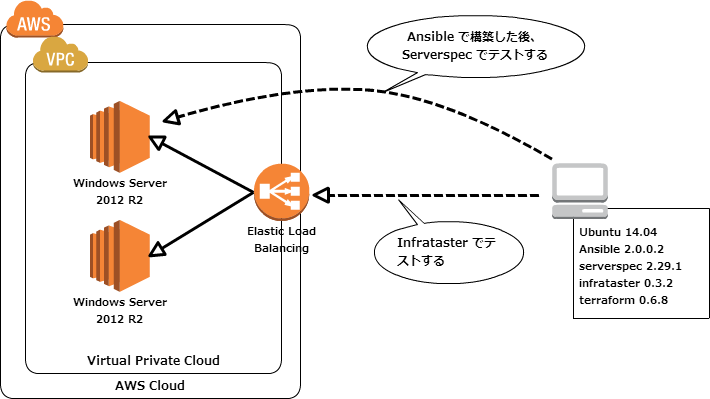
今回は以下の環境で引き続き進める。

f:id:inokara:20160125010302p:plain

ELB を追加、ELB のバックエンドに EC2 を 2 台という構成。(AWS 環境の構築には Terraform を利用するが、利用方法等については割愛)


参考


IIS を Ansible でセットアップしてみる

教材

github.com

モジュール

IIS をセットアップするには Ansible の以下のモジュールを利用する。

Windows 向けのモジュールが多数用意されているので、そこそこの事は Ansible で出来るんだなと独りで納得。

Playbook

特に難しいことは無く、win_feature に記載されたサンプルをそのまま写経。

$ cat roles/iis/tasks/main.yml
- name: Install IIS
  win_feature:
    name: "Web-Server"
    state: present
    restart: yes
    include_sub_features: yes
    include_management_tools: yes

roles 配下におく。

$ tree --charset=x .
.
|-- default.yml
|-- hosts
`-- roles
    `-- iis
        `-- tasks
            `-- main.yml

3 directories, 3 files

適用

Playbook を適用してみる。

#
# チェック
#
$ ansible-playbook -i hosts default.yml --check

PLAY ***************************************************************************

TASK [iis : Install IIS] *******************************************************
skipping: [ec2-xx-xx-xxx-xx.ap-northeast-1.compute.amazonaws.com]

PLAY RECAP *********************************************************************
ec2-xx-xx-xxx-xx.ap-northeast-1.compute.amazonaws.com : ok=0    changed=0    unreachable=0    failed=0

#
# 適用
#
$ ansible-playbook -i hosts default.yml

PLAY ***************************************************************************

TASK [iis : Install IIS] *******************************************************
changed: [ec2-xx-xx-xxx-xx.ap-northeast-1.compute.amazonaws.com]

PLAY RECAP *********************************************************************
ec2-xx-xx-xxx-xx.ap-northeast-1.compute.amazonaws.com : ok=1    changed=1    unreachable=0    failed=0

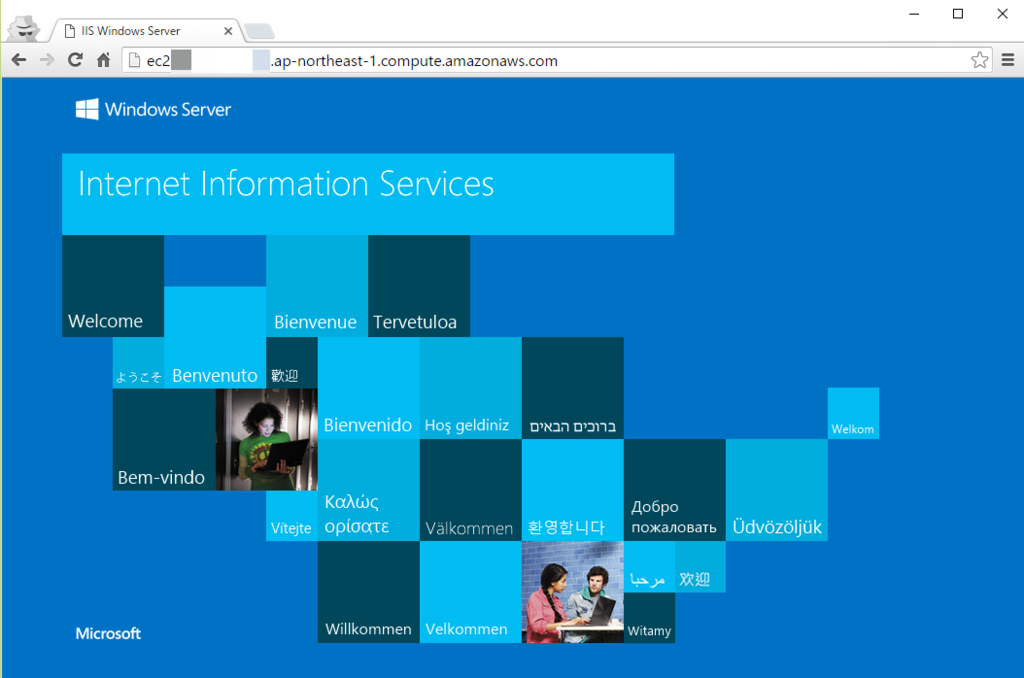
ひとまず確認

f:id:inokara:20160124183807p:plain

おお。


Serverspec で確認する

目視での確認をソコソコに...

今回のように一台セットアップ後の確認は手動で目視も悪くないと思うけど、2 台以上確認が必要であれば Serverspec を使いたい。また、Web サイトをユーザーアクセスを想定したアクセスで確認したい場合には Infrataster を使いたいということで、Serverspec で IIS が動いていることを確認しつつ、Infrataster を使って Web サイトが表示されていることを確認する。

引き続き教材は

github.com

Serverspec のセットアップ

以下のように serverspec-init を実行して Serverspec を使えるようにセットアップする。

$ pwd
~/sample-ansible-win$

$ bundle install --path vendor/bundle
$ bundle exec serverspec-init
Select OS type:

  1) UN*X
  2) Windows

Select number: 2

Select a backend type:

  1) WinRM
  2) Cmd (local)

Select number: 1

Input target host name: iis
 + spec/
 + spec/iis/
 + spec/iis/sample_spec.rb
 + spec/spec_helper.rb
 + Rakefile
 + .rspec

$ ls -ltr
total 20
-rw-rw-r-- 1 vagrant vagrant  186 Jan 24 17:54 hosts
drwxrwxr-x 3 vagrant vagrant 4096 Jan 24 18:19 roles
-rw-rw-r-- 1 vagrant vagrant   54 Jan 24 18:26 default.yml
drwxrwxr-x 3 vagrant vagrant 4096 Jan 24 18:45 spec
-rw-rw-r-- 1 vagrant vagrant  685 Jan 24 18:45 Rakefile

Serverspec はロール単位でテストを行いたいので、Advanced Tips を参考にして以下のように Rakefile を書き換える。

require 'rake'
require 'rspec/core/rake_task'
require 'yaml'

properties = YAML.load_file('properties.yml')

desc "Run serverspec to all hosts"
task :spec => 'serverspec:all'

namespace :serverspec do
  task :all => properties.keys.map {|key| 'serverspec:' + key.split('.')[0] }
  properties.keys.each do |key|
    desc "Run serverspec to #{key}"
    RSpec::Core::RakeTask.new(key.split('.')[0].to_sym) do |t|
      ENV['TARGET_HOST'] = key
      ENV['USERNAME'] = properties[key][:username]
      ENV['PASSWORD'] = properties[key][:password]
      t.pattern = 'spec/{' + properties[key][:roles].join(',') + '}/*_spec.rb'
    end
  end
end

更に Infrataster のテストも行いたいので、こちらの記事を参考にさせて頂いて spec/spec_helper.rb を以下のように書き換える。

require 'serverspec'
require 'winrm'
require 'infrataster/rspec'
require 'yaml'

set :backend, :winrm

properties = YAML.load_file('properties.yml')

host = ENV['TARGET_HOST']
set_property properties[host]

Infrataster::Server.define(properties[host][:name], host)

user = ENV['USERNAME']
pass = ENV['PASSWORD']
endpoint = "http://#{ENV['TARGET_HOST']}:5985/wsman"

winrm = ::WinRM::WinRMWebService.new(endpoint, :ssl, :user => user, :pass => pass, :basic_auth_only => true)
winrm.set_timeout 300 # 5 minutes max timeout for any operation
Specinfra.configuration.winrm = winrm

テスト対象となるホストや ELB のエンドポイントの情報(ホスト名、ロール名等)を properties.yml に持たせておいて、set_property properties[host]host をキーにして各種情報を後述の各テストファイルで利用することが出来る。こちらも Advanced Tips に掲載されている。

Windows Server に対して Serverspec でテスト出来るようにする

こちらの記事を参考にさせて頂いて、PowerShell を使って以下を実行する。

# Refer to http://opcdiary.net/?p=29576
#
# PowerShellで外部スクリプトを実行可能にする
Set-ExecutionPolicy -ExecutionPolicy "RemoteSigned" -Force
Get-ExecutionPolicy

# リモートアクセスを有効にする
Enable-PSRemoting -Force

# タイムアウト設定
Set-Item -Path "WSMan:\localhost\MaxTimeoutms" 1800000
Get-Item -Path "WSMan:\localhost\MaxTimeoutms"

# 暗号化されていない接続を許可
Set-Item -Path "WSMan:\localhost\Service\AllowUnencrypted" "true"
Get-Item -Path "WSMan:\localhost\Service\AllowUnencrypted"

# Basic認証を許可
Set-Item -Path "WSMan:\localhost\Service\Auth\Basic" "true"
Get-Item -Path "WSMan:\localhost\Service\Auth\Basic"

各パラメータが何を意味しているのかは後ほどちゃんと調べたい。

テストを書く

以下のようなディレクトリ構成となる。

$ tree --charset=x spec
spec
|-- iis
|   `-- iis_spec.rb
|-- spec_helper.rb
`-- web
    `-- web_spec.rb

2 directories, 3 files

iis/iis_spec.rb は以下のように。

$ cat spec/iis/iis_spec.rb
require 'spec_helper'

describe port(80) do
  it { should be_listening }
end

describe iis_website('Default Web Site') do
  it{ should exist }
end

describe iis_website('Default Web Site') do
  it{ should be_enabled }
end

describe iis_website('Default Web Site') do
  it{ should be_running }
end

web/web_spec.rb は以下のように。

$ cat spec/web/web_spec.rb
require 'spec_helper'

describe server(property[:name]) do
  describe http('http://' + ENV['TARGET_HOST']) do
    it "responds as 'text/html'" do
      expect(response.headers['content-type']).to match(%r{^text/html})
    end
    it "responds as '200'" do
      expect(response.status).to be 200
    end
  end
end

こちらのテストは Infrataster で実行されるテストとなる。

テスト対象の設定

以下のようにテストの対象となるホスト、ELB のエンドポイントを properties.yml に書く。

$ cat properties.yml.sample
ec2-xx-xx-xx-x1.ap-northeast-1.compute.amazonaws.com:
  :username: 'User'
  :password: 'xxxxxxxxxxxxxxxxxxx'
  :name: :web01
  :roles:
    - iis
    - web

ec2-xx-xx-xx-x1.ap-northeast-1.compute.amazonaws.com:
  :username: 'User'
  :password: 'xxxxxxxxxxxxxxxxxxx'
  :name: :web02
  :roles:
    - iis
    - web

iis-elb-xxxxxxxxxxxxxxxxxxx.ap-northeast-1.elb.amazonaws.com:
  :name: :app
  :roles:
    - web

テストの実行

以下のようにテストを実行する。

#
# タスクの確認
#
$ bundle exec rake -T
rake serverspec:ec2-xx-xx-xx-x1               # Run serverspec to ec2-xx-xx-xx-x1.ap-northeast-1.compute.amazonaws.com
rake serverspec:ec2-xx-xx-xx-x2               # Run serverspec to ec2-xx-xx-xx-x2.ap-northeast-1.compute.amazonaws.com
rake serverspec:iis-elb-xxxxxxxxxxxxxxxxxxx   # Run serverspec to iis-elb-xxxxxxxxxxxxxxxxxxx.ap-northeast-1.elb.amazonaws.co
rake spec                                     # Run serverspec to all hosts

#
# テストの実行
#
$ bundle exec rake spec

(snip)

Port "80"
 WARN  WinRM::WinRMWebService : WinRM::WinRMWebService#run_powershell_script is deprecated. Use WinRM::CommandExecutor#run_powershell_script instead
  should be listening

IIS Website "Default Web Site"
 WARN  WinRM::WinRMWebService : WinRM::WinRMWebService#run_powershell_script is deprecated. Use WinRM::CommandExecutor#run_powershell_script instead
  should exist

(snip)

server 'web02'
  http 'http://ec2-xx-xx-xx-x2.ap-northeast-1.compute.amazonaws.com' with {:params=>{}, :method=>:get, :headers=>{}}
    responds as 'text/html'
    responds as '200'

Finished in 5.32 seconds (files took 0.63342 seconds to load)
6 examples, 0 failures

(snip)

server 'app'
  http 'http://iis-elb-xxxxxxxxxxxxxxxxxx.ap-northeast-1.elb.amazonaws.com' with {:params=>{}, :method=>:get, :headers=>{}}
    responds as 'text/html'
    responds as '200'

Finished in 0.20204 seconds (files took 0.63369 seconds to load)
2 examples, 0 failures

WARN WinRM::WinRMWebService : WinRM::WinRMWebService#run_powershell_script is deprecated. Use WinRM::CommandExecutor#run_powershell_script instead のワーニングが気になる(後で調べる)ところではあるがテストが何とか通った。


以上

todo

  • Ansible や Serverspec 等(Chef も含む)を Windows に適用する際の WinRM 回りの設定について整理する
  • WARN WinRM::WinRMWebService : WinRM::WinRMWebService#run_powershell_script is deprecated. Use WinRM::CommandExecutor#run_powershell_script instead のワーニングについて調べる

ひとまず

  1. Windows Server を Ansible で構成管理出来るようにする
  2. Ansible で IIS をセットアップしてみる
  3. セットアップアップした内容を Serverspec でテストする

1 ~ 3 までは出来た気がするので引き続き 4 の「EC2 の起動も Ansible で管理する」をやってみたい。

以上。

Serverspec に送ったプルリクエストをマージして頂けたのがとても嬉しかったのでメモ

Serverspec に小さな機能追加のプルリクエストを送ったらマージして頂いてとても嬉しかったので、自分なりに機能追加のポイント等を整理したことをメモる。内容に誤り等あれば適宜アップデートしていく。

プルリクエスト

github.com

以前にプルリクエストを送った際には色々と不勉強な点がありマージまでは至らなかったが、今回はなんとかマージして頂くところまで辿りつけて感動もひとしお。これもひとえに作者の mizzy さんやコントリビューターの方々の努力があって拡張し易い実装になっていること大きいと考えている。本当に感謝、有難うございます。


経緯

ギョームでネットワーク・インターフェースの MTU を変更する Ansible Playbook を書いて、当然テストは Serverspec でやるでしょって思っていたら MTU 値が interface リソースタイプのオプションとして定義されていなかった。当初は以下のように command リソースを利用して /sys/class/net/eth0/mtucat して値を取ればいいかなと思って見て見ぬふりをしていたが、今年の目標の一つである 「OSS への貢献」にうってつけの案件だと思い夕飯を食べた後、すぐに実装に取り掛かった。

describe command('cat /sys/class/net/eth1/mtu') do
  its(:stdout) { should match /1500/ }
end

ちなみに、実際の実行結果は以下のようになる。

#
# Interface を確認
#
$ ifconfig eth0
eth0      Link encap:Ethernet  HWaddr 08:00:27:7d:bc:c9
          inet addr:10.0.2.15  Bcast:10.0.2.255  Mask:255.255.255.0
          inet6 addr: fe80::a00:27ff:fe7d:bcc9/64 Scope:Link
          UP BROADCAST RUNNING MULTICAST  MTU:1500  Metric:1
          RX packets:4661315 errors:0 dropped:0 overruns:0 frame:0
          TX packets:3849991 errors:0 dropped:0 overruns:0 carrier:0
          collisions:0 txqueuelen:1000
          RX bytes:1943853709 (1.9 GB)  TX bytes:1154680993 (1.1 GB)

#
# example
#
$ cat spec/localhost/sample_spec.rb
require 'spec_helper'

describe interface('eth0') do
  its(:mtu) { should eq 1500 }
end

#
# テスト実行
#
$ rake
(snip)

Interface "eth0"
  mtu
    should eq 1500

Finished in 0.07793 seconds (files took 0.4603 seconds to load)
1 example, 0 failures

実装

Serverspc と Specinfra

Serverspec にリソースタイプの追加を実装するにあたって、Specinfra の存在を抜きにして語ることは出来ないということを今回の実装で感じた。尚 Serverspec と Specinfra についての詳細はそれぞれ以下のリンクが詳しいので割愛。

serverspec.org

github.com

ということで、Serverspec と Specinfra はざっくりと以下のような関係となる。

f:id:inokara:20160110230128p:plain

(出典:書籍 Serverspec 第四章 4.1 Serverspec のアーキテクチャ 図 4-2 を模写)

今回は Linux を対象にネットワーク・インターフェースの MTU 値を取得してテストを行う為、Specinfa 及び Serverspec の両方に対して以下のような追加実装を行った。尚、リソースタイプの追加に関しては書籍 Serverspec の第四章 4.5 Serverspec のリソースタイプの拡張が参考になる。

Specinfra への追加実装

specinfra/lib/specinfra/command/linux/base/interface.rb に以下を追加。

(snip)

    def get_mtu_of(name)
      "cat /sys/class/net/#{name}/mtu"
    end

(snip)

元々、ネットワークインターフェースの speed の値を取得するメソッドが存在したので、それを参考にさせて頂いて MTU 値を取得するようにコマンドを実装、メソッド名を修正した。

Serverspec への追加実装

serverspec/lib/serverspec/type/interface.rb に以下を追加。

(snip)

    def mtu
      ret = @runner.get_interface_mtu_of(@name)
      val_to_integer(ret)
    end

(snip)

クラス変数の @runner 自体は serverspec/lib/serverspec/type/base.rb にて以下のように Specinfra の Runner クラスが定義されていることが解る。

(snip)

    def initialize(name=nil, options = {})
      @name    = name
      @options = options
      @runner  = Specinfra::Runner
    end
    
(snip)

また、Serverspec 側から Specinfra のコマンドを呼び出す場合のメソッド名は以下のような規則で呼び出しているようなので...

アクション_リソースタイプ_サブアクション

今回の場合には Specinfra 側で定義したメソッド名は get_mtu_of となり、リソースタイプは interface となるので以下のようなメソッド名で Specinfra の command インターフェースを呼び出す。

get_interface_mtu_of

尚、上記は書籍 Serverspec の第四章 4.3.3 コマンド取得の仕組みに記載されている。

ということで、今回の実装を先ほどの図に重ねると以下のようになる。

f:id:inokara:20160110231104p:plain


デバッグ方法 tips

テスト→実装→テストのサイクル

実装にあたってデバッグは以下のように行った。

  1. 実装してみる
  2. rake build でそれぞれの gem をビルド
  3. rake install:local でそれぞれの gem をインストール
  4. テストを流す
  5. テストを確認

尚、書籍 Serverspec の 4.5.1 Serverspec 側の拡張には「最初にテストコードを書きます」とあるので、今後はテストコードを書くことから始めたいと思う...。

テスト

Serverspec と Specinfra それぞれのテストは以下のように書いた。これも、既存のテストコードの模倣。

  • Specinfra のテスト
describe get_command(:get_interface_mtu_of, 'eth0') do
  it { should eq "cat /sys/class/net/eth0/mtu" }
end

上記の get_command というメソッドは spec_helper.rb に以下のように定義されている。

module GetCommand
  def get_command(method, *args)
    Specinfra.command.get(method, *args)
  end
end
  • Serverspec のテスト
describe interface('eth0') do
  let(:stdout) { '1500' }
  its(:mtu) { should eq 1500 }
end

describe interface('invalid-interface') do
  let(:stdout) { '9001' }
  its(:mtu) { should_not eq 1500 }
end

最後に

拡張し易い

まだまだ序の口であることは否めないが Serverspec と Specinfra は拡張し易い作りになっていることを実感出来た気がする。

次は

  • Serverspec と Specinfra の内部実装を引き続き勉強する
  • 他の OS で mtu をチェックする実装を追加
  • リソースタイプ追加

ということで

マージして頂いて本当にうれしかったです。基本的には書籍 Serverspec 第四章を熟読することで Serverspec の詳細を理解して拡張することも出来るようになると思うので、是非、手にとって頂いて読むことをお薦めしたい。

(ショロカレアップデート) Amazon Managed Policy をコンテナインスタンスに付与しておく方が色々と幸せになれたので追記します

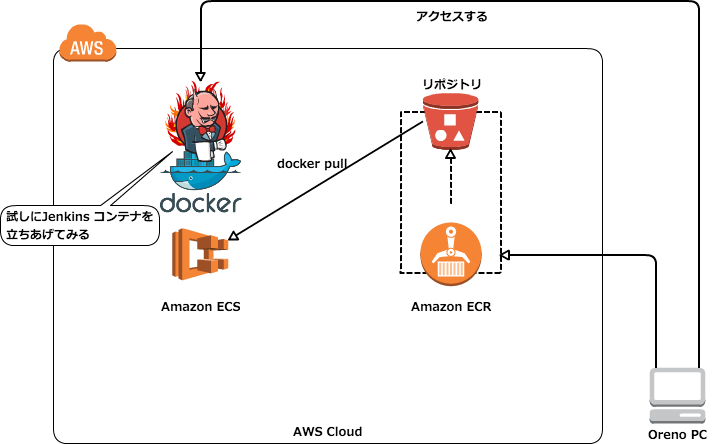
この記事はショロカレで書いた記事の中で検証した内容を再構成してお送り致します。

tl;dr

inokara.hateblo.jp

の中で ECS のコンテナインスタンスに付ける IAM role ポリシーの JSON を以下のように terraform 内で直接記載していた。

# 
# Create IAM role Policy
#
resource "aws_iam_role_policy" "ecs_iam_role" {
    name = "ecs_iam_role"
    role = "${aws_iam_role.ecs_iam_role.id}"
    policy = <<EOF
{
  "Version": "2012-10-17",
  "Statement": [
    {
      "Action": [
         "ecs:RegisterContainerInstance",
         "ecs:DeregisterContainerInstance",
         "ecs:DiscoverPollEndpoint",
         "ecs:Submit*",
         "ecs:Poll",
         "ecs:StartTask",
         "ecs:StartTelemetrySession"
      ],
      "Effect": "Allow",
      "Resource": "*"
    },
    {
       "Effect": "Allow",
       "Action": [
           "ecr:BatchCheckLayerAvailability",
           "ecr:BatchGetImage",
           "ecr:GetDownloadUrlForLayer",
           "ecr:GetAuthorizationToken"
       ],
       "Resource": "*"
     }
  ]
}
EOF
}

記事を読んで下さった @riywo さんから以下のような助言を頂いたので、Amazon Managed Policy を付与する方法に変えて試してみることにした。

IAM Policyですが、TerraformにInlineで直書きするよりも、AWS Managed PolicyをRoleにattachしておいた方が、今回の様なサービス側での変更に自動で追従できるので便利だと思います。

@riywo さん、本当に有難うございます!


メモ

引き続き、教材は...

github.com

を使う。

構成も terraform 一発で...

f:id:inokara:20151223024101p:plain

が出来る。

まずは Amazon Managed Policy とは

マネジメントコンソールを日本語表示していると「管理ポリシー」という名前になっているので、一瞬だけ「?」となってしまったが、 Amazon Managed Policy とは...

docs.aws.amazon.com

上記のドキュメントを拝借すると以下のように書かれている。

AWS 管理ポリシーは、多くの一般的ユースケースでアクセス権限を提供できるように設計されています。たとえば、管理者用(すべてのアクセス)、パワーユーザー用(IAM を除くすべてのアクセス)、および AWS サービスへのその他のさまざまなレベルアクセス用の一般的なアクセス権限を定義する AWS 管理ポリシーが用意されています。AWS 管理ポリシーでは、ポリシーを自身で記述する場合よりも適切なアクセス権限をユーザー、グループ、およびロールにより簡単に割り当てられます。

ざっくりで恐縮だが、「AWS 側でアクセスレベルに応じていい感じで見繕ったポリシー集」という認識。そして、Amazon Managed Policy の特徴として...

AWS 管理ポリシーで定義したアクセス権限は変更できません。AWS により、AWS 管理ポリシーで定義されたアクセス権限は不定期に更新されます。

上記のように AWS 側で新しいサービスや機能が追加されるとポリシーも更新されるという点。例えば、今回の ECR が利用出来るようになった時点で、元々は ECS のみのポリシーしかアタッチされていなかった Managed Policy に対して、ECR の各種リソースにアクセス出来るポリシーが追加されたりするということである。

具体的な例だと...

  • AmazonEC2ContainerServiceforEC2Role

上記のポリシーは従来は以下のようなポリシーとなっていた。

{
  "Version": "2012-10-17",
  "Statement": [
    {
      "Effect": "Allow",
      "Action": [
        "ecs:CreateCluster",
        "ecs:DeregisterContainerInstance",
        "ecs:DiscoverPollEndpoint",
        "ecs:Poll",
        "ecs:RegisterContainerInstance",
        "ecs:StartTelemetrySession",
        "ecs:Submit*"
      ],
      "Resource": "*"
    }
  ]
}

が、ECR が利用出来るようになってからは以下のように更新されている。

{
  "Version": "2012-10-17",
  "Statement": [
    {
      "Effect": "Allow",
      "Action": [
        "ecs:CreateCluster",
        "ecs:DeregisterContainerInstance",
        "ecs:DiscoverPollEndpoint",
        "ecs:Poll",
        "ecs:RegisterContainerInstance",
        "ecs:StartTelemetrySession",
        "ecs:Submit*",
        "ecr:GetAuthorizationToken",
        "ecr:BatchCheckLayerAvailability",
        "ecr:GetDownloadUrlForLayer",
        "ecr:BatchGetImage"
      ],
      "Resource": "*"
    }
  ]
}

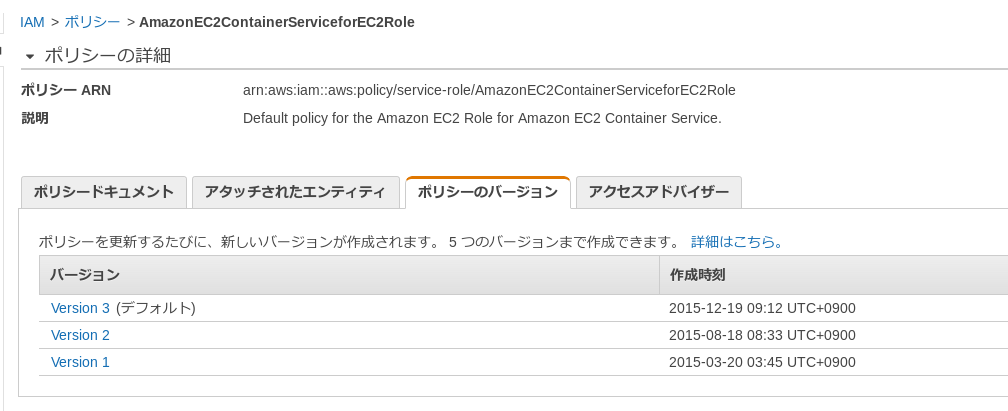
この変更の履歴については各ポリシーの「ポリシーのバージョン」で確認することが出来る。(この「ポリシーのバージョン」についても @riywo さんに教えて頂いた。感謝!)

f:id:inokara:20151225084651p:plain

Version 3 が最新で上述のように ECR に関するポリシーが追加されていることになる。

ということで...terraform のテンプレートを書き換える

terraform のテンプレートを以下のように書き換えて apply してみた。

$ cat iam.tf 
#
# Create IAM Instance Profile
#
resource "aws_iam_instance_profile" "ecs_iam_role" {
    name = "ecs_iam_role"
    roles = ["${aws_iam_role.ecs_iam_role.name}"]
}

#
# Create IAM role
#
resource "aws_iam_role" "ecs_iam_role" {
    name = "ecs_iam_role"
    assume_role_policy = <<EOF
{
  "Version": "2012-10-17",
  "Statement": [
    {
      "Action": "sts:AssumeRole",
      "Principal": {
        "Service": "ec2.amazonaws.com"
      },
      "Effect": "Allow",
      "Sid": ""
    }
  ]
}
EOF
}

#
# Attach Managed Policy
#
resource "aws_iam_policy_attachment" "ecs-role-attach" {
    name = "ecs-role-attach"
    roles = ["${aws_iam_role.ecs_iam_role.name}"]
    policy_arn = "arn:aws:iam::aws:policy/service-role/AmazonEC2ContainerServiceforEC2Role"
}

aws_iam_policy_attachment というリソースを使うことで、Managed Policy を IAM role に付与することが出来た。

apply

以下のように terraform apply を実行する。

$ make tf-apply

(snip)

Outputs:

  EC2 IP address   = xx.xxx.xx.xxx
  EC2 Instance ID  = i-xxxxxxx
  ECS Cluster Name = oreno-cluster

既に ECR に push 済みのイメージを利用している。

確認

$ aws ecs list-clusters
{
    "clusterArns": [
        "arn:aws:ecs:us-east-1:xxxxxxxxxxxxxxx:cluster/oreno-cluster"
    ]
}
  • task-definition
$ aws ecs describe-task-definition --task-definition sample01
{
    "taskDefinition": {
        "status": "ACTIVE", 
        "family": "sample01", 
        "volumes": [], 
        "taskDefinitionArn": "arn:aws:ecs:us-east-1:xxxxxxxxxxxxxxxx:task-definition/sample01:5", 
        "containerDefinitions": [
            {
                "environment": [], 
                "name": "oreno-jenkins", 
                "mountPoints": [], 
                "image": "xxxxxxxxxxxxxxxxxx.dkr.ecr.us-east-1.amazonaws.com/oreno-docker-repo", 
                "cpu": 0, 
                "portMappings": [
                    {
                        "protocol": "tcp", 
                        "containerPort": 8080, 
                        "hostPort": 8080
                    }
                ], 
                "command": [], 
                "memory": 256, 
                "essential": true, 
                "volumesFrom": []
            }
        ], 
        "revision": 5
    }
}
  • コンテナイメージを Serverspec で
$ rake spec:ecs
/usr/local/bin/ruby -I/usr/local/lib/ruby/gems/2.1.0/gems/rspec-support-3.3.0/lib:/usr/local/lib/ruby/gems/2.1.0/gems/rspec-core-3.3.2/lib /usr/local/lib/ruby/gems/2.1.0/gems/rspec-core-3.3.2/exe/rspec --pattern spec/ecs/\*_spec.rb

Docker image "xxxxxxxxxxxxxxxxxxxxx.dkr.ecr.us-east-1.amazonaws.com/oreno-docker-repo"
  should exist

Finished in 9.79 seconds (files took 0.63187 seconds to load)
1 example, 0 failures
  • 実際に Jenkins コンテナにアクセスする
$ curl -s xx.xxx.xx.xx:8080/api/json | jq .
{
  "views": [
    {
      "url": "http://xx.xxx.xx.xx:8080/",
      "name": "All"
    }
  ],
  "useSecurity": false,
  "useCrumbs": false,
  "unlabeledLoad": {},
  "slaveAgentPort": 0,
  "quietingDown": false,
  "primaryView": {
    "url": "http://xx.xxx.xx.xx:8080/",
    "name": "All"
  },
  "assignedLabels": [
    {}
  ],
  "mode": "NORMAL",
  "nodeDescription": "the master Jenkins node",
  "nodeName": "",
  "numExecutors": 2,
  "description": null,
  "jobs": [],
  "overallLoad": {}
}

OK!


以上

Managed Policy

を使うことで terraform テンプレートを簡潔に書くことが出来るようになったのと、今後の機能追加等にも自動で追随出来るようになって管理のコストも抑えられそう!

まだまだ

勉強が必要な初老丸でした!