ようへいの日々精進XP

よかろうもん

来年の isucon で泣かずに予選を終える為のメモ(1)

tl;dr

isucon6 予選は何も出来ずに涙を飲んだので、来年は少しでも手を動かせるように過去問を触りながら isucon の雰囲気に慣れていきたい。

isucon6 予選の反省点

  • どの言語でとか等のチーム方針が明確では無かった
  • チーム方針が明確では無かったので当然役割分担も不明瞭だった
  • 過去問に触れずに挑んだ為、何をすれば良いのか全く解らなかった
  • 各種解析ツールの存在、使い方に慣れていなかった(そもそも使ったことが無かった)
  • データベースに関する知識、経験がほぼ 0 だった為、データベースのチューニングには全く手を付けることが出来なかった

ということで、今回は過去問を起動するところから、解析ツールを仕込むところまでやってみる。

過去問や解析ツールのメモ

Apache / Nginx アクセスログの解析

MySQL スローログの解析

アプリケーションの解析

過去問 matsuu さんに感謝

isucon2 から isucon5 まで用意されており、各過去問が vagrant 一発で起動させることが出来る。

isucon5 の予選で利用された問題を展開する例

$ git clone https://github.com/matsuu/vagrant-isucon.git
$ cd isucon5-qualifier-standalone
vagrant up

ブラウザでアクセスしたい場合には Vagrantfile を以下のように修正する。

$ diff -u Vagrantfile.original Vagrantfile
--- Vagrantfile.original        2016-09-25 11:35:04.349082426 +0900
+++ Vagrantfile 2016-09-24 21:27:00.276552570 +0900
@@ -28,7 +28,7 @@
 
   # Create a private network, which allows host-only access to the machine
   # using a specific IP.
-  # config.vm.network "private_network", ip: "192.168.33.10"
+  config.vm.network "private_network", ip: "192.168.33.10"
 
   # Create a public network, which generally matched to bridged network.
   # Bridged networks make the machine appear as another physical device on

ボクがログインしたらやれそうなこと...

これだったら出来そう

  • Nginx ログの解析
  • MySQL SlowLog 取得の設定
  • アプリケーション解析の設定

Nginx ログの解析

  • alp を使う場合に Nginx のアクセスログフォーマットを ltsv 形式に設定する
http {

  log_format ltsv "time:$time_local"
                  "\thost:$remote_addr"
                  "\tforwardedfor:$http_x_forwarded_for"
                  "\treq:$request"
                  "\tstatus:$status"
                  "\tmethod:$request_method"
                  "\turi:$request_uri"
                  "\tsize:$body_bytes_sent"
                  "\treferer:$http_referer"
                  "\tua:$http_user_agent"
                  "\treqtime:$request_time"
                  "\tcache:$upstream_http_x_cache"
                  "\truntime:$upstream_http_x_runtime"
                  "\tapptime:$upstream_response_time"
                  "\tvhost:$host";

  access_log  /var/log/nginx/access.log  ltsv;

  upstream app {
    server 127.0.0.1:8080;
  }

  server {
    location / {
      proxy_set_header Host $host;
      proxy_pass http://app;
    }
  }
}
  • alp でログ解析
$ sudo cat /var/log/nginx/access.log | ./alp -r | less
+-------+-------+-------+---------+-------+-------+-------+-------+--------+-----------+------------+-------------+-----------+--------+------------------------------------+
| COUNT |  MIN  |  MAX  |   SUM   |  AVG  |  P1   |  P50  |  P99  | STDDEV | MIN(BODY) | MAX(BODY)  |  SUM(BODY)  | AVG(BODY) | METHOD |                URI                 |
+-------+-------+-------+---------+-------+-------+-------+-------+--------+-----------+------------+-------------+-----------+--------+------------------------------------+
|   207 | 0.001 | 2.669 | 225.738 | 1.091 | 0.001 | 1.012 | 2.548 |  0.612 | 16285.000 |  16791.000 | 2966944.000 | 14333.063 | GET    | /                                  |
|     3 | 0.654 | 2.499 |   3.875 | 1.292 | 0.654 | 0.654 | 0.722 |  0.854 |  3476.000 |   3747.000 |   10970.000 |  3656.667 | GET    | /diary/entry/489651                |
|     9 | 0.013 | 2.292 |   3.258 | 0.362 | 0.013 | 0.025 | 0.588 |  0.704 | 53984.000 |  61469.000 |  530916.000 | 58990.667 | GET    | /diary/entries/verlie_crooks151

(snip)

MySQL SlowLog 取得の設定

  • my.cnf に設定を追加
[mysqld]

(snip)

slow_query_log                = 1
slow_query_log_file           = /var/log/mysql/mysqld-slow.log
long_query_time               = 0
log-queries-not-using-indexes = 
  • pt-query-digest で解析
$ sudo pt-query-digest /var/log/mysql/mysqld-slow.log

# 1.3s user time, 0 system time, 28.45M rss, 85.27M vsz
# Current date: Sun Sep 25 11:54:50 2016
# Hostname: vagrant
# Files: /var/log/mysql/mysqld-slow.log
# Overall: 7.45k total, 27 unique, 2.45 QPS, 0.00x concurrency ___________
# Time range: 2016-09-25 08:22:49 to 09:13:31
# Attribute          total     min     max     avg     95%  stddev  median
# ============     ======= ======= ======= ======= ======= ======= =======
# Exec time             3s     3us   204ms   432us   247us     6ms   113us
# Lock time          238ms       0     2ms    31us    44us    38us    27us
# Rows sent         21.36k       0    1000    2.94    0.99   40.61    0.99
# Rows examine       5.71M       0 488.50k  804.05    0.99  19.01k       0
# Query size       817.88k      11     226  112.42  112.70   19.13  112.70

# Profile
# Rank Query ID           Response time Calls R/Call V/M   Item
# ==== ================== ============= ===== ====== ===== ===============
#    1 0xDE6DD0309F9386F8  1.0643 33.1%     6 0.1774  0.00 SELECT relations
#    2 0xD44150558D8295E1  0.9162 28.5%  6942 0.0001  0.00 SELECT relations
#    3 0x492C7CAB538DE80D  0.8483 26.3%     6 0.1414  0.00 SELECT footprints
#    4 0x064A5B2042FC8316  0.2127  6.6%     7 0.0304  0.01 SELECT entries
#    5 0xCE3E456E0D0EFD1C  0.0584  1.8%     6 0.0097  0.01 SELECT comments entries
# MISC 0xMISC              0.1200  3.7%   483 0.0002   0.0 <22 ITEMS>

# Query 1: 0.00 QPS, 0.00x concurrency, ID 0xDE6DD0309F9386F8 at byte 317533
# Scores: V/M = 0.00
# Time range: 2016-09-25 08:23:03 to 09:13:31
# Attribute    pct   total     min     max     avg     95%  stddev  median
# ============ === ======= ======= ======= ======= ======= ======= =======
# Count          0       6
# Exec time     33      1s   168ms   204ms   177ms   198ms    13ms   163ms
# Lock time      0   176us    28us    32us    29us    31us     1us    28us
# Rows sent      5   1.24k     212     212     212     212       0     212
# Rows examine  49   2.83M 483.53k 483.53k 483.53k 483.53k       0 483.53k
# Query size     0     522      87      87      87      87       0      87
# String:
# Databases    isucon5q
# Hosts        localhost
# Users        root
# Query_time distribution
#   1us
#  10us
# 100us
#   1ms
#  10ms
# 100ms  ################################################################
#    1s
#  10s+
# Tables
#    SHOW TABLE STATUS FROM `isucon5q` LIKE 'relations'\G
#    SHOW CREATE TABLE `isucon5q`.`relations`\G
# EXPLAIN /*!50100 PARTITIONS*/
SELECT * FROM relations WHERE one = '3657' OR another = '3657' ORDER BY created_at DESC\G

(snip)

アプリケーション解析の設定

  • rack-lineprof を仕込む(事前に bundle install しておく)
$ diff -u app.rb.original app.rb
--- app.rb.original     2016-09-25 11:59:24.195894782 +0900
+++ app.rb      2016-09-25 12:00:10.071619573 +0900
@@ -4,6 +4,7 @@
 require 'tilt/erubis'
 require 'erubis'
 require 'rack-lineprof'
+require 'profiler'
 
 module Isucon5
   class AuthenticationError < StandardError; end
@@ -18,6 +19,7 @@
 end
 
 class Isucon5::WebApp < Sinatra::Base
+  use Rack::Lineprof
   use Rack::Session::Cookie
   set :erb, escape_html: true
   set :public_folder, File.expand_path('../../static', __FILE__)
  • アプリケーションにアクセス

ブラウザで 192.168.33.10/?lineprof=app.rb にアクセスする。

$ sudo journalctl -f

(snip)

 925 12:04:18 vagrant bundle[5117]:               .......
 925 12:04:18 vagrant bundle[5117]:                |  189        entry[:title] = entry[:body].split(/\n/).first
 925 12:04:18 vagrant bundle[5117]:                |  190        entries_of_friends << entry
 9月 25 12:04:18 vagrant bundle[5117]:    2.9ms     3 |  191        break if entries_of_friends.size >= 10
 9月 25 12:04:18 vagrant bundle[5117]:                |  192      end
 9月 25 12:04:18 vagrant bundle[5117]:                |  193
 9月 25 12:04:18 vagrant bundle[5117]:  151.4ms  1587 |  194      comments_of_friends = []
 9月 25 12:04:18 vagrant bundle[5117]:  114.7ms   528 |  195      db.query('SELECT * FROM comments ORDER BY created_at DESC LIMIT 1000').each do |comment|
 9月 25 12:04:18 vagrant bundle[5117]:    0.4ms    20 |  196        next unless is_friend?(comment[:user_id])
 9月 25 12:04:18 vagrant bundle[5117]:                |  197        entry = db.xquery('SELECT * FROM entries WHERE id = ?', comment[:entry_id]).first
 9月 25 12:04:18 vagrant bundle[5117]:                |  198        entry[:is_private] = (entry[:private] == 1)
 9月 25 12:04:18 vagrant bundle[5117]:               .......
 9月 25 12:04:18 vagrant bundle[5117]:                |  200        comments_of_friends << comment
 9月 25 12:04:18 vagrant bundle[5117]:                |  201        break if comments_of_friends.size >= 10
 9月 25 12:04:18 vagrant bundle[5117]:  151.8ms  1884 |  202      end
 9月 25 12:04:18 vagrant bundle[5117]:  128.2ms   627 |  203
 9月 25 12:04:18 vagrant bundle[5117]:    2.4ms    84 |  204      friends_query = 'SELECT * FROM relations WHERE one = ? OR another = ? ORDER BY created_at DESC'
 9月 25 12:04:18 vagrant bundle[5117]:                |  205      friends_map = {}
 9月 25 12:04:18 vagrant bundle[5117]:    0.4ms     2 |  206      db.xquery(friends_query, current_user[:id], current_user[:id]).each do |rel|
 9月 25 12:04:18 vagrant bundle[5117]:                |  207        key = (rel[:one] == current_user[:id] ? :another : :one)
 9月 25 12:04:18 vagrant bundle[5117]:                |  208        friends_map[rel[key]] ||= rel[:created_at]
 9月 25 12:04:18 vagrant bundle[5117]:               .......
 9月 25 12:04:18 vagrant bundle[5117]:                |  211
 9月 25 12:04:18 vagrant bundle[5117]:                |  212      query = <<SQL
 9月 25 12:04:18 vagrant bundle[5117]:  170.6ms   641 |  213  SELECT user_id, owner_id, DATE(created_at) AS date, MAX(created_at) AS updated
 9月 25 12:04:18 vagrant bundle[5117]:                |  214  FROM footprints
 9月 25 12:04:18 vagrant bundle[5117]:                |  215  WHERE user_id = ?
 9月 25 12:04:18 vagrant bundle[5117]:               .......

(snip)

上記のように行ごとに処理に要した時間が出力される。

ひとまず

解析する為の仕込みは出来た。ただ、これらから何を読み取って、どこを改善していくか...ここからが本当の isucon なんだと思う。

Nginx の rewrite を使ったリダイレクトで URL に #(アンカーリンク)が付いていたらどうなるの?

追記

以下、同僚のぐっさんに教えて頂いたので追記。

tl;dr

http://xxx.xxx.xx.xxx/index.html#foo のようなリンクを http://xxx.xxx.xx.xxx/maintenance.html にリダイレクトさせた場合に、#foo ってどうなのかなと思って調べてみた。

出来れば、リダイレクト先では #foo を削除出来たら嬉しい。

memo

試した環境

bash-3.2$ sw_vers
ProductName:    Mac OS X
ProductVersion: 10.11.6
BuildVersion:   15G31

bash-3.2$ docker-machine -version
docker-machine version 0.6.0, build e27fb87

bash-3.2$ docker exec -t -i nginx nginx -v
nginx version: nginx/1.11.3

結論

  • リダイレクト先にも # はくっついてくる

雑な Nginx 設定

server {

    listen 80;
    server_name example.org;
    charset utf-8;

    location / {
        root   html;
        index  index.html index.htm;
        rewrite /index.html /maintenance.html permanent;
    }
}

Dockerfile は以下のように用意。

FROM nginx:alpine
RUN rm /etc/nginx/conf.d/default.conf
RUN mkdir /etc/nginx/html
ADD maintenance.html /etc/nginx/html/
ADD index.html /etc/nginx/html/
ADD demo.conf /etc/nginx/conf.d/

各コンテンツ。

bash-3.2$ cat index.html
index.html
bash-3.2$ cat maintenance.html
maintenance.html

以下のようにコンテナを起動。

docker run --name=nginx -d -p 80:80 inokappa/nginx-demo

curl で試す

bash-3.2$ curl -vL 'http://xxx.xxx.xx.xxx/index.html#foo'
*   Trying xxx.xxx.xx.xxx...
* Connected to xxx.xxx.xx.xxx (xxx.xxx.xx.xxx) port 80 (#0)
> GET /index.html HTTP/1.1
> Host: xxx.xxx.xx.xxx
> User-Agent: curl/7.43.0
> Accept: */*
>
< HTTP/1.1 301 Moved Permanently
< Server: nginx/1.11.3
< Date: Tue, 20 Sep 2016 13:59:40 GMT
< Content-Type: text/html
< Content-Length: 185
< Location: http://xxx.xxx.xx.xxx/maintenance.html
< Connection: keep-alive
<
* Ignoring the response-body
* Connection #0 to host xxx.xxx.xx.xxx left intact
* Issue another request to this URL: 'http://xxx.xxx.xx.xxx/maintenance.html'
* Found bundle for host xxx.xxx.xx.xxx: 0x7fed63d10e70
* Re-using existing connection! (#0) with host xxx.xxx.xx.xxx
* Connected to xxx.xxx.xx.xxx (xxx.xxx.xx.xxx) port 80 (#0)
> GET /maintenance.html HTTP/1.1
> Host: xxx.xxx.xx.xxx
> User-Agent: curl/7.43.0
> Accept: */*
>
< HTTP/1.1 200 OK
< Server: nginx/1.11.3
< Date: Tue, 20 Sep 2016 13:59:40 GMT
< Content-Type: text/html; charset=utf-8
< Content-Length: 17
< Last-Modified: Tue, 20 Sep 2016 07:12:24 GMT
< Connection: keep-alive
< ETag: "57e0e158-11"
< Accept-Ranges: bytes
<
maintenance.html
* Connection #0 to host xxx.xxx.xx.xxx left intact

よく見ると...

< Location: http://192.168.99.100/maintenance.html

Response ヘッダの Location は http://192.168.99.100/maintenance.html で返ってきているのでなんか期待できそうだ。

ブラウザで見る

f:id:inokara:20160920230716p:plain

それ、リダイレクト。

f:id:inokara:20160920230729p:plain

うおお、#foo が付いたままや。

アクセスログ見てみる

とりあえず、アクセスログを見てみる。

# curl でアクセスした場合
xxx.xxx.xx.x - - [20/Sep/2016:13:59:40 +0000] "GET /index.html HTTP/1.1" 301 185 "-" "curl/7.43.0" "-"
xxx.xxx.xx.x - - [20/Sep/2016:13:59:40 +0000] "GET /maintenance.html HTTP/1.1" 200 17 "-" "curl/7.43.0" "-"

# ブラウザでアクセスした場合
xxx.xxx.xx.x - - [20/Sep/2016:14:03:49 +0000] "GET /index.html HTTP/1.1" 301 185 "-" "Mozilla/5.0 (Macintosh; Intel Mac OS X 10_11_6) AppleWebKit/537.36 (KHTML, like Gecko) Chrome/53.0.2785.116 Safari/537.36" "-"
xxx.xxx.xx.x - - [20/Sep/2016:14:03:49 +0000] "GET /maintenance.html HTTP/1.1" 200 17 "-" "Mozilla/5.0 (Macintosh; Intel Mac OS X 10_11_6) AppleWebKit/537.36 (KHTML, like Gecko) Chrome/53.0.2785.116 Safari/537.36" "-"

あら、ログには #foo はくっついてきてませんがな。イメージとしてクエリパラメータ(?foo=bar)と同じような内容を想定していたけど。ちなみに、クエリパラメータをくっつけた場合には以下のようなログが記録される。

# curl でアクセスした場合
xxx.xxx.xx.x - - [20/Sep/2016:14:11:34 +0000] "GET /index.html?foo=bar HTTP/1.1" 301 185 "-" "curl/7.43.0" "-"
xxx.xxx.xx.x - - [20/Sep/2016:14:11:34 +0000] "GET /maintenance.html?foo=bar HTTP/1.1" 200 17 "-" "curl/7.43.0" "-"

# ブラウザでアクセスした場合
xxx.xxx.xx.x - - [20/Sep/2016:14:12:10 +0000] "GET /index.html?foo=bar HTTP/1.1" 301 185 "-" "Mozilla/5.0 (Macintosh; Intel Mac OS X 10_11_6) AppleWebKit/537.36 (KHTML, like Gecko) Chrome/53.0.2785.116 Safari/537.36" "-"
xxx.xxx.xx.x - - [20/Sep/2016:14:12:10 +0000] "GET /maintenance.html?foo=bar HTTP/1.1" 200 17 "-" "Mozilla/5.0 (Macintosh; Intel Mac OS X 10_11_6) AppleWebKit/537.36 (KHTML, like Gecko) Chrome/53.0.2785.116 Safari/537.36" "-"

ちゃんとクエリパラメータがログに記録されている。これであればサーバーサイドでパラメータを削除したり、書き換えたりすることができそう。ちなみに、クエリパラメータを削除したい場合には以下のような設定を書くことでクエリパラメータを削除した状態でリダイレクトされる。

server {

    listen 80;
    server_name example.org;
    charset utf-8;

    location / {
        root   html;
        index  index.html index.htm;
        rewrite /index.html /maintenance.html? permanent;
    }
}

ということで

アンカーリンクは...

リダイレクト先にも引き継がれてしまう。

なんで?

アンカーリンクでサーバーサイドというよりもブラウザで解釈されるものだからかなと。

誤り等あればご指摘頂ければ幸いです。

Elasticsearch の Multi Search API メモ

tl;dr

  • 定期的に Elasticsearch に問い合わせを行うバッチスクリプトで Elasticsearch への問い合わせ回数を減らしたい

memo

状況

  • Amazon ES に保存されたログを検索するバッチスクリプトで特定の ID 毎に日付を範囲してログの件数を取得する
  • 当初は ID が少なかったのであまり意識していなかったけど、テストで ID を増やしていったところ CPU 負荷も上がるし、たまに Amazon ES への接続エラーも発生している(認証辺りも絡んでいるかもしれない)
  • ID 毎に Elasticsearch に問い合わせを行う実装にしていた(先に気づけよ的な話ではある)

戦略

www.elastic.co

Multi Search API で実装すれば良さそう。

Multi Search API を使う前

以下のような感じのスクリプトで ID 毎に Elaseticsearch に検索していた。

#!/bin/bash

declare -A _hash
_hash["foo"]="2016-09-19T10:00:00+09:00"
_hash["bar"]="2016-09-19T10:00:00+09:00"
_hash["baz"]="2016-09-19T10:00:00+09:00"

while true;
do
  for key in ${!_hash[@]}; do
    curl -s -XGET "https://${AMAZON_ES_ENDPOINT}/cwl-*/_search" -w "\n" -d "
    {
      \"size\": 0,
      \"query\" : {\"term\" : { \"param_id\" : \"${key}\" }},
      \"aggregations\": {
        \"id_name\": {
          \"terms\": {\"field\": \"param_id\"},
          \"aggregations\": {
            \"id_count\": {
              \"filter\":{
                \"range\": { \"@timestamp\": { \"gte\": \"${_hash[${key}]}\", \"lte\": \"now\" }}
              }
            }
          }
        }
      }
    }" | jq -c '.aggregations.id_name.buckets[0]|{"id": .key, "count": .id_count.doc_count}'
    sleep 1
  done
  sleep 3
done

実行すると以下のような出力が得られる。

{"count":867,"id":"foo"}
{"count":863,"id":"bar"}
{"count":865,"id":"baz"}

Multi Search API を使った場合

以下のような感じで検索する。コードの行数も減らせてイイ感じ。

#!/bin/bash

declare -A _hash
_hash["foo"]="2016-09-19T10:00:00+09:00"
_hash["bar"]="2016-09-19T10:00:00+09:00"
_hash["baz"]="2016-09-19T10:00:00+09:00"

while true;
do
  queries=""
  for key in ${!_hash[@]}; do
    queries+="{\"index\": \"cwl-*\"}\n"
    queries+="{\"size\": 0,\"query\" : {\"term\" : { \"param_id\" : \"${key}\" }},\"aggregations\": {\"id_name\": {\"terms\": {\"field\": \"param_id\"},\"aggregations\": {\"id_count\": {\"filter\":{\"range\": { \"@timestamp\": { \"gte\": \"${_hash[${key}]}\", \"lte\": \"now\" }}}}}}}}\n"
  done
  echo -e ${queries} | curl -s -XGET 'https://${AMAZON_ES_ENDPOINT}/_msearch' --data-binary @- | \
  jq -c '.responses[].aggregations.id_name.buckets[0]|{"count":.id_count.doc_count,"id":.key}'
  sleep 3
done

実行すると以下のような出力が得られる。

{"count":1778,"id":"foo"}
{"count":1744,"id":"bar"}
{"count":1841,"id":"baz"}

Multi Search API を使う場合、クエリは以下のような内容となる。

{"index": ${インデックス名}}
{"query" : ${実際のクエリ}
{"index": ${インデックス名}}
{"query" : ${実際のクエリ}

Elasticsearch へのリクエストは以下のような内容となる。

echo -e ${queries} | curl -s -XGET 'https://${AMAZON_ES_ENDPOINT}/_msearch' --data-binary @-

で、Multi Search API を使ったらどうなったか

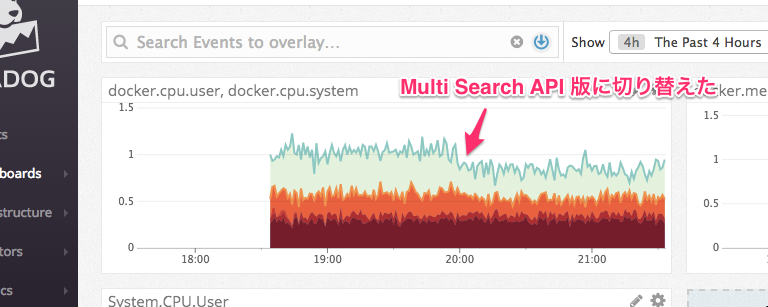
以下のようにバッチを動かしているコンテナの CPU 使用率が少しだけ下がった。

f:id:inokara:20160919214204p:plain

以上

必要に応じて Multi Search API を使いましょう。

td-agent 自体のログレベルを設定したい

tl;dr

  • td-agent 自体のログレベルを設定したい

memo

参考

docs.fluentd.org

動作確認環境

$ cat /etc/redhat-release
CentOS Linux release 7.2.1511 (Core)

$ td-agent --version
td-agent 0.12.26

設定

  • /etc/td-agent/td-agent.conf
<system>
  log_level [info|warn|error|fatal|debug|trace]
</system>

infodebugtrace にしておくと、設定ファイルがログにダンプされるので、これを避けたい場合(そんなシチュエーションが在るかどうか判らないけど)には warnerror にしておくと良い。

以上

メモでした。

td-agent.conf 設定パラメータの値を環境変数から参照したい

tl;dr

  • td-agent.conf 設定パラメータの値を環境変数から参照したい

memo

動作確認環境

$ cat /etc/redhat-release
CentOS Linux release 7.2.1511 (Core)

$ td-agent --version
td-agent 0.12.26

設定

  • /etc/sysconfig/td-agent
export TD_AGENT_LOG_LEVEL=debug
  • /etc/td-agent/td-agent.conf
<system>
  log_level "#{ENV['TD_AGENT_LOG_LEVEL']}"
</system>

(snip)

確認

  • service td-agent restart して /var/log/td-agent/td-agent.log を確認
(snip)

2016-09-17 09:10:04 +0900 [info]: using configuration file: <ROOT>
  <system>
    log_level debug
  </system>
  <source>
    @type forward
    bind 127.0.0.1
  </source>

(snip)

TD_AGENT_LOG_LEVEL の中身が展開されている。

以上

メモでした。

Windows Server 上の各種ログを CloudWatch Logs に送信するメモ

ども、初老丸です。

tl;dr

Windows Server 上のイベントログや IIS のログって CloudWatch Logs にどうやって送るのかしらと思って調べて試したメモ。


参考


メモ

構成図

f:id:inokara:20160211003810p:plain

ざっくり手順

  1. 適切なポリシーを EC2 にアタッチ済みの IAM role にアタッチする(既に IAM role がアタッチされている前提)
  2. EC2Config サービスにて CloudWatch Logs integration を有効にする
  3. AWS.EC2.Windows.CloudWatch.json を修正
  4. EC2Config サービスの再起動

以下のようなポリシーを EC2 にアタッチ済みの IAM role にアタッチする

  • AmazonEC2RoleforSSM
  • CloudWatch Logs に対する以下のポリシー(Managed Policy の CloudWatchFullAccess でも良いと思う)
{
    "Version": "2012-10-17",
    "Statement": [[f:id:inokara:20160210231534p:plain]
        {
            "Effect": "Allow",
            "Action": [
                "logs:CreateLogGroup",
                "logs:CreateLogStream",
                "logs:PutLogEvents",
                "logs:DescribeLogStreams"
            ],
            "Resource": [
                "arn:aws:logs:*:*:*"
            ]
        }
    ]
}

EC2Config サービスの設定変更

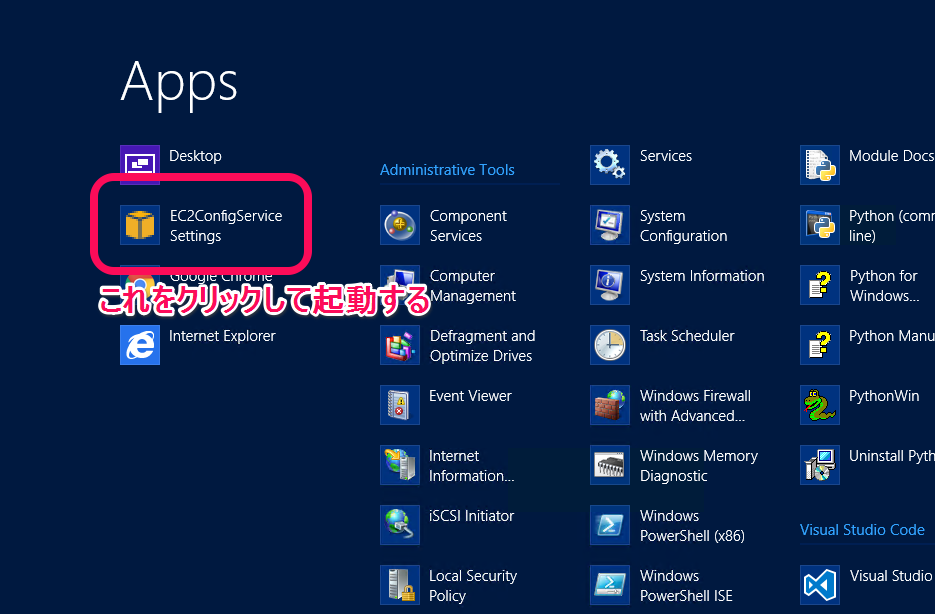
スタートメニューから All apps に遷移して EC2ConfigService Setting を起動する。

f:id:inokara:20160210231348p:plain

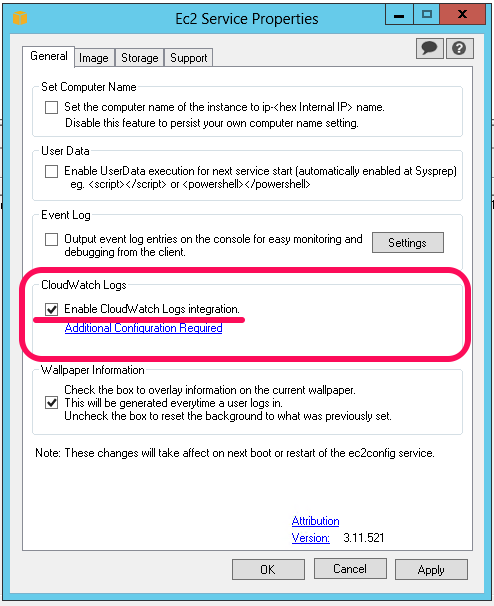
起動したら Enable CloudWatch Logs integration をチェックする。

f:id:inokara:20160210231534p:plain

チェックして Apply 又は OK でウィンドウを閉じる。

AWS.EC2.Windows.CloudWatch.json の修正

C:\Program Files\Amazon\Ec2ConfigService\Settings\AWS.EC2.Windows.CloudWatch.json を適当なエディタで開いて修正する。今回の要件を改めて整理すると...

  • IIS のログを取得する
  • IIS のログを 2 つのログストリームに転送する

この要件を満たす設定は以下の通り。(ポイントは // でコメントを付ける)

(snip)
             // IIS の Log の転送定義
             // 
             // - TimestampFormat を IIS のログに合わせて定義する
             // - Encoding を定義する
             //
            {
                "Id": "IISLog",
                "FullName": "AWS.EC2.Windows.CloudWatch.IisLog.IisLogInputComponent,AWS.EC2.Windows.CloudWatch",
                "Parameters": {
                    "LogDirectoryPath": "C:\\inetpub\\logs\\LogFiles\\W3SVC1",
                    "TimestampFormat": "yyyy-MM-dd HH:mm:ss",
                    "Encoding": "UTF-8"
                }
            },
(snip)
             // 転送先定義
             //
             // - IAM role が適用されていなければ AccessKey や SecretKey を適宜設定する
             // - CloudWatch Logs の Region を定義
             // - LogGroup と Log Stream を定義する
             //
            {
                "Id": "CloudWatchLogs",
                "FullName": "AWS.EC2.Windows.CloudWatch.CloudWatchLogsOutput,AWS.EC2.Windows.CloudWatch",
                "Parameters": {
                    "AccessKey": "",
                    "SecretKey": "",
                    "Region": "ap-northeast-1",
                    "LogGroup": "Default-Log-Group",
                    "LogStream": "{instance_id}"
                }
            },

            // 転送先定義
             //
             // - IAM role が適用されていなければ AccessKey や SecretKey を適宜設定する
             // - CloudWatch Logs の Region を定義
             // - LogGroup と Log Stream を定義する
             //
            {
                "Id": "CloudWatchLogs02",
                "FullName": "AWS.EC2.Windows.CloudWatch.CloudWatchLogsOutput,AWS.EC2.Windows.CloudWatch",
                "Parameters": {
                    "AccessKey": "",
                    "SecretKey": "",
                    "Region": "ap-northeast-1",
                    "LogGroup": "Default-Log-Group",
                    "LogStream": "{instance_id}-02"
                }
            },
(snip)

そして... このエージェントが収集したログをどこに(LogGroup / LogStream)転送するかを以下のように Flow セクションで定義する。 Flow セクション自体は CloudWatch Logs だけではなく CloudWatch でも収集したパフォーマンスカウンタのメトリクスをどこの Namespace に転送するかも定義する。

        "Flows": {
            "Flows": 
            [
                "IISLog, (CloudWatchLogs, CloudWatchLogs02)"
            ]
        }

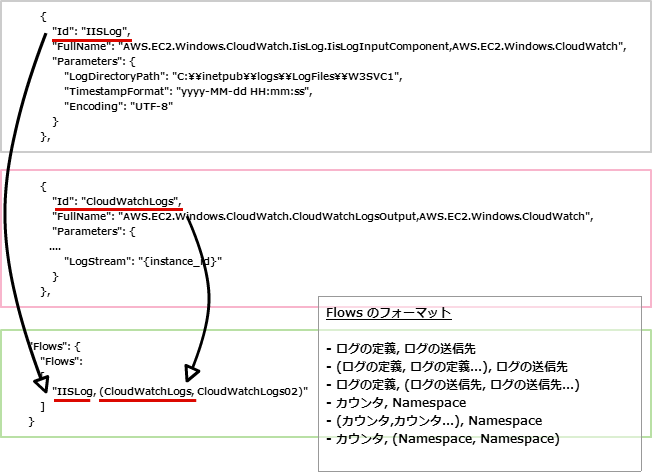
上記の定義だと、ID: IISLog に定義されたログは ID: CloudWatchLogsID: CloudWatchLogs02 に定義された転送先に転送するということ。

少しわかりづらいので図示。

f:id:inokara:20160211003742p:plain

うむ...これでもわかり辛い。

EC2Config サービスの再起動

そして、EC2Config サービスを再起動する。

#
# 一旦、サービスを確認
#
C:\Users\Administrator>sc query | find "DISP"

(snip)

DISPLAY_NAME: Diagnostic Policy Service
DISPLAY_NAME: Ec2Config
DISPLAY_NAME: Windows Event Log

(snip)

DISPLAY_NAME: Windows Remote Management (WS-Management)
C:\Users\Administrator>

#
# Ec2Config を停止
#
C:\Users\Administrator>sc stop Ec2Config

SERVICE_NAME: Ec2Config
        TYPE               : 10  WIN32_OWN_PROCESS
        STATE              : 3  STOP_PENDING
                                (STOPPABLE, NOT_PAUSABLE, ACCEPTS_SHUTDOWN)
        WIN32_EXIT_CODE    : 0  (0x0)
        SERVICE_EXIT_CODE  : 0  (0x0)
        CHECKPOINT         : 0x0
        WAIT_HINT          : 0x0

#
# Ec2Config を開始
#
C:\Users\Administrator>sc start Ec2Config

SERVICE_NAME: Ec2Config
        TYPE               : 10  WIN32_OWN_PROCESS
        STATE              : 2  START_PENDING
                                (NOT_STOPPABLE, NOT_PAUSABLE, IGNORES_SHUTDOWN)
        WIN32_EXIT_CODE    : 0  (0x0)
        SERVICE_EXIT_CODE  : 0  (0x0)
        CHECKPOINT         : 0x0
        WAIT_HINT          : 0x7d0
        PID                : 3888
        FLAGS              :

C:\Users\Administrator>

ちなみに、上記の操作はコマンドプロンプトにて実施すること。

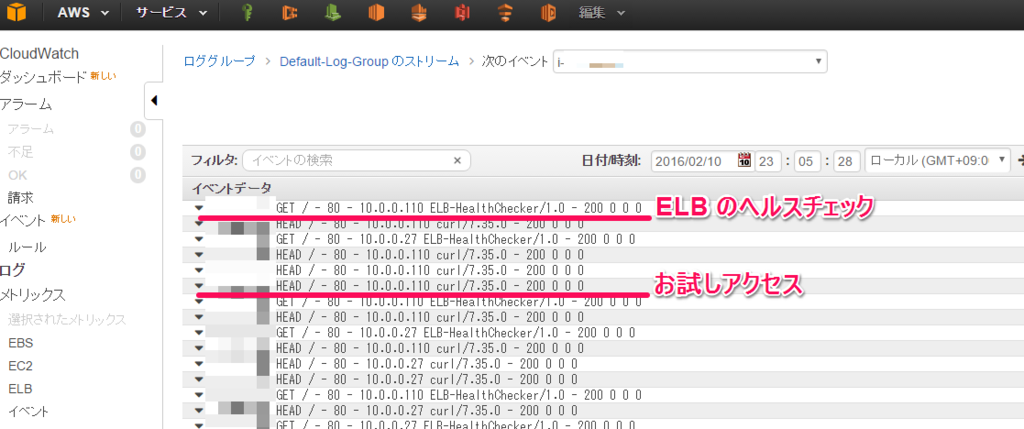
適当にアクセスすると...

以下のように適当にアクセスして IIS にログを吐かせる。

$  curl -s -I win01-xxxxxxxxxx.ap-northeast-1.elb.amazonaws.com

しばらくすると...

f:id:inokara:20160210235241p:plain

ふむ。

ひとまずは目的達成。


以上

Windows Server 上の各種ログを CloudWatch Logs に転送する雰囲気はつかめた気がする。気がするだけかも。

自分で作った Python スクリプトを Windows Server にサーヴィスとして登録するショートコント(1)

ども、「ブログはショートコント」だが持論の初老丸です。

ショートコント...

Python スクリプトWindows Server でサーヴィスとして動かしたい。


まずは

コントは起承転結で。

ひとまず、自分で作った Python スクリプトWindows Server でサーヴィスとして登録する方法としては以下の二つを見つけた。

  • Windows でサーヴィスとして登録する
  • honcho を使ってみる(Windows 上で動くか不明確)

Python 製でプロセス監視ツールとして名高い SupervisordWindows では動作しないようだ。

Supervisor works on just about everything except for Windows. It is tested and supported on Linux, Mac OS X, Solaris, and FreeBSD. It is written entirely in Python, so installation does not require a C compiler.

うむ。

Supervisord だと指定したプロセスが落ちていたら自動で再起動してくれるのが非常に有り難いのだけど、この機能も実装されていると嬉しいなあと思いつつ...

環境

ということで、各種参考記事に掲載されているサンプルを写経しながら以下の環境で試していく。

f:id:inokara:20160206202300p:plain


承(pywin32 を利用する Windows サービスとして登録する)

Python スクリプトをサービスとして登録したい場合には pywin32 を利用すると良いらしい。

参考

ジャパニーズだと以下の記事が参考になった。

masahito.hatenablog.com

有難うございます。

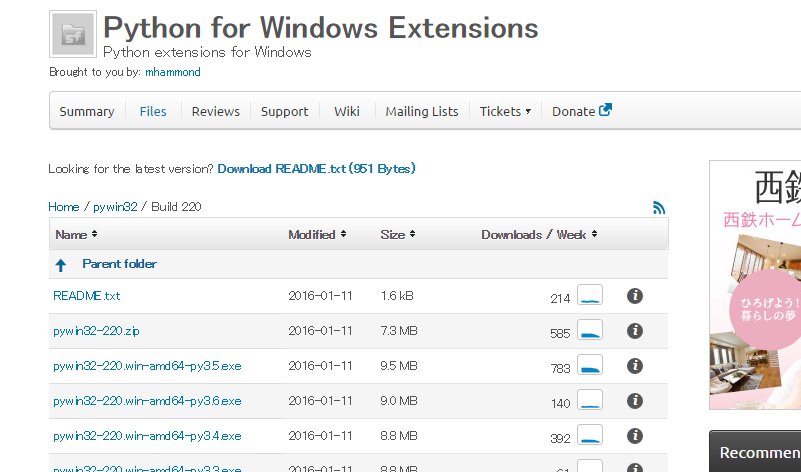
pywin32 のインストール

pywin32 のインストールは pywin32 からダウンロードする。

f:id:inokara:20160207170803p:plain

Python のバージョンを合わせる必要があるので注意する。32bit 版と 64bit 版もあるので注意する。自分はここでスベった。

サービスとして利用するスクリプトサンプル

以下のように写経して動かしてみる。

# -*- coding:utf-8 -*-

import win32serviceutil
import win32service
import win32event
import servicemanager
import socket
import time
import logging

logging.basicConfig(
    filename = 'c:\\oreno-service.log',
    level = logging.DEBUG, 
    format="%(asctime)s %(levelname)s %(message)s"
)

class OrenoSvc (win32serviceutil.ServiceFramework):
    _svc_name_ = "Oreno-Service01"
    _svc_display_name_ = "Oreno Service01"

    # Class の初期化     
    def __init__(self,args):
        win32serviceutil.ServiceFramework.__init__(self,args)
        self.stop_event = win32event.CreateEvent(None,0,0,None)
        socket.setdefaulttimeout(60)
        self.stop_requested = False

    '''
     - サービス停止時に呼ばれるメソッド
      - win32event.SetEvent で win32event.CreateEvent(None,0,0,None) で作成したイベントハンドル(非シグナル)がセットされる
    '''
    def SvcStop(self):
        self.ReportServiceStatus(win32service.SERVICE_STOP_PENDING)
        win32event.SetEvent(self.stop_event)
        logging.info('サービスを停止します ...')
        self.stop_requested = True

    '''
     - サービス開始時に呼ばれるメソッド
      - servicemanager.LogMsg でログを出力している
      - main() を呼ぶ
    '''
    def SvcDoRun(self):
        servicemanager.LogMsg(
            servicemanager.EVENTLOG_INFORMATION_TYPE,
            servicemanager.PYS_SERVICE_STARTED,
            (self._svc_name_,'')
        )
        self.main()

    '''
     - 以下に実際の処理を書いていく
    '''
    def main(self):
        logging.info('Oreno Service を開始します...')
        while True:
            if self.stop_requested:
                logging.info('停止シグナルをうけました: ループを停止します ...')
                break
            time.sleep(5)
            logging.info("コマネチ!! at %s" % time.ctime())
        return

if __name__ == '__main__':
    win32serviceutil.HandleCommandLine(OrenoSvc)

引数なしで実行すると以下のように出力される。

PS C:\Users\Administrator\Documents\python> python.exe .\o-re-no-service.py
Usage: 'o-re-no-service.py [options] install|update|remove|start [...]|stop|restart [...]|debug [...]'
Options for 'install' and 'update' commands only:
 --username domain\username : The Username the service is to run under
 --password password : The password for the username
 --startup [manual|auto|disabled|delayed] : How the service starts, default = manual
 --interactive : Allow the service to interact with the desktop.
 --perfmonini file: .ini file to use for registering performance monitor data
 --perfmondll file: .dll file to use when querying the service for
   performance data, default = perfmondata.dll
Options for 'start' and 'stop' commands only:
 --wait seconds: Wait for the service to actually start or stop.
                 If you specify --wait with the 'stop' option, the service
                 and all dependent services will be stopped, each waiting
                 the specified period.

ふむふむ。

サービスの登録

サービスの登録は install オプションを利用する。

PS C:\Users\Administrator\Documents\python> python.exe .\o-re-no-service.py install
Installing service Oreno-Service01
Service installed

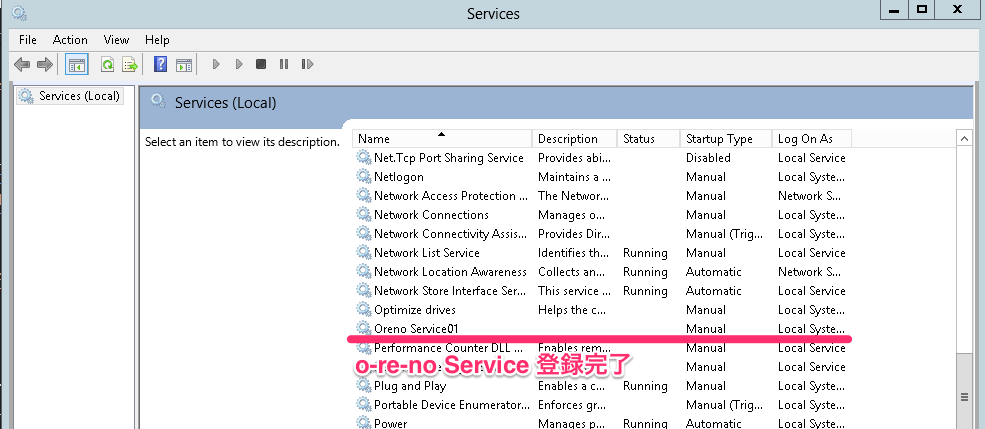
以下のようにサービスが登録されたくさ。

f:id:inokara:20160207180407p:plain

サービスの開始

サービスの開始は start オプションを利用する。

PS C:\Users\Administrator\Documents\python> python.exe .\o-re-no-service.py start
Starting service Oreno-Service01

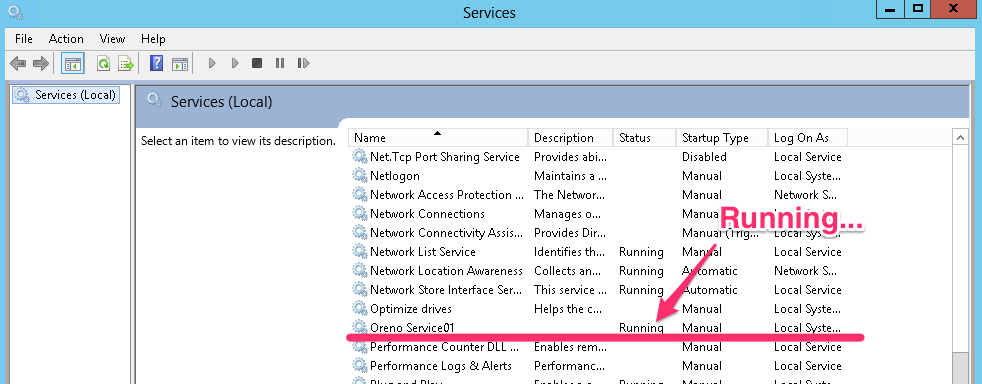
以下のようにサービスが開始されたばい。

f:id:inokara:20160207180630p:plain

今回のサービスは 5 秒ごとにコマネチ!!をログに記録するので、ちゃんとコマネチ!!が記録されているかを確認する。

f:id:inokara:20160207181023p:plain

キタでコマネチ。

サービスの停止

サービスの停止は stop オプションを利用する。

PS C:\Users\Administrator\Documents\python> python.exe .\o-re-no-service.py stop
Stopping service Oreno-Service01

以下の通りサービスは停止している。

f:id:inokara:20160207180407p:plain

画像は install 時の使い回しだが、ちゃんとサービスが停止している。

サービスの削除

サービスの削除は remove オプションを利用する。

PS C:\Users\Administrator\Documents\python> python.exe .\o-re-no-service.py remove
Removing service Oreno-Service01
Service removed

転(honcho を使ってみる)

honcho とは

pypi.python.org

ドキュメントに記載されているように foreman の Clone として開発されているツールforeman 同様に複数のプロセスを管理することが出来るライブラリ。

Windows サポートについては以下の通りマージされているようだ。

github.com

honcho インストール

pip で一発。

PS C:\Users\Administrator\Documents\python> pip install honcho
Collecting honcho
  Downloading honcho-0.6.6-py2.py3-none-any.whl
Collecting colorama (from honcho)
  Downloading colorama-0.3.6-py2.py3-none-any.whl
Installing collected packages: colorama, honcho
Successfully installed colorama-0.3.6 honcho-0.6.6
You are using pip version 7.1.2, however version 8.0.2 is available.
You should consider upgrading via the 'python -m pip install --upgrade pip' command.

サービスとして利用するサンプルスクリプト

Windows サービスに登録した際のスクリプトを流用。

# -*- coding:utf-8 -*-
import time
import logging

# Referred http://symfoware.blog68.fc2.com/blog-entry-883.html
stdout_log = logging.StreamHandler()
stdout_log.setLevel(logging.DEBUG)
stdout_log.setFormatter(logging.Formatter('%(asctime)s %(levelname)s %(message)s'))
file_log = logging.FileHandler(filename = 'c:\\oreno-service.log')
file_log.setLevel(logging.DEBUG)
file_log.setFormatter(logging.Formatter('%(asctime)s %(levelname)s %(message)s'))
logging.getLogger().addHandler(stdout_log)
logging.getLogger().addHandler(file_log)
logging.getLogger().setLevel(logging.DEBUG)

class OrenoSvc:
    '''
     - 以下に実際の処理を書いていく
    '''
    def main(self):
        logging.info('Starting Oreno Service ...')
        try:
            while True:
                time.sleep(5)
                logging.info("Komanechi!! at %s" % time.ctime())
        except KeyboardInterrupt:    
            logging.info('stop signal was received :  Stopping loop ...')

if __name__ == '__main__':
    ore = OrenoSvc()
    ore.main()

Procfile を用意する

foreman 同様に Procfile を作成する。

ore: python o-re-no-service02.py

これだけ。

サービスの開始

honcho.exe start でスタート。

PS C:\Users\Administrator\Documents\python> honcho.exe start
2016-02-07 09:50:09 [2304] [WARNING] Your terminal is not configured to receive UTF-8 encoded text. Please adjust your locale settings or force UTF-8 output by setting PYTHONIOENCODING="utf-8".
09:50:09 system | ore.1 started (pid=2796)

開始すると以下のようなコマンドプロンプトのウィンドウが起動する。

f:id:inokara:20160207185642p:plain

今回はログを stdout にも出力するようにしていたのでログが出力される。

また、run オプションもあるので start オプションとの違いについて確認する必要がある。

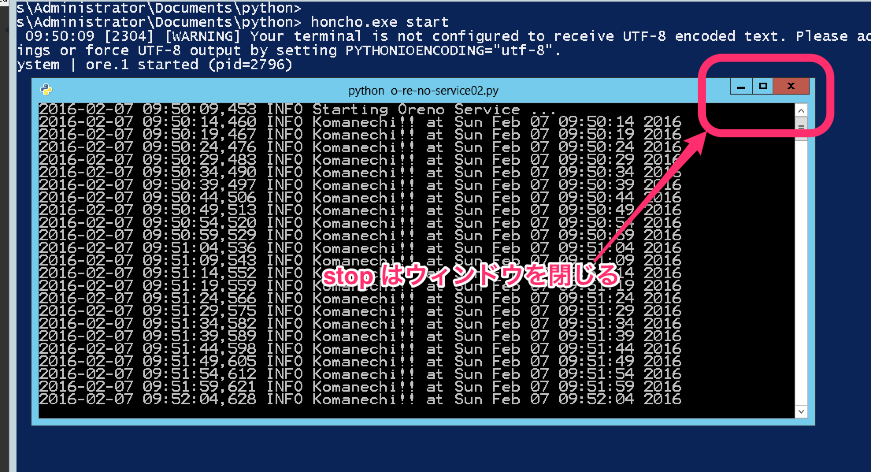
サービスの停止

サービスの停止は下図のようにコマンドプロンプトのウィンドウを閉じる。

f:id:inokara:20160207185818p:plain

ウィンドウを閉じると以下のようにコマンドプロンプト(今回は PowerShell 上)に出力される。

10:00:04 ore.1  | ^C
10:00:04 system | ore.1 stopped (rc=-1073741510)

ホントにこれしか方法が無いかは引き続き要調査。

動画デモ

youtu.be

こんな感じで動いている。


ということで...

Python スクリプトWindows 上でサービスとして動かす方法を以下の二つの方法でコントしてみた。

どっちが良いか

Windows なら特に理由がなければ Windows サービスへの登録の方が良さそうな気がする。理由は単純で Windows サービス管理下にある為、何か問題があった場合等は Event Viewer で状態を確認することが出来る(スクリプト内から Event ログを吐くことも当然出来る)為。但し、お手軽にサービスとして動かしたいとか、pywin32 の処理をスクリプトに含めるのが面倒等の場合には honcho でも良さそうな気がする。

あと、Windows サービスも honcho も Supervisord のようにプロセスが停止していたら叩き起こしてくれるような処理は独自に実装が必要なのは注意が必要。

以上。

watchmedo が便利だと思ったのでメモ

ども、初老丸です。

tl;dr

Python で watchdog というモジュールが個人的にホットでこのモジュールを使って、ファイル作成を検知したら任意のアクションを起こすツールをサクッと作ってみたりしたが、よくよく調べてみると watchdog に同梱されている watchmedo というツールが既に存在しているので触ってみた。


試す

試した環境

$ cat /etc/lsb-release
DISTRIB_ID=Ubuntu
DISTRIB_RELEASE=14.04
DISTRIB_CODENAME=trusty
DISTRIB_DESCRIPTION="Ubuntu 14.04.2 LTS"

$ python -V
Python 2.7.6

インストールとヘルプ

  • ひとまず pip でインストール
$ pip install watchdog

watchdog のバージョンは watchdog-0.8.3 を前提に。

  • ヘルプ
$ watchmedo --help
usage: watchmedo [-h] [--version]
                 {tricks-from,tricks-generate-yaml,log,shell-command,auto-restart}
                 ...

positional arguments:
  {tricks-from,tricks-generate-yaml,log,shell-command,auto-restart}
    tricks-from         Subcommand to execute tricks from a tricks
                        configuration file. :param args: Command line argument
                        options.
    tricks-generate-yaml
                        Subcommand to generate Yaml configuration for tricks
                        named on the command line. :param args: Command line
                        argument options.
    log                 Subcommand to log file system events to the console.
                        :param args: Command line argument options.
    shell-command       Subcommand to execute shell commands in response to
                        file system events. :param args: Command line argument
                        options.
    auto-restart        Subcommand to start a long-running subprocess and
                        restart it on matched events. :param args: Command
                        line argument options.

optional arguments:
  -h, --help            show this help message and exit
  --version             show program's version number and exit

Copyright 2011 Yesudeep Mangalapilly <yesudeep@gmail.com>.
Copyright 2012 Google, Inc.

Licensed under the terms of the Apache license, version 2.0. Please see
LICENSE in the source code for more information.

ロギング

watchmedo で対象のディレクトリで発生するイベントをロギングしてみる。ロギングしたい場合には以下のように実行する。

$ watchmedo log --recursive --patterns "*.txt;*.png" ./test01/
  • log オプションでイベントのロギングを開始する
  • --recursive オプションでディレクトリを再帰的に監視
  • --patterns オプションで監視対象ファイルの拡張子複数指定
  • 最後に監視対象ディレクトリ(./test01/)を指定

その他にもオプションがあるので詳細は watchmedo log --help にて確認したい。

せっかくなのでデモ動画。

コマンド実行

ロギングに続いて、ディレクトリイベントをトリガにしてコマンドを実行してみる。

$ watchmedo shell-command --recursive --patterns '*.txt;*.png' --command 'echo ${watch_src_path}' ./test01/
  • shell-command オプションで --command で指定したコマンドを実行する
  • --command オプションではいくつかの変数が使える(後述)
  • --recursive--patternslog オプションと同じ

その他にもオプションがあるので詳細は watchmedo shell-command --help にて確認したい。

ちなみに、--command オプションで利用できる変数は以下の通り。

  • ${watch_event_type}
  • ${watch_object}
  • ${watch_src_path}
  • ${watch_dest_path}

それぞれを echo した場合は以下の通り。

#
# touch test01/test01.txt
# mv test01/test01.txt test01/test02.txt
# echo "foo" >> test01/test02.txt
# mv test01/test02.txt /tmp/
#
$ watchmedo shell-command --recursive --patterns '*.txt;*.png' --command 'echo "${watch_event_type} | ${watch_object}"' ./test01/
created | file
modified | file
moved | file
modified | file
deleted | file

#
# touch ./test01/test12345.txt を実行した場合
#
$ watchmedo shell-command --recursive --patterns '*.txt;*.png' --command 'echo ${watch_src_path}' ./test01/
./test01/test12345.txt

#
# echo "test" >> ./test01/test12345.txt
# mv ./test01/test12345.txt ./test01/test7890.txt を実行した場合
#
$ watchmedo shell-command --recursive --patterns '*.txt;*.png' --command 'echo ${watch_dest_path}' ./test01/
./test01/test7890.txt

この shell-command オプションを利用することで、監視対象ディレクトリにファイルを保存したタイミングで別のストレージ(例えばリモートの NFS サーバー)やオブジェクトストレージ(例えば Amazon S3 とかに)に保存等を行わせることが出来そう。

あと watchmedo Tricks って...

なんぞや。あとで調べよっと。


以上

同様のスクリプトを作っておかげで watchmedo の理解も進んだ気がする。

やりたい事は watchmedo で実現できそうな気がするが、shell-command を利用した際の他のコマンドとの連携とか気になるところ。引き続き、触っていきたい。

mruby-cli でディレクトリ監視ツールワンバイナリ版を作った

ご無沙汰しております。

tl;dr

自分の中で以下のブームが到来しております。

  • ディレクトリ監視(ファイル作成、削除、編集等のイベント検知)
  • ツールは出来るだけワンバイナリで提供したい(でも Go 言語は Hello world 準一級 = 初心者)

これからのブームを満たしてくれるのが mruby そして mruby-cli ということで、mruby 界に名を轟かすべくサンプルツールを作ってみることにしました。


リンク

参考

作ったもの

github.com


どんなものか

ダウンロードしてすぐ使える

もし、気になった方がいらっしゃったらこちらからダウンロードしてみて下さい。

ひとまずヘルプ

$ ./watcher --help          

Usage: watcher [options]

  -h, --help            Display help.
  -v, --version         Display version.
  --path WATCH_PATH     Set monitoring directory path.

デモ

youtu.be

watcher バイナリを適当なパスにダウンロードするだけ。上のウィンドウで展開している test_dir を監視するように watcher を実行している図。


watcher を支える技術(というほどでもないけど)

ディレクトリ変更検知

#
# サンプルをほぼそのまま流用
#

    def watch
      logging('DEBUG', 'Watch starting...')
      watcher = Inotify::RecursiveNotifier.new
      watcher.rwatch(@path, :all_events) do |event|
        # puts event.inspect
        #
        # - [close_write, :close]
        # - 書き込みが発生したファイルを検知する
        #
        if event.events[0] == :close_write && event.events[1] == :close
          if event.watched_path[-1] == '/'
            logging('INFO', event.watched_path + event.name)
          else
            logging('INFO', event.watched_path + '/' + event.name)
          end
        end
      end

:all_events 以外のイベント :create を利用すると Segmentation fault (core dumped) を吐いてアプリケーションが落ちてしまう(こちらの原因調査に時間を要した...)ので、all_events を利用して、ファイルの書き込みが完了した(と思われる)イベントの close_write, :close を利用しました。

Watcher クラスを呼び出す処理

  • Watcher クラスを呼び出す処理
def __main__(argv)

  opt = Getopts.getopts(
    'vh',
    'version',
    'help',
    'path:'
  )

  if opt['v'] || opt['version']
    puts "v#{Watcher::VERSION}"
  elsif opt['h'] || opt['help'] || opt['path'] == ''
    puts "#{Watcher::HELP}"
  elsif opt['path']
    w = Watcher::Watcher.new(opt)
    w.watch
  else
    puts "#{Watcher::HELP}"
  end

end

こちらを参考にさせて頂いて、引数の処理には mruby-getopts を利用しました。


ワンバイナリ提供が必要なら mruby + mruby-cli の利用も検討したい

mruby-cli でワンバイナリツールの作り方については...

以下の記事がとても Blog 記事が参考になりました。

harasou.github.io

一回読めば、mruby-cliツール作りの基本を理解することが出来ます。有難うございました。

実は Windows 版のバイナリを作りたかったんですが...

Windows 上でも動かしてみたいと考えて、Ubuntu 14.04 上で Windows 向けのバイナリを生成しようとしましたが...以下のようなエラーが...

... /watcher/mruby/build/mrbgems/mruby-inotify/src/inotify.c:8:25: fatal error: sys/inotify.h: No such file or directory
 #include <sys/inotify.h>
                         ^
compilation terminated.
... /watcher/mruby/build/mrbgems/mruby-inotify/src/inotify.c:8:25: fatal error: sys/inotify.h: No such file or directory
 #include <sys/inotify.h>
                         ^
compilation terminated.
rake aborted!

ちくしょー、ちくしょー。きっと、必要なライブラリが揃ってないだけなんだ、そうなんだ...。ん、Windows で inotify が動くのかとかそのレベルなのかもしれない。

とは言え...

mruby と mruby-cli を使えば Ruby DSL を使って異なる環境のワンバイナリツールを書けるというのは個人的にとてもうれしい限りです。Go 言語同様に Ruby や mruby に関しても初心者の域を出ておりませんが、Go 言語と比較すると若干慣れ親しんでいるという点で個人的には推していきたいなと考えております。

以上。

Serverspec に送ったプルリクエストをマージして頂けたのがとても嬉しかったのでメモ

Serverspec に小さな機能追加のプルリクエストを送ったらマージして頂いてとても嬉しかったので、自分なりに機能追加のポイント等を整理したことをメモる。内容に誤り等あれば適宜アップデートしていく。

プルリクエスト

github.com

以前にプルリクエストを送った際には色々と不勉強な点がありマージまでは至らなかったが、今回はなんとかマージして頂くところまで辿りつけて感動もひとしお。これもひとえに作者の mizzy さんやコントリビューターの方々の努力があって拡張し易い実装になっていること大きいと考えている。本当に感謝、有難うございます。


経緯

ギョームでネットワーク・インターフェースの MTU を変更する Ansible Playbook を書いて、当然テストは Serverspec でやるでしょって思っていたら MTU 値が interface リソースタイプのオプションとして定義されていなかった。当初は以下のように command リソースを利用して /sys/class/net/eth0/mtucat して値を取ればいいかなと思って見て見ぬふりをしていたが、今年の目標の一つである 「OSS への貢献」にうってつけの案件だと思い夕飯を食べた後、すぐに実装に取り掛かった。

describe command('cat /sys/class/net/eth1/mtu') do
  its(:stdout) { should match /1500/ }
end

ちなみに、実際の実行結果は以下のようになる。

#
# Interface を確認
#
$ ifconfig eth0
eth0      Link encap:Ethernet  HWaddr 08:00:27:7d:bc:c9
          inet addr:10.0.2.15  Bcast:10.0.2.255  Mask:255.255.255.0
          inet6 addr: fe80::a00:27ff:fe7d:bcc9/64 Scope:Link
          UP BROADCAST RUNNING MULTICAST  MTU:1500  Metric:1
          RX packets:4661315 errors:0 dropped:0 overruns:0 frame:0
          TX packets:3849991 errors:0 dropped:0 overruns:0 carrier:0
          collisions:0 txqueuelen:1000
          RX bytes:1943853709 (1.9 GB)  TX bytes:1154680993 (1.1 GB)

#
# example
#
$ cat spec/localhost/sample_spec.rb
require 'spec_helper'

describe interface('eth0') do
  its(:mtu) { should eq 1500 }
end

#
# テスト実行
#
$ rake
(snip)

Interface "eth0"
  mtu
    should eq 1500

Finished in 0.07793 seconds (files took 0.4603 seconds to load)
1 example, 0 failures

実装

Serverspc と Specinfra

Serverspec にリソースタイプの追加を実装するにあたって、Specinfra の存在を抜きにして語ることは出来ないということを今回の実装で感じた。尚 Serverspec と Specinfra についての詳細はそれぞれ以下のリンクが詳しいので割愛。

serverspec.org

github.com

ということで、Serverspec と Specinfra はざっくりと以下のような関係となる。

f:id:inokara:20160110230128p:plain

(出典:書籍 Serverspec 第四章 4.1 Serverspec のアーキテクチャ 図 4-2 を模写)

今回は Linux を対象にネットワーク・インターフェースの MTU 値を取得してテストを行う為、Specinfa 及び Serverspec の両方に対して以下のような追加実装を行った。尚、リソースタイプの追加に関しては書籍 Serverspec の第四章 4.5 Serverspec のリソースタイプの拡張が参考になる。

Specinfra への追加実装

specinfra/lib/specinfra/command/linux/base/interface.rb に以下を追加。

(snip)

    def get_mtu_of(name)
      "cat /sys/class/net/#{name}/mtu"
    end

(snip)

元々、ネットワークインターフェースの speed の値を取得するメソッドが存在したので、それを参考にさせて頂いて MTU 値を取得するようにコマンドを実装、メソッド名を修正した。

Serverspec への追加実装

serverspec/lib/serverspec/type/interface.rb に以下を追加。

(snip)

    def mtu
      ret = @runner.get_interface_mtu_of(@name)
      val_to_integer(ret)
    end

(snip)

クラス変数の @runner 自体は serverspec/lib/serverspec/type/base.rb にて以下のように Specinfra の Runner クラスが定義されていることが解る。

(snip)

    def initialize(name=nil, options = {})
      @name    = name
      @options = options
      @runner  = Specinfra::Runner
    end
    
(snip)

また、Serverspec 側から Specinfra のコマンドを呼び出す場合のメソッド名は以下のような規則で呼び出しているようなので...

アクション_リソースタイプ_サブアクション

今回の場合には Specinfra 側で定義したメソッド名は get_mtu_of となり、リソースタイプは interface となるので以下のようなメソッド名で Specinfra の command インターフェースを呼び出す。

get_interface_mtu_of

尚、上記は書籍 Serverspec の第四章 4.3.3 コマンド取得の仕組みに記載されている。

ということで、今回の実装を先ほどの図に重ねると以下のようになる。

f:id:inokara:20160110231104p:plain


デバッグ方法 tips

テスト→実装→テストのサイクル

実装にあたってデバッグは以下のように行った。

  1. 実装してみる
  2. rake build でそれぞれの gem をビルド
  3. rake install:local でそれぞれの gem をインストール
  4. テストを流す
  5. テストを確認

尚、書籍 Serverspec の 4.5.1 Serverspec 側の拡張には「最初にテストコードを書きます」とあるので、今後はテストコードを書くことから始めたいと思う...。

テスト

Serverspec と Specinfra それぞれのテストは以下のように書いた。これも、既存のテストコードの模倣。

  • Specinfra のテスト
describe get_command(:get_interface_mtu_of, 'eth0') do
  it { should eq "cat /sys/class/net/eth0/mtu" }
end

上記の get_command というメソッドは spec_helper.rb に以下のように定義されている。

module GetCommand
  def get_command(method, *args)
    Specinfra.command.get(method, *args)
  end
end
  • Serverspec のテスト
describe interface('eth0') do
  let(:stdout) { '1500' }
  its(:mtu) { should eq 1500 }
end

describe interface('invalid-interface') do
  let(:stdout) { '9001' }
  its(:mtu) { should_not eq 1500 }
end

最後に

拡張し易い

まだまだ序の口であることは否めないが Serverspec と Specinfra は拡張し易い作りになっていることを実感出来た気がする。

次は

  • Serverspec と Specinfra の内部実装を引き続き勉強する
  • 他の OS で mtu をチェックする実装を追加
  • リソースタイプ追加

ということで

マージして頂いて本当にうれしかったです。基本的には書籍 Serverspec 第四章を熟読することで Serverspec の詳細を理解して拡張することも出来るようになると思うので、是非、手にとって頂いて読むことをお薦めしたい。