はじめに
前の記事で AWS CloudTrail でログを elasticsearch に放り込んでみたものの以下のような点が宿題になった。
AWS CloudTrailのログはJSON形式だけど複数の操作が一つのファイルに収まっている- その為、
elasticsearchのbulk APIを使ってデータを放り込む elasticsearchのbulk APIを使う場合にはデータにひと手間加える必要がある
これらをとりあえず以下のようにして解決した。他にもっと効率の良い方法があると思うので教えて下さい!!
参考
- bulk api
- jq
- 数値、アルファベットからランダムなn文字の文字列を生成する
- 標準入力を処理するプログラムを書く
- Ruby/MD5関数でハッシュ値生成
- CloudTrail x Stackdriver
- CloudTrail x splunk
AWS CloudTrail のログ
上記のように JSON フォーマット。一つの操作が 1 行の JSON レコードになっているが、約 5 分に一回 S3 に吐かれるログファイルには複数の操作 JSON レコードが記録されている。(追記:Records[] というキーの配下に一つの操作が 1 行で複数記録されているので厳密には一行かな...)ここが今回、個人的なネックとなった...(単純に自分のスキル不足)
elasticsearch の bulk API
ドキュメントによると bulk API を使ってデータを放り込む際には以下の点に注意しなければならないようだ。
curlで放り込む場合には--data-binaryオプションをつけましょう\nが区切り文字になるぜ、だからprettyフォーマットではダメだよindexやcreateやdeleteのアクションをレコードに入れておかなきゃだめだぜ(?)
と bulk API を使うというのは個人的にはかなり敷居が高い...がやってみる。
やってみる
必要なツール
以下のようなツールを用意。
ログを放り込む
bulk API 用に体裁を整える為のスクリプトを適当な名前で保存(以下の例では bulk_post.rb)して実行権限を与えておく。
cat 123456789012_CloudTrail_us-east-1_20131207T0500Z_826as5qRk23U9O1N.json | jq .Records[] --compact-output | ./bulk_post.rb | \
curl -v -H "Accept: application/json" -H "Content-type: application/json" --data-binary @- -X POST 'http://xxx.xxx.xxx.xx:9200/testpost/test3/_bulk'
上記を実行すると....
'http://xxx.xxx.xxx.xx:9200/testpost/test3/_bulk'
* About to connect() to xxx.xxx.xxx.xx port 9200 (#0)
*   Trying xxx.xxx.xxx.xx...
* Adding handle: conn: 0x1605830
* Adding handle: send: 0
* Adding handle: recv: 0
* Curl_addHandleToPipeline: length: 1
* - Conn 0 (0x1605830) send_pipe: 1, recv_pipe: 0
* Connected to xxx.xxx.xxx.xx (xxx.xxx.xxx.xx) port 9200 (#0)
> POST /testpost/test3/_bulk HTTP/1.1
> User-Agent: curl/7.32.0
> Host: xxx.xxx.xxx.xx:9200
> Accept: application/json
> Content-type: application/json
> Content-Length: 10414
> Expect: 100-continue
>
< HTTP/1.1 100 Continue
< HTTP/1.1 200 OK
< Content-Type: application/json; charset=UTF-8
< Content-Length: 1702
<
{"took":349,"items":[{"index":{"_index":"testpost","_type":"test3","_id":"a92f7ba6239d376429548f2c5023cf6d","_version":1,"ok":true}},{"index":{"_index":"testpost","_type":"test3","_id":"a06d983f5e4a80847b4ce3fc94c38707","_version":1,"ok":true}},{"index":{"_index":"testpost","_type":"test3","_id":"ae7d256ca8ba7dc3752dceafc34bbccc","_version":1,"ok":true}},{"index":{"_index":"testpost","_type":"test3","_id":"2cf61183eb7622019999b63ff3421965","_version":1,"ok":true}},{"index":{"_index":"testpost","_type":"test3","_id":"f56b134e979389984648afd81ce9f0eb","_version":1,"ok":true}},{"index":{"_index":"testpost","_type":"test3","_id":"647eca8462ce84a57a56fa46328ebfaa","_version":1,"ok":true}},{"index":{"_index":"testpost","_type":"test3","_id":"de5b7f13a35003f004a275e1b43b05b9","_version":1,"ok":true}},{"index":{"_index":"testpost","_type":"test3","_id":"8afadddc30deb1664dacd8f8a46c4704","_version":1,"ok":true}},{"index":{"_index":"testpost","_type":"test3","_id":"55cc304aa10740262d8298ed53dfdb08","_version":1,"ok":tr* Connection #0 to host xxx.xxx.xxx.xx left intact
ue}},{"index":{"_index":"testpost","_type":"test3","_id":"761a5a80b6b095192ee6fd51d299b54f","_version":1,"ok":true}},{"index":{"_index":"testpost","_type":"test3","_id":"fbe7d45ed07307d4ad3f4f6e15991324","_version":1,"ok":true}},{"index":{"_index":"testpost","_type":"test3","_id":"9a19e3614c1e8de3496a8b9ac6f9bef0","_version":1,"ok":true}},{"index":{"_index":"testpost","_type":"test3","_id":"d0bd8bc25ef577e4e407b808f736b1c0","_version":1,"ok":true}},{"index":{"_index":"testpost","_type":"test3","_id":"26585839a868a46492952dfbafa5f94d","_version":1,"ok":true}},{"index":{"_index":"testpost","_type":"test3","_id":"51d19b60fd000071e9c74caf58c247fe","_version":1,"ok":true}}]}
上記のようにデータ登録が出来た!
確認
elasticsearch で確認
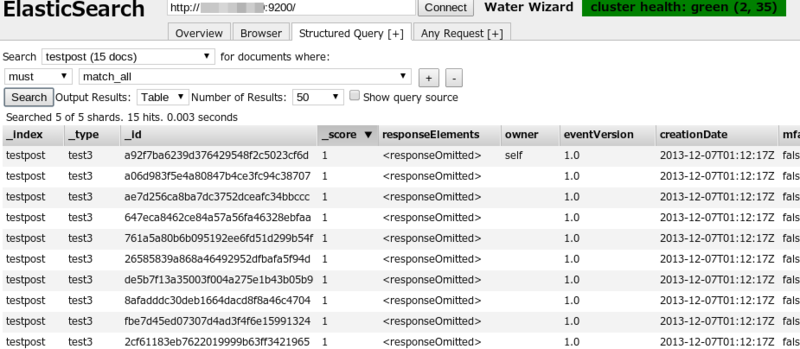
elasticsearch-head で確認する。elasticsearch-head まじ、便利。

おお、ちゃんと登録されている。
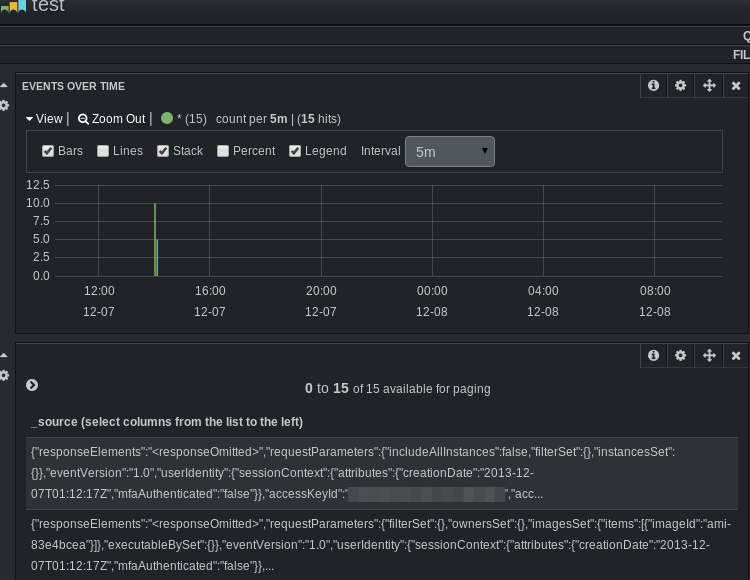
kibana で確認
elasticsearch にデータが登録出来たということは...kibana でも見ることが出来るですよね。

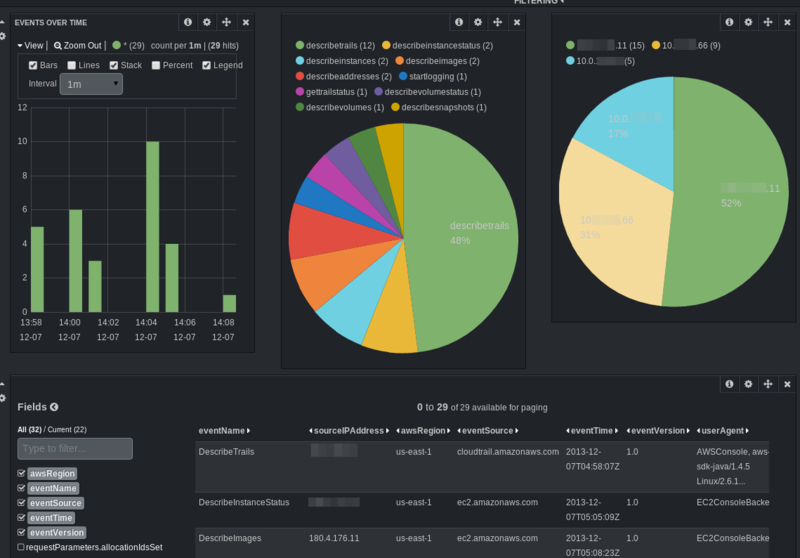
eventName と sourceIPAddress で円グラフを作ってみた。

どんな値を見るか等はちゃんと検討、設計する必要はあるけど elasticsearch や kibana に放り込むことで以下に記載しているサードパーティ製のツールには及ばないものの検索や視覚化が簡単に行えるのではないか。
最後に
とりあえず
とりあえずログを放り込んでみた感が否めないが、幾つかのツールとちょっとした工夫でログを保存し検索しやすくする環境は作れるのではないかと思う。尚、バッチ又は fluentd を使ってログの収集部分や elasticsearch への取り込みを自動化出来ればと考えている(fluentd のプラグインの登場が待たれる...自分にプラグインを作るスキルが無いのが非常に残念)。
CDP
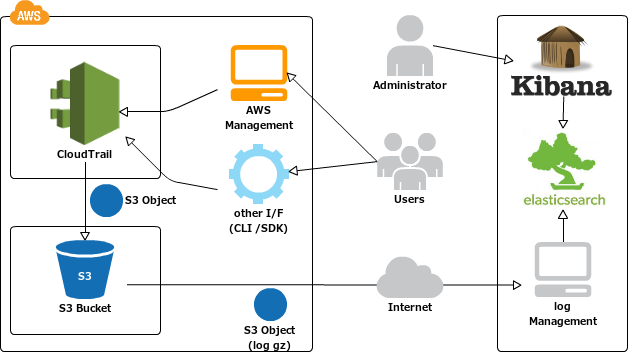
とりあえず CDP の図を作ってみたw

今回はログの収集は aws-cli のサブコマンドである s3 を利用したが資料等を読むと splunk 等は SNS の Topics として登録して SQS に送ってそのキューを splunk が受け取ってログを読みにいく仕組みで動いているようだ。
サードパーティ製のツール
ちなみにこちらの記事によると AWS CloudTrail のログの分析ツールを提供しているサードパーティ製のツールがあるのでそちらも試してみたい。(※一昨日参加した JAWS-UG 鹿児島 Vol.04 では Stackdriver を取り上げて説明して頂いた)
tips
今回の記事を書くにあたって調べたことなどをちょっとメモ。
標準入力から curl を使ってデータを POST する
echo "{"hoge" : "huga"}" | curl --data-binary @- -X POST 'http://xxx.xxx.xxx.xx:9200/_bulk'
jq で JSON をよろしく扱う
is like sed for JSON data – you can use it to slice and filter and map and transform structured data with the same ease that sed, awk, grep and friends let you play with text.
と書かれているので JSON の出力を色々イジれるツール。詳しい情報は公式サイトに譲るとして、jq 自体は標準で pretty フォーマットで出力するが今回は pretty フォーマットで出力されると困るので以下のオプションを使った。
jq .Records[] --compact-output
上記を使うことで Records[] エレメントを削除しつつ pretty フォーマットではなく一つのレコードを一行で出力してくれる。