ググれば
いくらでも情報は出てくるので、それらの情報を参考にしてチュートリアルしてみる。
構成
下図のような構成を想定している。

チュートリアルでは以下のような作業を行う。
- CircleCI 用の IAM ユーザー作成
- デプロイ用 S3 バケット作成
- CodeDeploy の設定
- CircleCI の設定
チュートリアル
CircleCI 用 IAM User 作成
- デプロイ用 S3 への put 権限と CodeDeploy 用の権限を付与
$ cat oreno-application_user_policy.json
{
  "Version": "2012-10-17",
  "Statement": [
    {
      "Effect": "Allow",
      "Action": [
        "codedeploy:RegisterApplicationRevision",
        "codedeploy:GetApplicationRevision"
      ],
      "Resource": [
        "arn:aws:codedeploy:*:*:application:oreno-application"
      ]
    },
    {
      "Effect": "Allow",
      "Action": [
        "codedeploy:CreateDeployment",
        "codedeploy:GetDeployment"
      ],
      "Resource": [
        "arn:aws:codedeploy:*:*:deploymentgroup:oreno-application/*"
      ]
    },
    {
      "Effect": "Allow",
      "Action": [
        "codedeploy:GetDeploymentConfig"
      ],
      "Resource": [
        "arn:aws:codedeploy:*:*:deploymentconfig:CodeDeployDefault.OneAtATime",
        "arn:aws:codedeploy:*:*:deploymentconfig:CodeDeployDefault.HalfAtATime",
        "arn:aws:codedeploy:*:*:deploymentconfig:CodeDeployDefault.AllAtOnce"
      ]
    },
    {
      "Effect": "Allow",
      "Action": [
        "s3:PutObject"
      ],
      "Resource": [
        "arn:aws:s3:::oreno-application/*"
      ]
    }
  ]
}
以下を実行してポリシーを作成する。
export _AWS_PROFILE=oreno-profile
export _AWS_REGION=ap-northeast-1
export _POLICY_ARN=$(aws --profile ${_AWS_PROFILE} --region ${_AWS_REGION} \
  iam create-policy \
    --policy-name oreno-application_user_policy \
    --policy-document file://oreno-application_user_policy.json \
    --query Policy.Arn \
    --output text)
echo ${_POLICY_ARN}
- ユーザーの作成とポリシーのアタッチ
#
# ユーザーの作成
#
aws --profile ${_AWS_PROFILE} --region ${_AWS_REGION} \
  iam create-user \
    --user-name oreno-application

#
# 作成したユーザーにポリシーをアタッチ
#
aws --profile ${_AWS_PROFILE} --region ${_AWS_REGION} \
  iam attach-user-policy \
    --user-name oreno-application \
    --policy-arn ${_POLICY_ARN}
- アクセスキーとシークレットアクセスキーを作成
aws --profile ${_AWS_PROFILE} --region ${_AWS_REGION} \
  iam create-access-key \
    --user-name oreno-application
以下のように出力されるので AccessKeyId と SecretAccessKey を控えておく。
{
    "AccessKey": {
        "UserName": "oreno-application",
        "Status": "Active",
        "CreateDate": "2017-06-24T02:34:21.549Z",
        "SecretAccessKey": "xxxxxxxxxxxxxxxxxxxxxxxxxxxxxxxxxxxx",
        "AccessKeyId": "AKXXXXXXXXXXXXXXXXXX"
    }
}
デプロイ用 S3 バケット作成
- S3 バケットを作成する
aws --profile ${_AWS_PROFILE} --region ${_AWS_REGION} \
  s3 mb s3://oreno-application
- 作成したバケットを確認する
aws --profile ${_AWS_PROFILE} --region ${_AWS_REGION} \
  s3 ls | grep 'oreno-application'
以下のように出力されることを確認する。
2017-06-24 11:37:37 oreno-application
CodeDeploy 設定
- パラメータと設置値
| パラメータ | 値 | 備考 |
|---|---|---|
| Service Role Name | oreno-application-role | 変数: _SERVICE_ROLE_NAME |
| Service Role Policy Name | oreno-application-role-policy | 変数: _SERVICE_ROLE_POLICY_NAME |
| Application Name | oreno-application | 変数: _APPLICATION_NAME |
| Deployment Group Name | oreno-application-group | 変数: _DEPLOYMENT_GROUP_NAME |
| Deployment Config Name | CodeDeployDefault.OneAtATime | 変数: _DEPLOYMENT_CONIG_NAME |
| EC2 tag Key | deploy | EC2 タグに指定しておく |
| EC2 tag Value | true | EC2 タグに指定しておく |
ちなみに、Deployment Config には以下のような種類がある。
| パラメータ | ざっくり説明 |
|---|---|
| CodeDeployDefault.OneAtATime | Deploy 対象 1 台ずつに対して Deploy を行う |
| CodeDeployDefault.AllAtOnce | 全ての Deploy 対象に対して一度に Deploy を行う |
| CodeDeployDefault.HalfAtATime | Deploy 対象の半分にまず Deploy を行う |
- CodeDeploy に付与する Service Role を作成する
$ cat oreno-application-role.json
{
  "Version": "2012-10-17",
  "Statement": [
    {
      "Sid": "",
      "Effect": "Allow",
      "Principal": {
        "Service": [
          "codedeploy.amazonaws.com"
        ]
      },
      "Action": "sts:AssumeRole"
    }
  ]
}
以下を実行して Service Role を作成する。
export _SERVICE_ROLE_NAME=oreno-application-role
export _SERVICE_ROLE_ARN=$(aws --profile ${_AWS_PROFILE} --region ${_AWS_REGION} \
  iam \
    create-role \
      --role-name ${_SERVICE_ROLE_NAME} \
      --assume-role-policy-document file://oreno-application-role.json \
      --query Role.Arn \
      --output text)
echo ${_SERVICE_ROLE_ARN}
- Service Role にポリシーを付与する
$ cat oreno-application-role-policy.json
{
    "Version": "2008-10-17",
    "Statement": [
        {
            "Effect": "Allow",
            "Resource": "*",
            "Action": [
                "ec2:Describe*"
            ]
        }
    ]
}
以下を実行して Service Role に Policy を追加する。
export _SERVICE_ROLE_POLICY_NAME=oreno-application-role-policy
aws iam put-role-policy \
  --role-name ${_SERVICE_ROLE_NAME} \
  --policy-name ${_SERVICE_ROLE_POLICY_NAME} \
  --policy-document file://oreno-application-role-policy.json
- アプリケーションの作成
export _APPLICATION_NAME=oreno-application
aws --profile ${_AWS_PROFILE} --region ${_AWS_REGION} \
  deploy create-application \
    --application-name ${_APPLICATION_NAME}
以下のように出力される。
{
    "applicationId": "12345678-1234-5678-9012-1abcde01a123"
}
- Deployment Group の作成
export _DEPLOYMENT_GROUP_NAME=oreno-application-group
export _DEPLOYMENT_CONIG_NAME=CodeDeployDefault.OneAtATime
aws --profile ${_AWS_PROFILE} --region ${_AWS_REGION} \
  deploy create-deployment-group \
    --application-name ${_APPLICATION_NAME} \
    --deployment-group-name ${_DEPLOYMENT_GROUP_NAME} \
    --deployment-config-name ${_DEPLOYMENT_CONIG_NAME} \
    --ec2-tag-filters Key=deploy,Value=true,Type=KEY_AND_VALUE \
    --service-role-arn ${_SERVICE_ROLE_ARN}
ここまでで CodeDeploy を利用する準備が出来たはず。
CodeDeploy Agent の導入
- CentOS 7 に導入する
今回は CentOS 7 に導入する。
$ cat /etc/system-release
CentOS Linux release 7.3.1611 (Core)
- 導入
sudo yum -y update
sudo yum -y install ruby wget
wget https://aws-codedeploy-ap-northeast-1.s3.amazonaws.com/latest/install
chmod +x ./install
sudo ./install auto
- 確認
$ sudo service codedeploy-agent status
The AWS CodeDeploy agent is running as PID 2223

$ systemctl list-unit-files | grep codedeploy
codedeploy-agent.service                      enabled
よし。
サンプルアプリケーションの用意
こちらのサンプルアプリケーションを利用する。
mkdir circleci-tutorial
cd circleci-tutorial
aws s3 cp s3://aws-codedeploy-ap-northeast-1/samples/latest/SampleApp_Linux.zip . --region ap-northeast-1
unzip SampleApp_Linux.zip
rm SampleApp_Linux.zip
事前に GitHub に追加していた circleci-tutorial というリポジトリにサンプルアプリケーションを追加する。
$ tree .
.
├── LICENSE.txt
├── README.md
├── appspec.yml
├── index.html
└── scripts
    ├── install_dependencies
    ├── start_server
    └── stop_server

1 directory, 8 files
appspec.yml は以下の通り。
$ cat appspec.yml
version: 0.0
os: linux
files:
  - source: /index.html
    destination: /var/www/html/
hooks:
  BeforeInstall:
    - location: scripts/install_dependencies
      timeout: 300
      runas: root
    - location: scripts/start_server
      timeout: 300
      runas: root
  ApplicationStop:
    - location: scripts/stop_server
      timeout: 300
      runas: root
CircleCI の設定
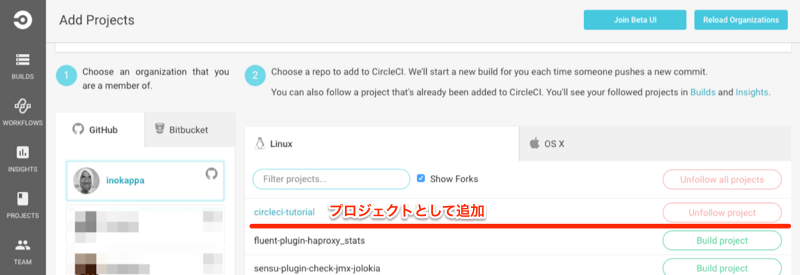
- プロジェクトの追加

サンプルアプリケーションを追加していた circleci-tutorial をプロジェクトとして追加する。
- AWS アクセスキーとシークレットアクセスキーを追加


控えておいたアクセスキーとシークレットアクセスキーを追加する。
- circle.yml を作成
cd circleci-tutorial
cat << EOT >> circle.yml
test:
  override:
    - echo 'test ok.'
deployment:
  staging:
    branch: master
    codedeploy:
      ${_APPLICATION_NAME}:
        application_root: /
        region: ap-northeast-1
        revision_location:
          revision_type: S3
          s3_location:
            bucket: ${_APPLICATION_NAME}
            key_pattern: ${_APPLICATION_NAME}-{BRANCH}-{SHORT_COMMIT}
        deployment_group: ${_DEPLOYMENT_GROUP_NAME}
        deployment_config: ${_DEPLOYMENT_CONIG_NAME}
EOT
circle.yml は以下のようになる。
$ cat circle.yml
test:
  override:
    - echo 'test ok.'
deployment:
  staging:
    branch: master
    codedeploy:
      oreno-application:
        application_root: /
        region: ap-northeast-1
        revision_location:
          revision_type: S3
          s3_location:
            bucket: oreno-application
            key_pattern: oreno-application-{BRANCH}-{SHORT_COMMIT}
        deployment_group: oreno-application-group
        deployment_config: CodeDeployDefault.OneAtATime
サンプルアプリケーションをデプロイ
サンプルアプリケーションの index.html を以下のように修正する。
$ git diff index.html
diff --git a/index.html b/index.html
index 4feaaa6..ba32312 100644
--- a/index.html
+++ b/index.html
@@ -26,8 +26,7 @@
 </head>
 <body>
   <div align="center">
-    <h1>Congratulations</h1>
+    <h1>俺のアプリケーション</h1>
     <h2>This application was deployed using AWS CodeDeploy.</h2>
     <p>For next steps, read the <a href="http://aws.amazon.com/documentation/codedeploy">AWS CodeDeploy Documentation</a>.</p>
   </div>
git push をする。
$ git add index.html
$ git commit -m "update"
[master 88c6bea] update
 1 file changed, 1 insertion(+), 2 deletions(-)
$ git push
Counting objects: 3, done.
Delta compression using up to 4 threads.
Compressing objects: 100% (3/3), done.
Writing objects: 100% (3/3), 320 bytes | 0 bytes/s, done.
Total 3 (delta 2), reused 0 (delta 0)
remote: Resolving deltas: 100% (2/2), completed with 2 local objects.
To git@github.com:inokappa/circleci-tutorial.git
   29cd755..88c6bea  master -> master
CircleCI でデプロイ済み。

以下の通り、俺のアプリケーションがデプロイされた。

ということで
CircleCI 用の IAM ユーザーに付与するポリシーで少しハマったけど、思ったよりも簡単に CircleCI と CodeDeploy を組み合わせることが出来た..気がする。